Books For a Snowy Day

Tags

, , , , , , , , ,

Snow
Snow!  This week has brought the first real taste of winter to Brooklyn.  All of a sudden it really feels like the holiday season and the kids are excited about decorations and treats to come.  We are decorating the tree, making the gingerbread house and taking the two big girls to The Nutcracker this weekend.  I dug out the winter books and we snuggled in to watch the snow fall this morning.  These are three of our favorite snow stories, which also make perfect holiday gifts for kids:

*Snow by Roy McKie (This book’s bright illustrations and happy story make it as fun to read today as when I was a kid).

*The Mitten by Jan Brett (The beautifully detailed drawings bring a Ukrainian folk tale to life).

*The Hat by Jan Brett (Inspired by a true story of a hedgehog.  Both The Hat and The Mitten feature vignettes on each page which hint at events to come as the story unfolds).

Let it snow, let it snow, let it snow!

Haircut

Tags

, , , , , , , , ,

Hair
Hair2
Ada would not let it go.  She begged daily for a haircut until we finally reluctantly gave in last week.  Her hair had been given only two small trims in her five years and now she wanted to cut it short.  I cried a bit for a couple of days, and then made an appointment.  I warned her I would be a wreck at the salon.  We realized her ponytail may be long enough to send to Wigs For Kids and she liked the idea of donating her hair to another child.  When Ada sat in the big chair and we measured and snipped I saw her instantly grow up a little bit.  Although it was just hair and it would grow back, there was something magic in that moment.  This new short hair of hers marked one of many points where we as parents have to let go, trust that we have done our job, and then let our children be their own people.

Flea Market Finds: Bluebirds

Tags

, , , , , , , , ,

030BlueBirdsLot

Flowers1
030BlueBirdsDetail
Platters1
My Gram had collections of these happy little blue birds.  I remember them scattered on linens and dishes and tea cups.  The motif became popular in 1934 when this song was played in homes across the country.  The lyrics reminded people to look on the brighter side, stay positive and to find peace in the knowledge that happiness was on the horizon.  This must have been a welcome message for a country still struggling with the remnants of the Great Depression.  The little birds make me smile.  I recently found the lot of bluebird linens and they are for sale in our Etsy shop.  Our own collection of bluebirds reminds me of my great-grandmother and how life must have been for her when she was my age.  Some days we all need a reminder of how lucky we are.

Basics

Tags

, , , , , , , , ,

Tights2 Ada started a school with uniforms this year. I have gotten used to it now, but the first week I cried while I hung up her colorful summer clothes on the line.  Luckily, Wovenplay makes sweet screen-printed, (more or less) uniform-compliant socks and tights.  And luckily, they are cute enough to make a child smile instead of groan when she opens socks on Christmas morning.

Flea Market Finds: Vintage Toleware Flowers on Etsy

Tags

, , , , , , , , ,

034FlowerCandleTop 036FlowerHookFront 037RoseHookDetail
We have been busy listing some new floral finds on our Etsy shop.  I love these metal Toleware flowers!  They were made in the 1940s and 1950s, often in Italy.  They were inexpensive at the time, and the colors are still vibrant today.  The hooks would be adorable in a child’s room.

Crowns

Tags

, , , , , , , , ,

Crowns
Crown Collection, Ada’s Mantel:

1. Headband Feather Crown, here

2. Crepe Paper Flower Crowns, DIY here

3. Vintage Glitter Party Crown, similar here

4. White Metal Crown from Aunt Sandy, similar here

What would I have done with boys?

Learning to Read

Tags

, , , , , , , , ,

Books
Ada has been sounding out words and making up stories to go along with her books for a while now.  Her teachers suggested we have her point to some words as we read to her.  I pulled out our copy of Go, Dog. Go! and she surprised me by reading/guessing a lot of the pages.  After secretly shedding a few tears I dug out our pile of I Can Read it All By Myself Books.  These are still some of the best books we own.  Go, Dog. Go!, Snow, Hop on Pop…So many good ones!  I love that she is reading the same words Chris and I first deciphered when we were just beginning.  We are so excited for her to join the world of reading!    

DIY Lampshade Refresh

Tags

, , , , , , , , ,

Lamp1Lamp2
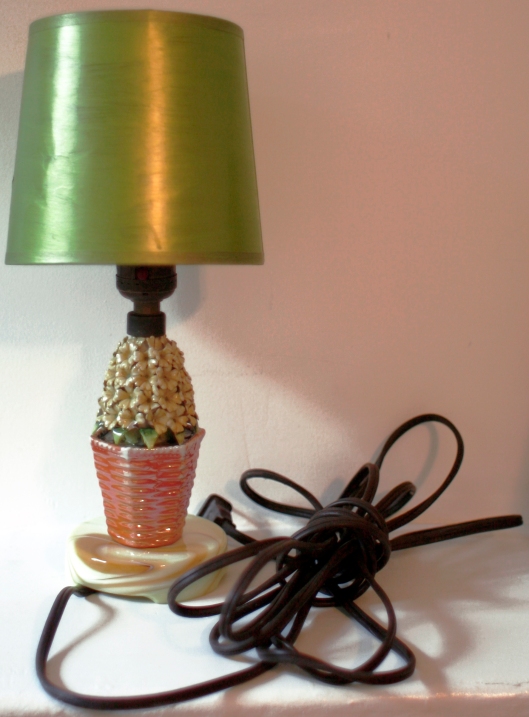
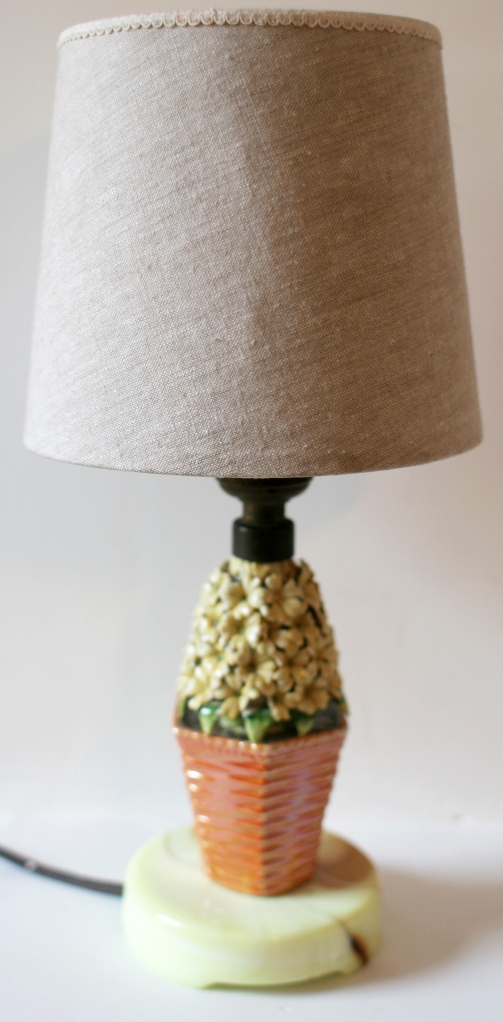
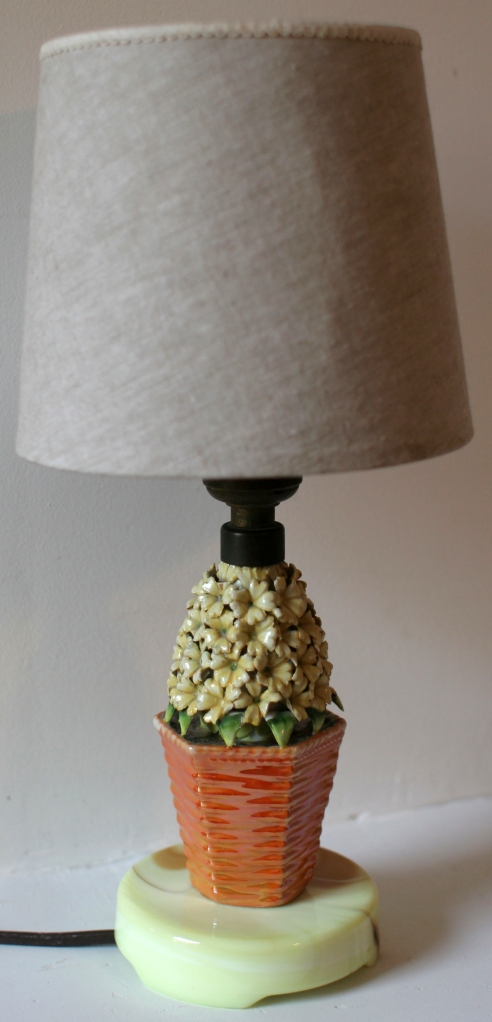
We have started a list of house projects for the upcoming indoor season.  Chris and I have a habit of getting overwhelmed by the number of things that need to be home-improved around here, and it prevents us from making progress on any of them.  We have decided to break down smaller projects and finish one per month while we save and plan for a huge house renovation.  One of the things on my list was to fix this little lamp’s shade.  We have had the lamp next to the bed for a long time, but the shade was always a little strange.  I got really sick of it when I was pregnant, borrowed some of Ada’s acrylic paints and covered it with what turned out to be an even stranger pearly metallic green.  We then bought and then returned two replacement shades, neither of which looked quite right above the little basket.  Finally I decide to try covering the existing shade with linen.  It was such a simple project and took less than an hour.  Such an improvement!  Why hadn’t I thought of that years ago?  To refresh your own lamp shade you will need:

* Linen Fabric (Be sure the fabric color and weave is heavy enough to cover existing shade color)

*Paper for Pattern

*Ruler

*Pencil

*Scissors

*Craft Glue

*Large Paintbrush

*Ribbon (To cover top edge)

Lamp4
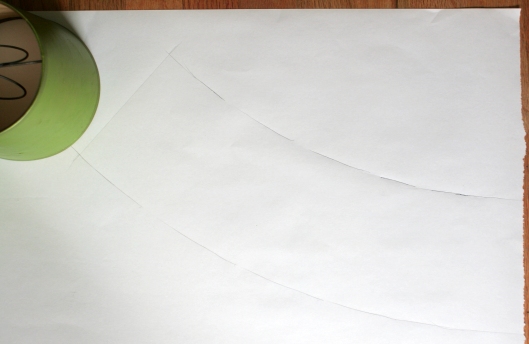
1. Using your ruler, draw a straight line down from top to bottom of the lamp shade.  (Or use the existing seam if your shade has one).  Position the shade’s pencil line along the edge of paper.

2.  Roll shade and trace outline, stopping when you return to the line on shade.  The shade will create a curved shape as it rolls. Using the ruler, draw a straight line 1/4″ past the point where the shade stopped rolling.  This will allow for overlap of the fabric and create a neat seam on the lampshade.

3. Add 1/4″ each on top and bottom of curve.  This will fold over top and bottom of shade.
Lamp5
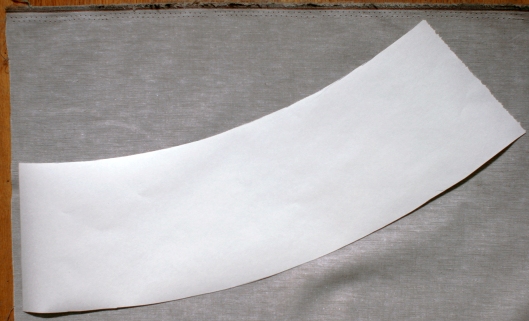
4. Cut out paper pattern, place on linen and cut out.
Lamp6
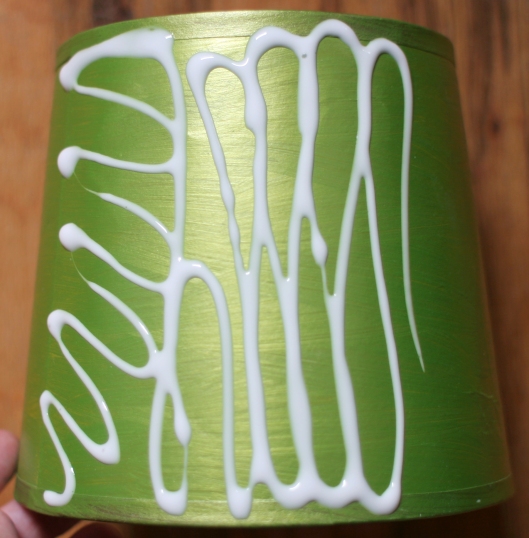
5. Squirt glue onto one side of the shade, as show.  (Don’t cover the whole shade at once or it will be messy).
Lamp7
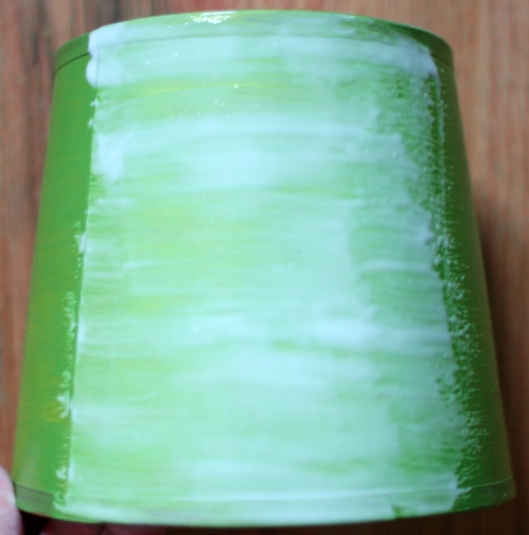
6. Use your brush to evenly smooth out glue.Lamp8
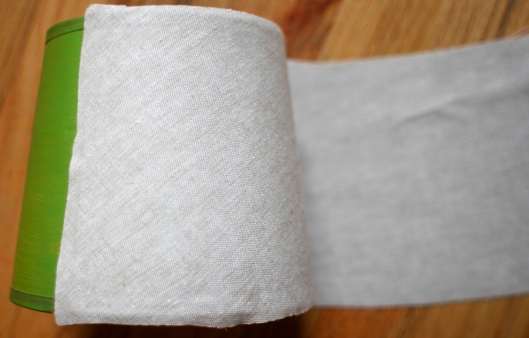
7. Slowly roll shade onto linen, keeping it the 1/4″ on top and bottom.
Lamp9
8. Add more glue, brush and roll until shade is covered.  Slightly overlap the ends of the linen, glue and press down neatly.

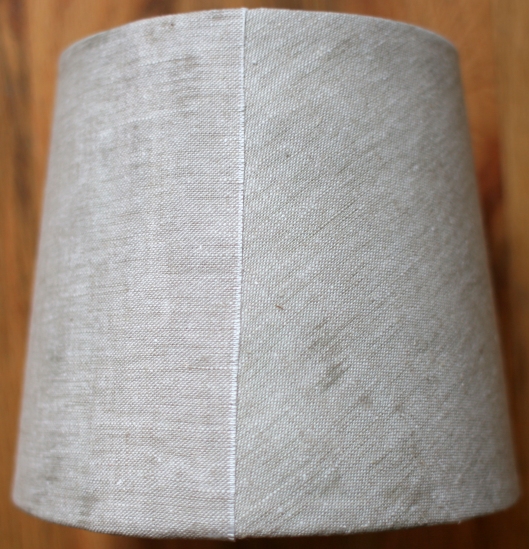
9. Brush a little glue along the inside top of shade and fold linen over.  Gently press and smooth with your fingers as you go to work out any bumps in the linen.

10. Repeat for bottom of shade as shown.
11. Brush on glue and smooth ribbon on to top of shade.  You can add a bottom ribbon as well.

12. Allow glue to dry and try on your new shade!
Lamp1
Lamp3

Flea Market Finds: For Sale!

Tags

, , , , , , , , ,

005PropPlaneTop
011NicholsClose
007ShashesPair
028IronstoneSide003MirrorClear
Anyone who knows me knows that I cannot walk by a stoop sale or drive by a flea market without stopping to take a look.  Well, we here at Domestic Space are excited to announce the addition of vintage treasures to our Etsy shop!  We will be updating our shop with fresh finds as they come in, and I will post alerts so our readers can be the first to know.  Let us do dusty digging and so you don’t have to.  We hope you will enjoy shopping our new curated collection of flea market finds as much as we enjoy finding them!

DIY Ribbon Wand

Tags

, , , , , , , , ,

Wand2 Wand1 Wand3
Ada had a half day of school last week and it rained, so we needed a project to keep the girls busy in the house.  We came up with these ribbon wands.  Josie loves the wands at her dance class and we had the supplies at home already.  The girls picked out their ribbon colors, I attached them to the dowels and Ada tuned her radio to a classical station for a ballerina dance party.   To make your ribbon wand you will need:

*Dowel (we cut ours in half)

*Lightweight Ribbons or Seam Binding

*Craft Glue

*Needle and Thread

*Scissors or Pinking Shears

1. Cut ribbons to desired length.

2. Line up ribbon ends in a stack.

3. Put a bit of glue at the end of the dowel and wrap ribbons around the dowel as shown.

4. Put a bit more glue at the end of the ribbon wrap and stitch into place.

5. If ribbons unravel at the ends, use pinking shears and seal ends with a bit of glue.

6. Allow glue to dry and start dancing.

Wand3