• Our Etsy Store
  • Vintage
  • Projects
  • Organizing
  • Likes
  • About
  • jeannerondeau.com

Domesticspace

~ Inside. kids, art, home, vintage.

Domesticspace

Category Archives: Projects

DIY Beaded Necklace Kit Gift

15 Wednesday May 2013

Posted by jeannerondeau in Projects

≈ 1 Comment

Tags

diy beaded necklace kit, DIY necklace, diy party favor, gifts for kids, inexpensive party favor, kid party, leather cord, party favor bags, pony beads, surprise ball

Beads1 Beads3 Beads4

My kids love stringing beads and making necklaces.  These pony beads are large enough for little fingers to grasp, and are a good exercise for fine motor skill development.  I originally put sets of beads and leather cord inside our Easter surprise balls this year.  The leather cord can be knotted on one end when stringing and then simply tied when necklace is complete.  We decided to make this set as a gift for a friend.  These kits would also make great party favors.  To make your own Beaded Necklace Gift Kit you will need:

*Variety of Pony Beads, Sequins and Other Beads with Large Openings

*Leather Cord to Fit Bead Openings

*Small Clear Plastic Envelopes

*Wooden Box

1. Open large packages of beads, place a few into plastic envelopes and seal.  We organizing our beads by color and shape.

2. Measure and cut lengths of leather cord and wind into circle.  Be sure cord is long enough to fit over child’s head when the ends are tied.  (Or you could also make bracelets).  Put into envelope and seal.

3. Place plastic envelopes into wooden box.

4. Wrap up the Necklace Kit or place into party favor bags.

5. Have fun beading!

Share this:

  • Click to share on Pinterest (Opens in new window) Pinterest
  • Click to share on Facebook (Opens in new window) Facebook
  • Click to share on LinkedIn (Opens in new window) LinkedIn
  • Click to share on Tumblr (Opens in new window) Tumblr
  • Click to share on X (Opens in new window) X
Like Loading...

The DIY (In Under Two Hours) Skirt

14 Tuesday May 2013

Posted by jeannerondeau in Projects

≈ 1 Comment

Tags

Brooklyn General, diy clothes for kids, DIY skirt, diy summer clothes, free sewing pattern, free skirt pattern, Liberty of London skirt, life with kids, MADE skirt pattern, sewing for kids

Skirts1 Skirts2 Skirts4 Skirts3

My favorite craft fabric/yarn/craft store Brooklyn General had a huge sale a couple of weeks ago.  I went specifically for knitting needles, and of course came home with more projects than I have time to do.  The Liberty Prints fabric taunted me from the wall as I was finishing up my purchasing.  I decided to get one yard of this beauty with no idea of what it would become.  I ended up making simple skirts for the girls, and had enough to make a sundress for Josie.  (Three projects from one yard!)  I based the skirts off of this pattern for a simple skirt by MADE.  (Danamadeit.com is such an an inspiring blog full of tutorials and color!) For ours skirts we made a single layer and did a basic turned hem instead of serging.  The skirts are super easy to make and if you are a faster sewer than I, (not at all a difficult task), you could finish a skirt in an hour.  So satisfying!  The girls have been wearing the skirts for two days now and I’ve decided to make them a summer supply out of different fabrics.  Hooray for warm-weather clothes!

Share this:

  • Click to share on Pinterest (Opens in new window) Pinterest
  • Click to share on Facebook (Opens in new window) Facebook
  • Click to share on LinkedIn (Opens in new window) LinkedIn
  • Click to share on Tumblr (Opens in new window) Tumblr
  • Click to share on X (Opens in new window) X
Like Loading...

Back Yard Progress: Before and After

10 Friday May 2013

Posted by jeannerondeau in Organizing, Projects

≈ 3 Comments

Tags

back yard bees, back yard before and after, back yard for kids, back yard gardening, back yard in Bed Stuy, Brooklyn back yard, DIY back yard, home, home improvement, life with kids

BY3 BY40

We finally have a back yard!

After one year and nine months of waiting, the girls have finally been allowed to run around in the grass.  We had no idea it would be such a project to get the yard ready, but it is so nice to have a quiet, clean, safe place for them to run around.  These are the steps we went through to clean it up:

1. Chris cut down some of the brush.  There was a huge overgrown shrub in the center of the yard when we moved in, as well as the metal awning, a 300 lb stone sink covered in ugly ceramic tiles, a long cement walkway, chain link fence and rat burrows (!).  We soon discovered that the soil was full of broken glass, metal and trash from the last 100 years.  We were naive about what it would take to get rid of the rats and trash (and hadn’t noticed them when we inspected the house).  We spent many nights wondering what the heck we had gotten ourselves into.

2. Get rid of the rats.  After many calls to 311 to deal with open trash next door (I love NYC!) and many visits by the exterminator on our side, the rats vacated.  At one point Chris and I devised an insane concrete/rebar fence to barricade ourselves from the rats.  Luckily, the other methods worked first.  This felt like a HUGE relief and victory!

3. Chris builds a soil-sifter out of screens, wood and a wheelbarrow and begins to sift through the soil to remove glass and trash.  He uncovers tons of marbles, broken mantles, flagstone, rusty metal, broken and intact bottles and a tiny Frozen Charlotte doll head.

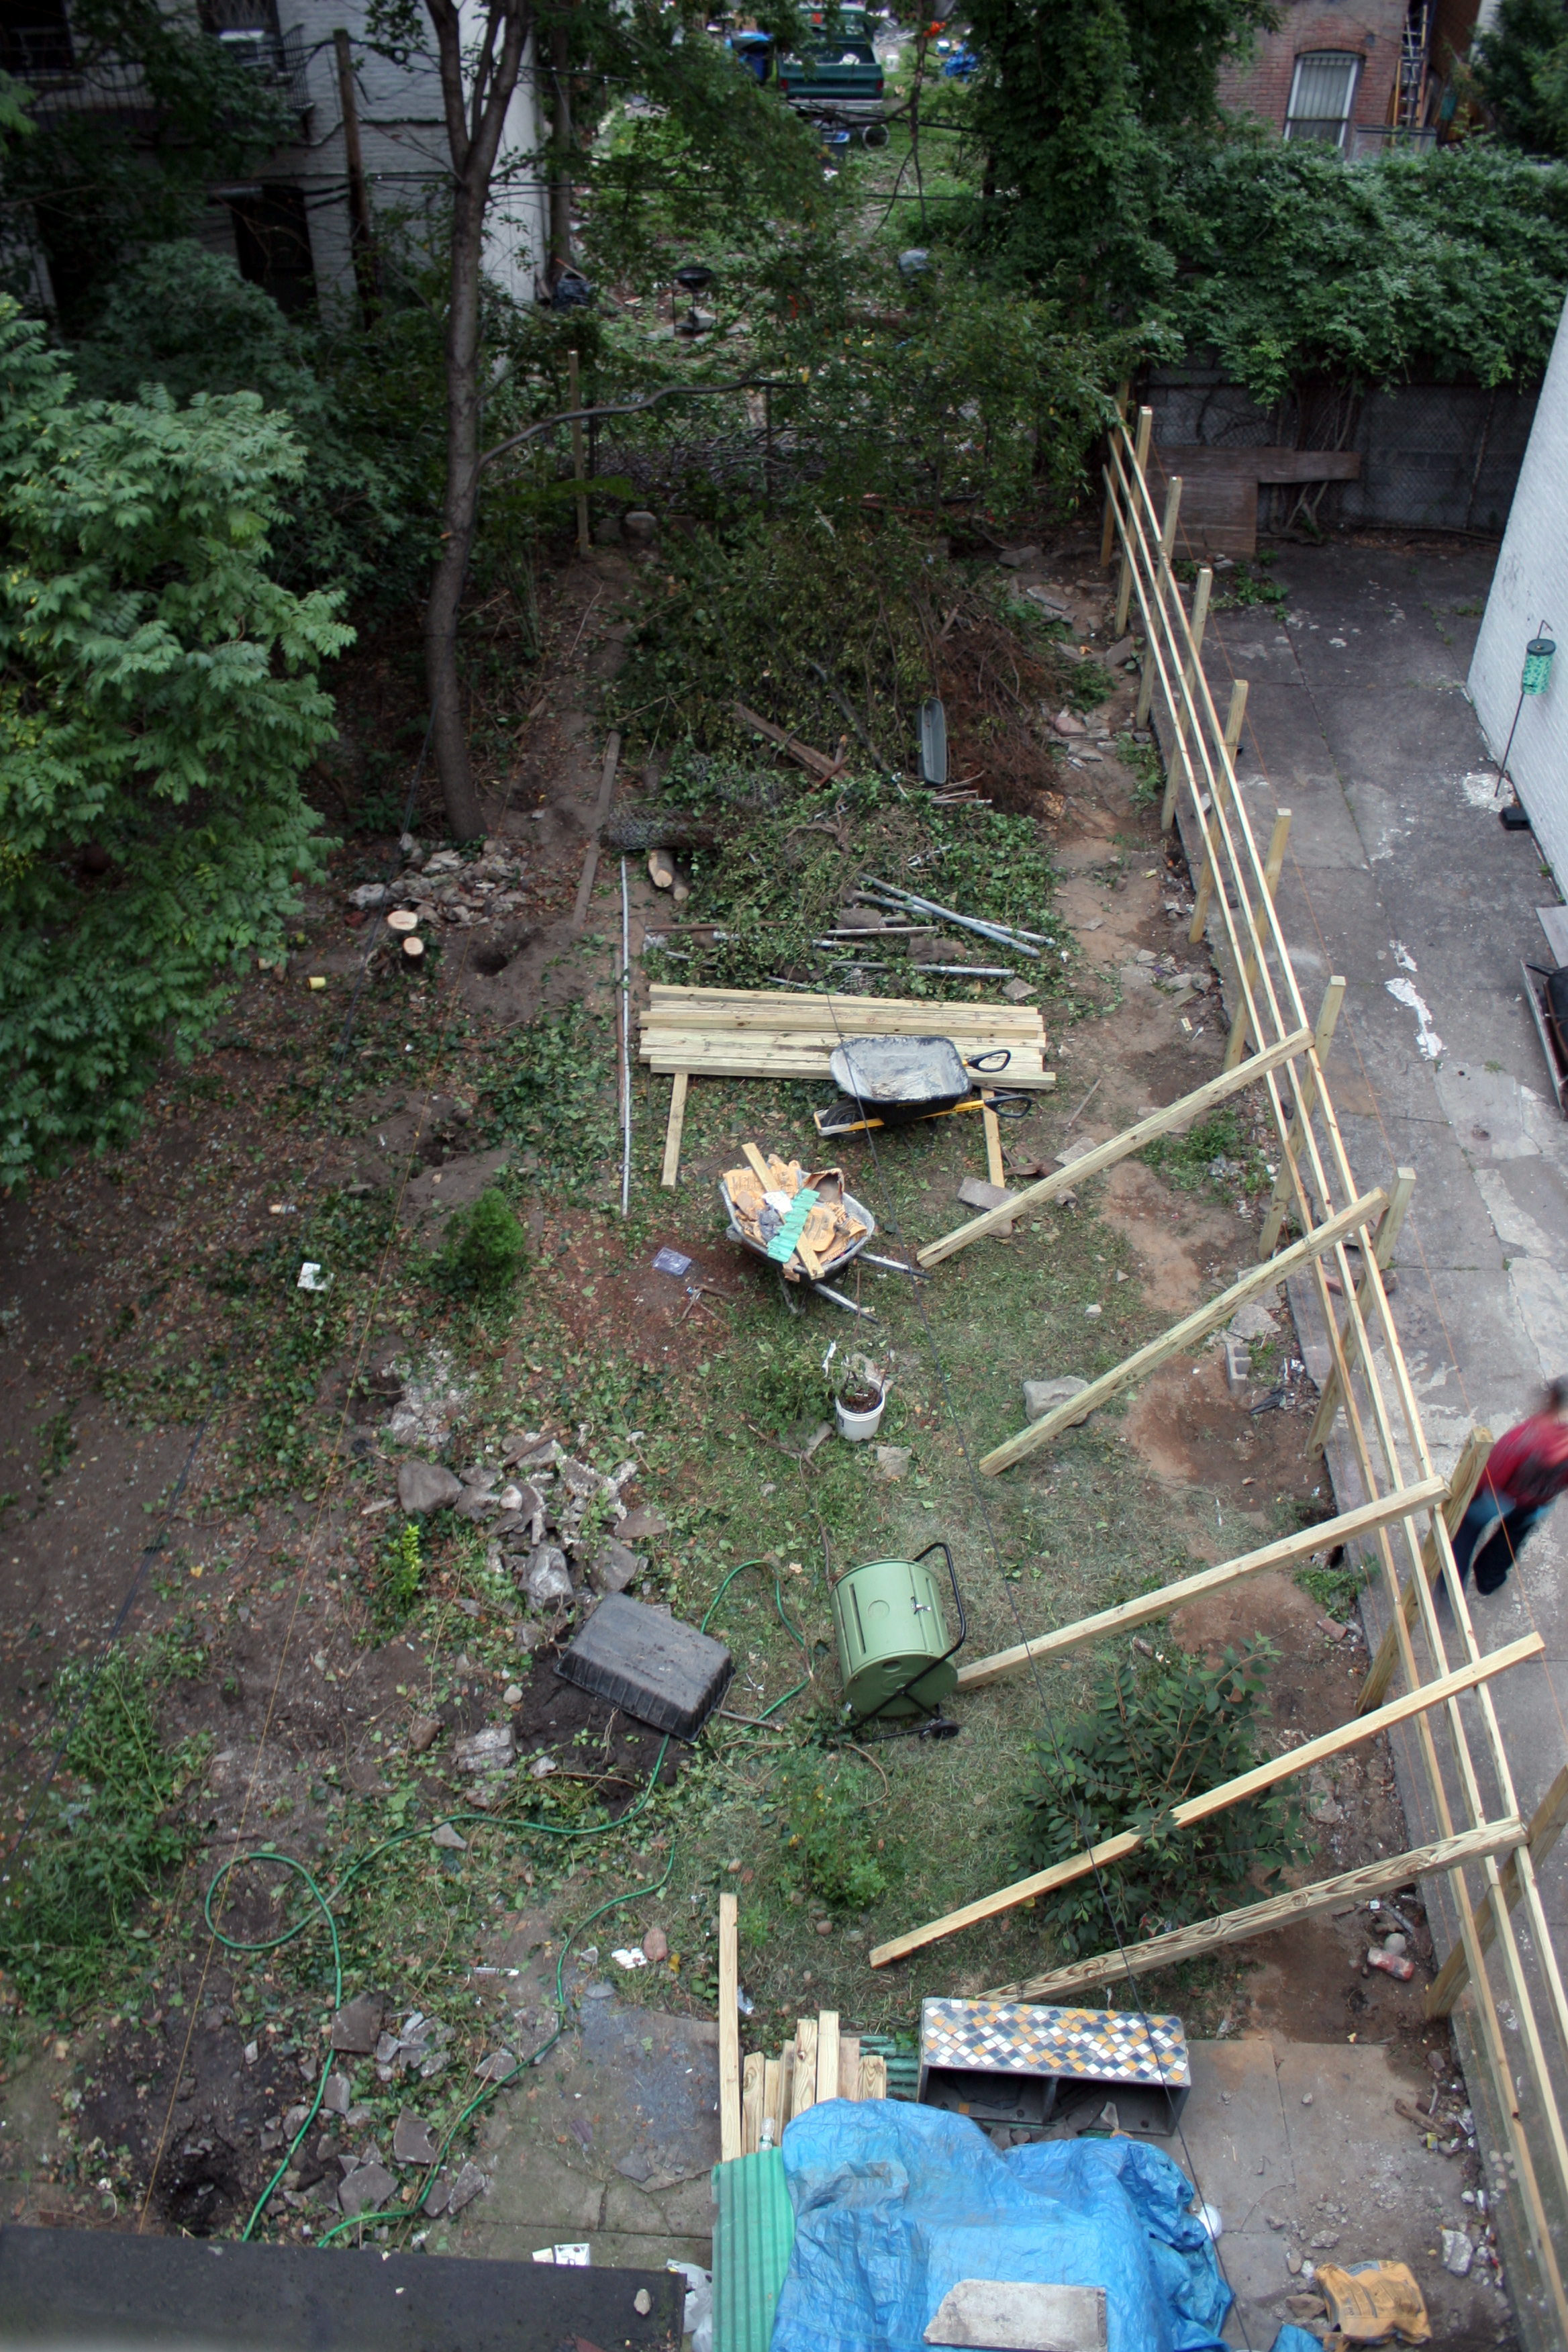
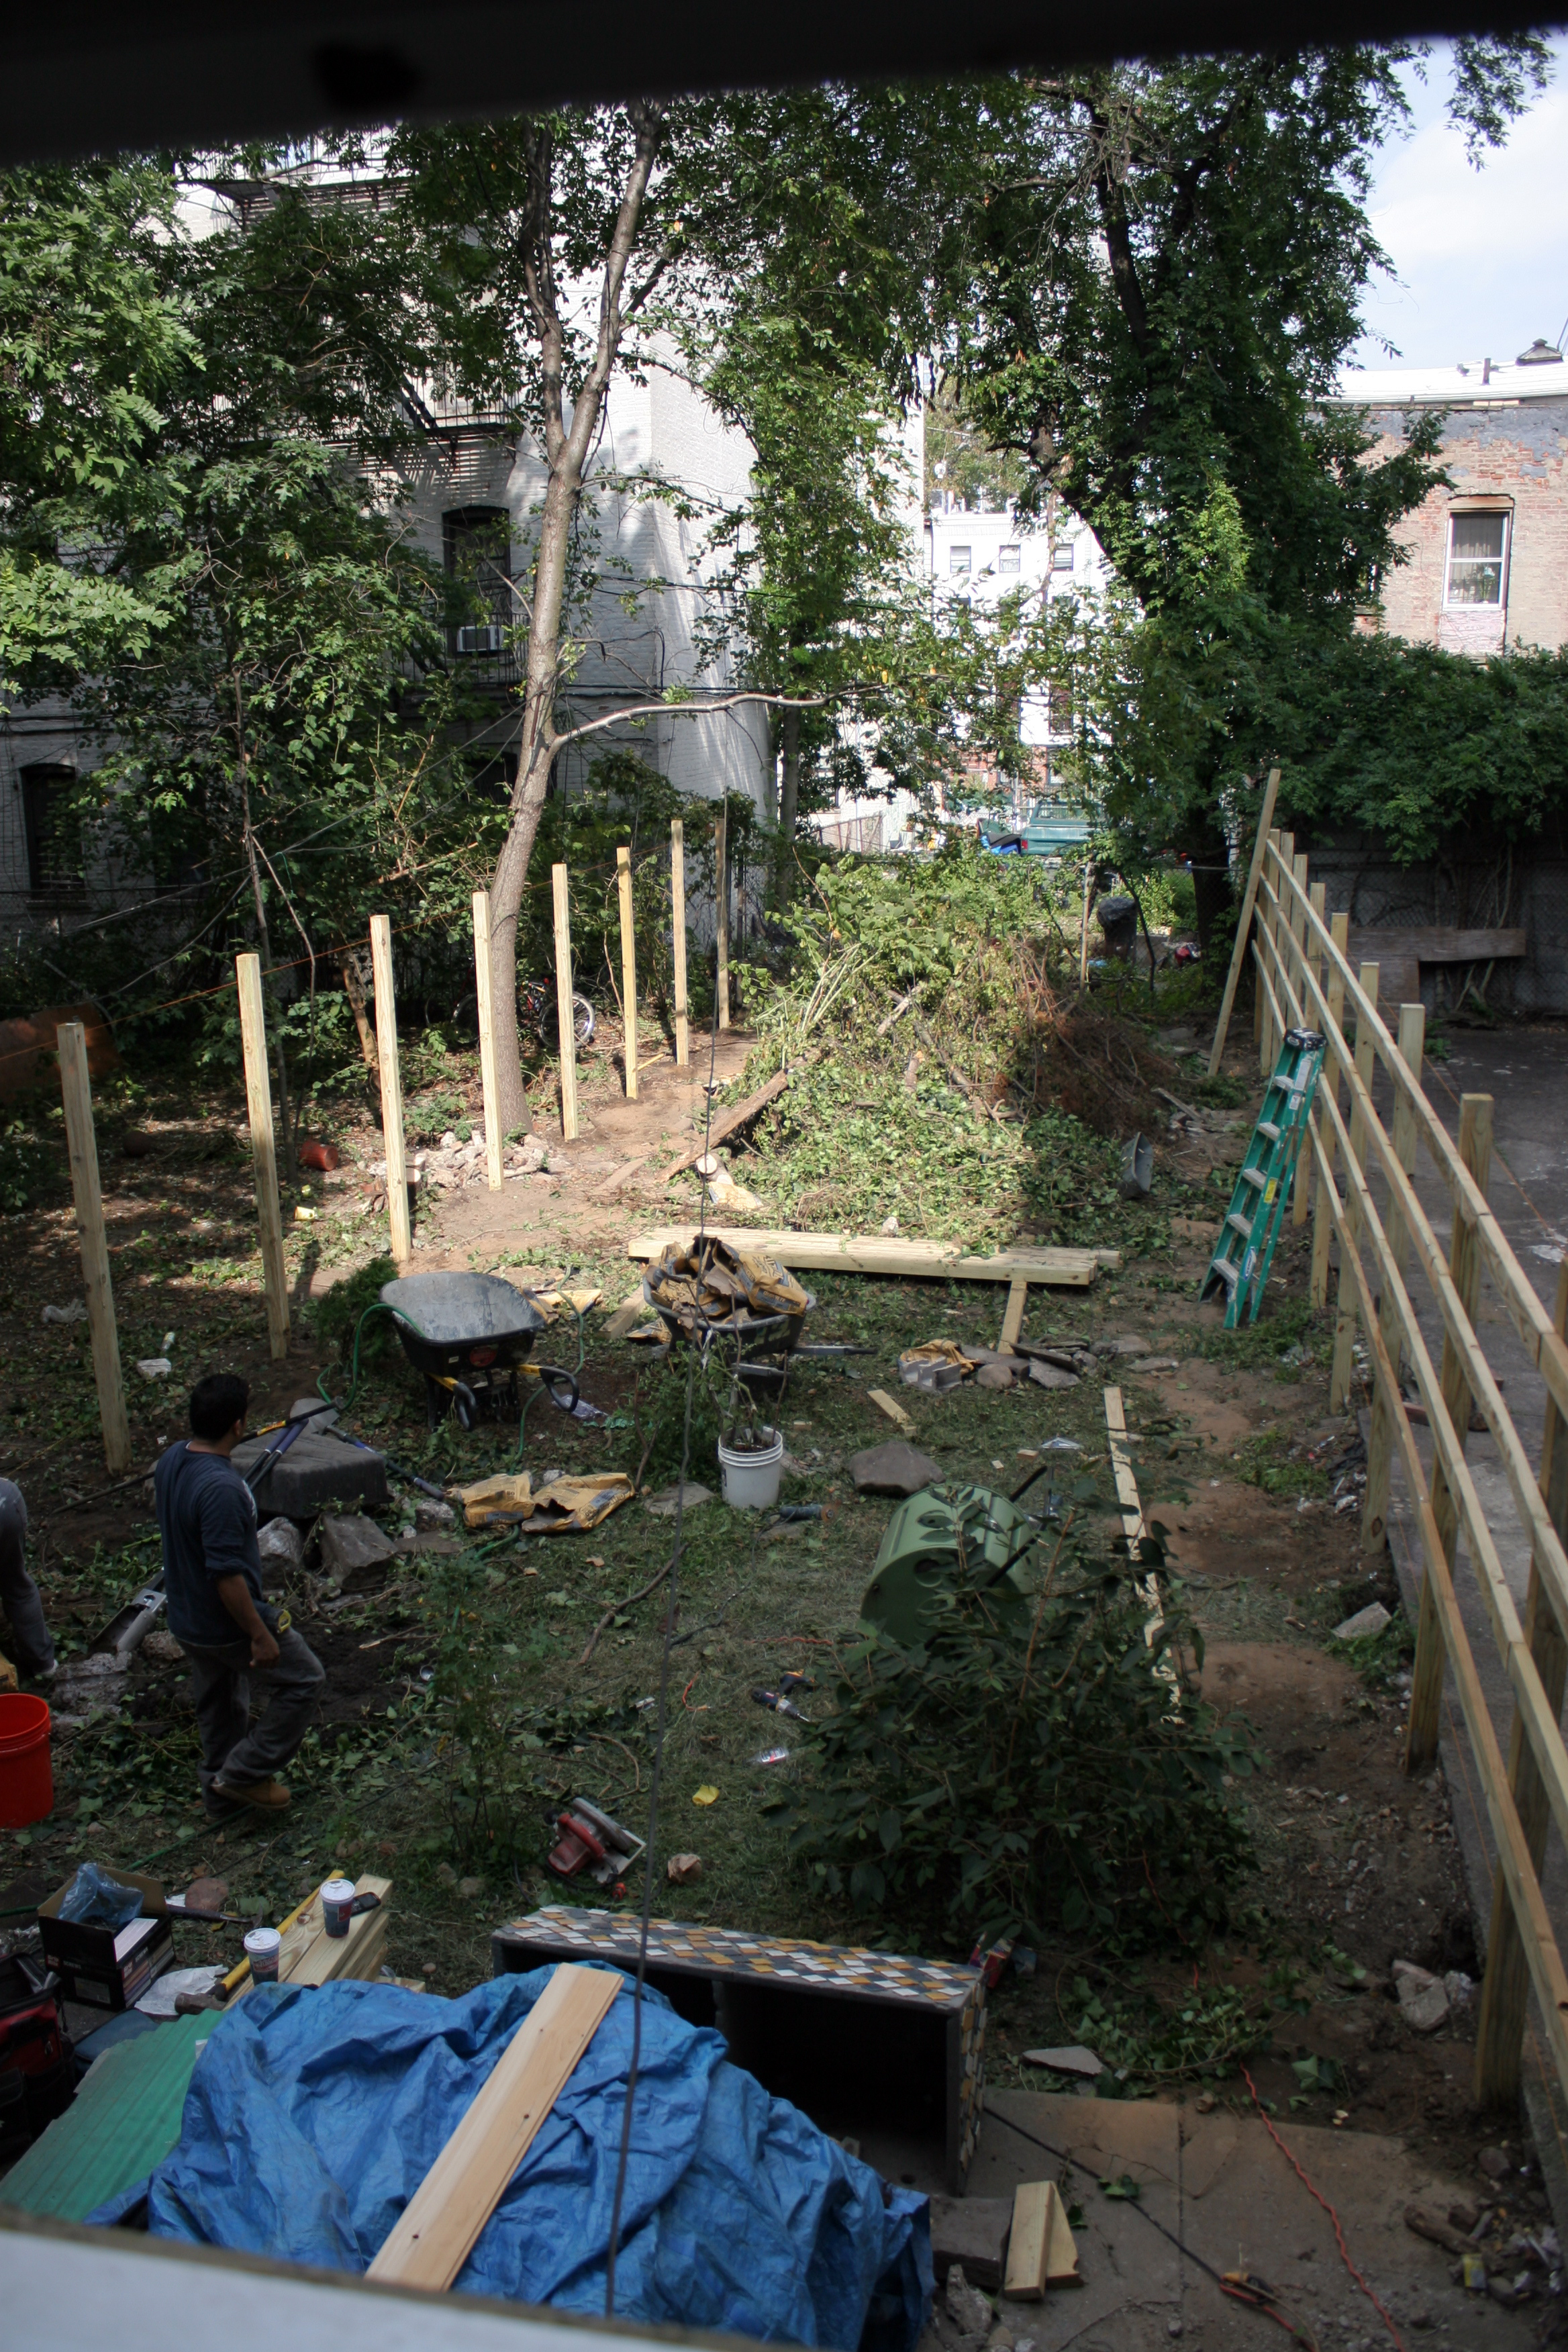
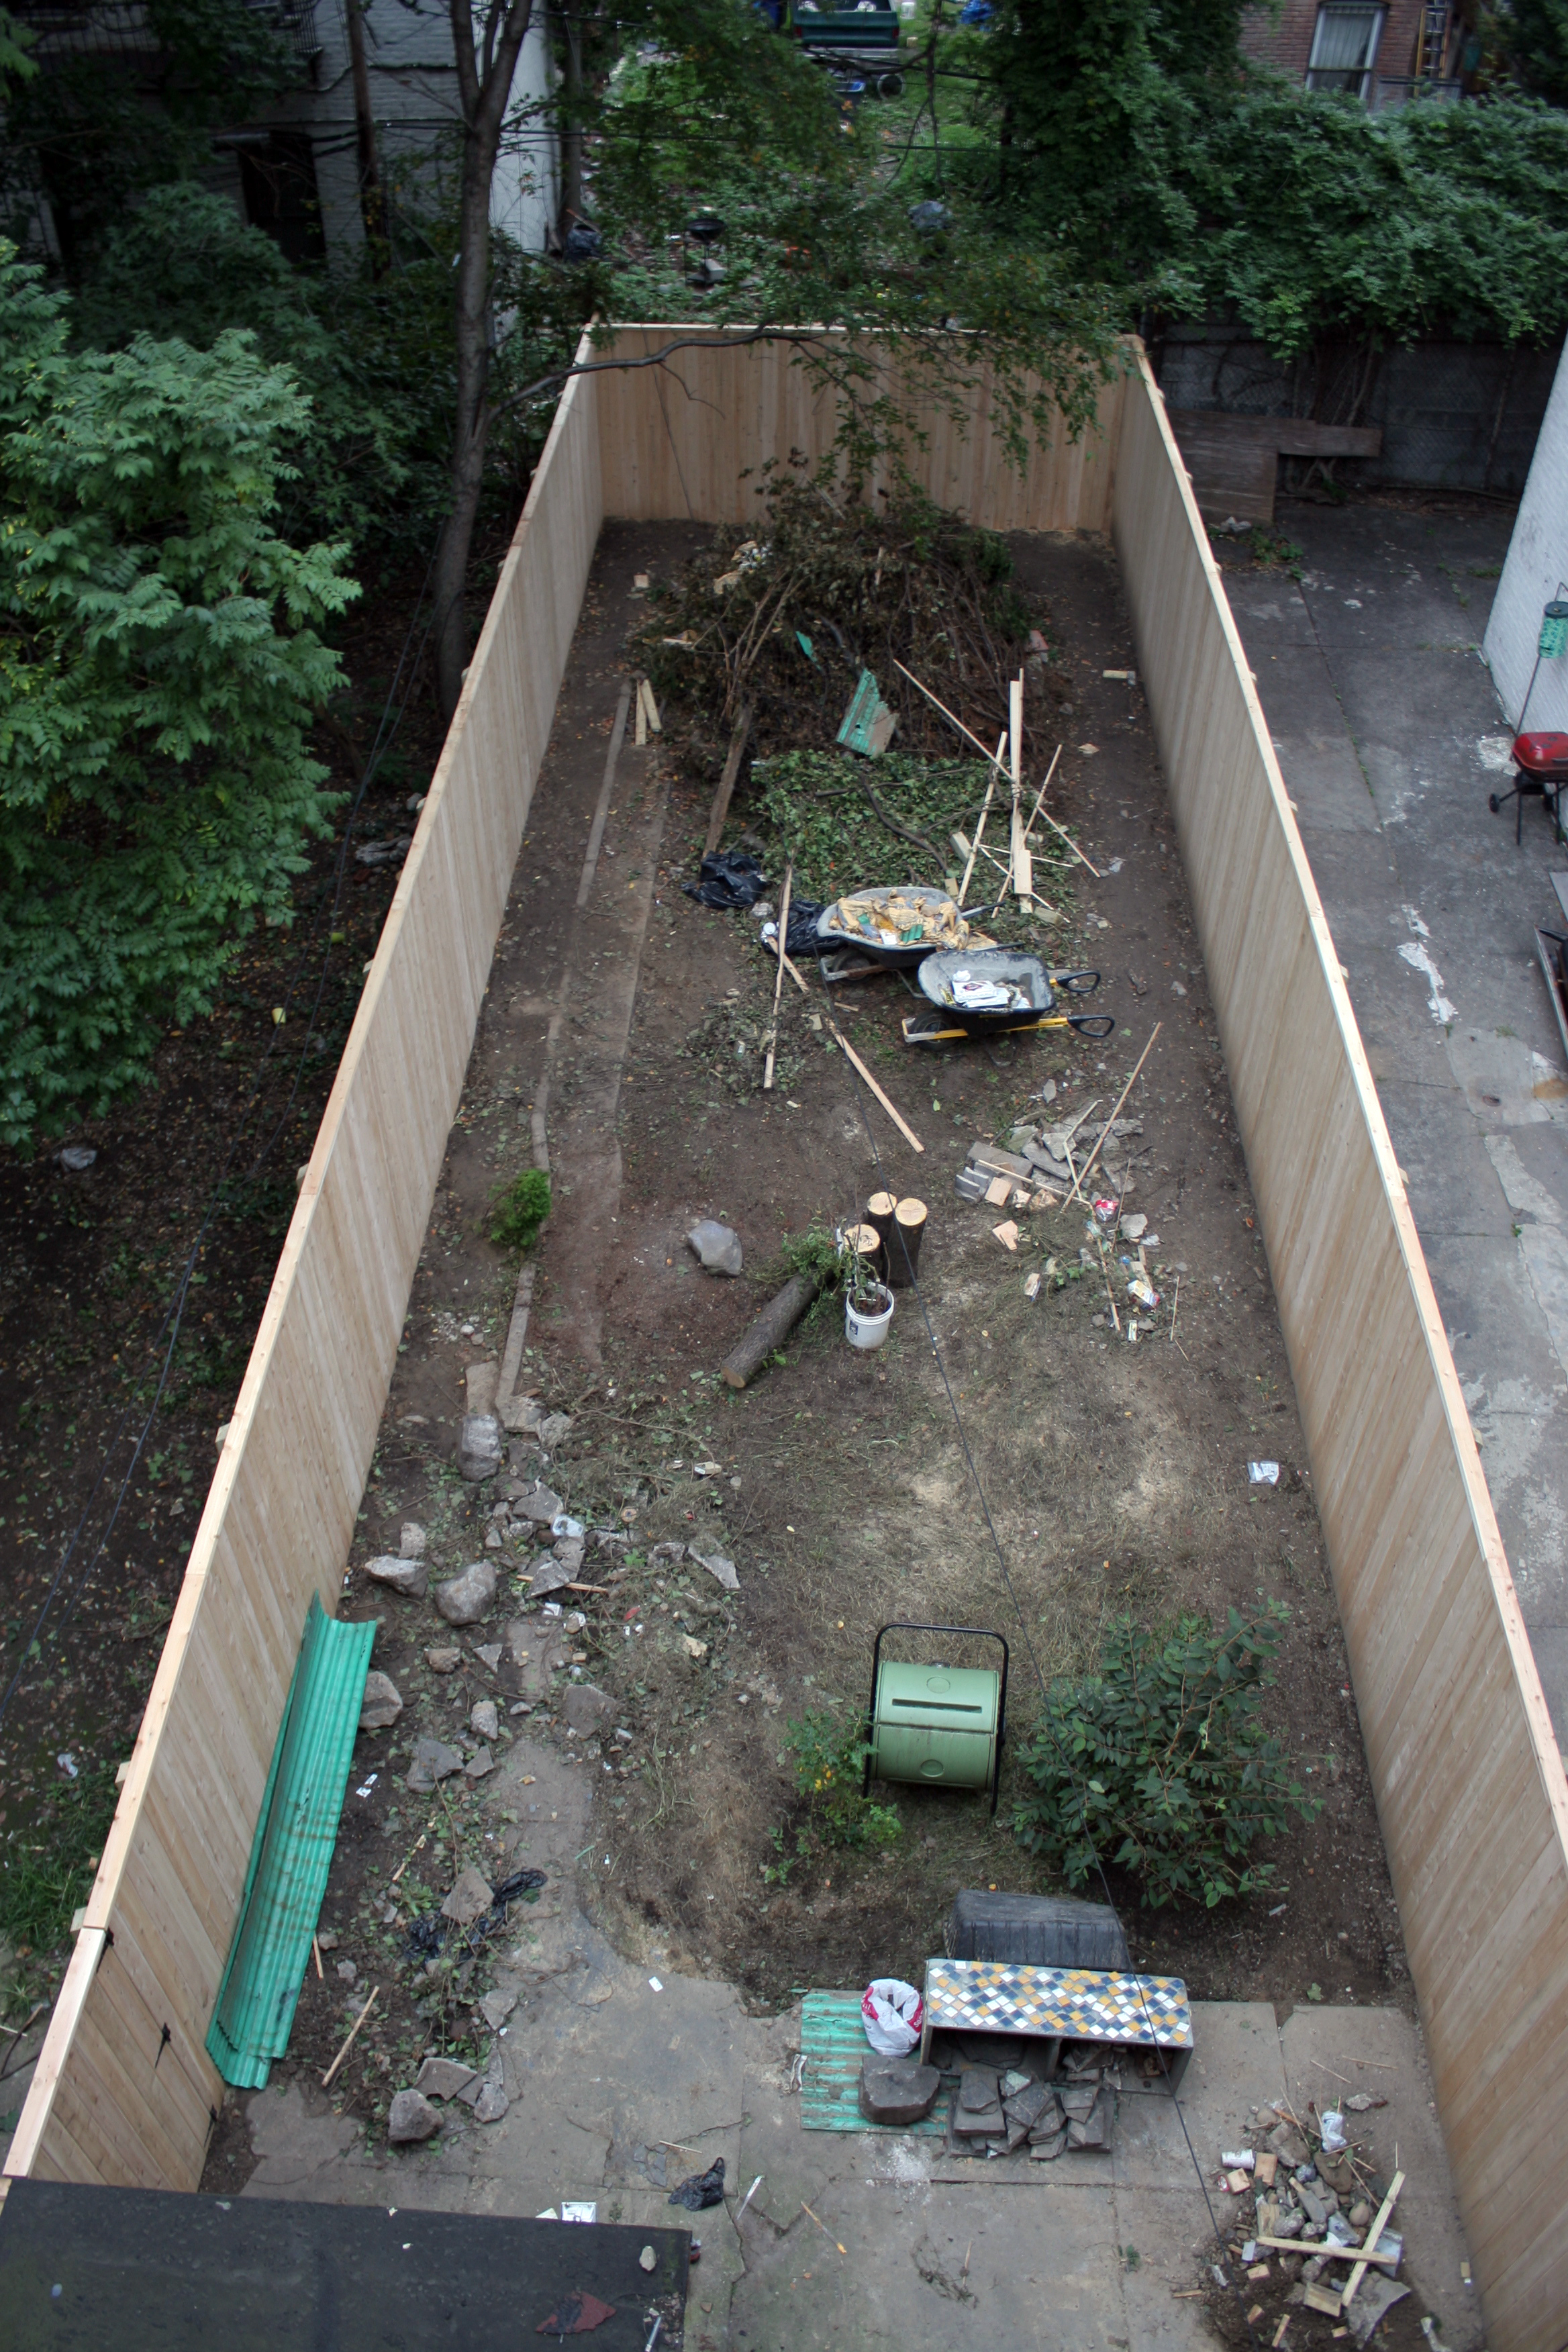
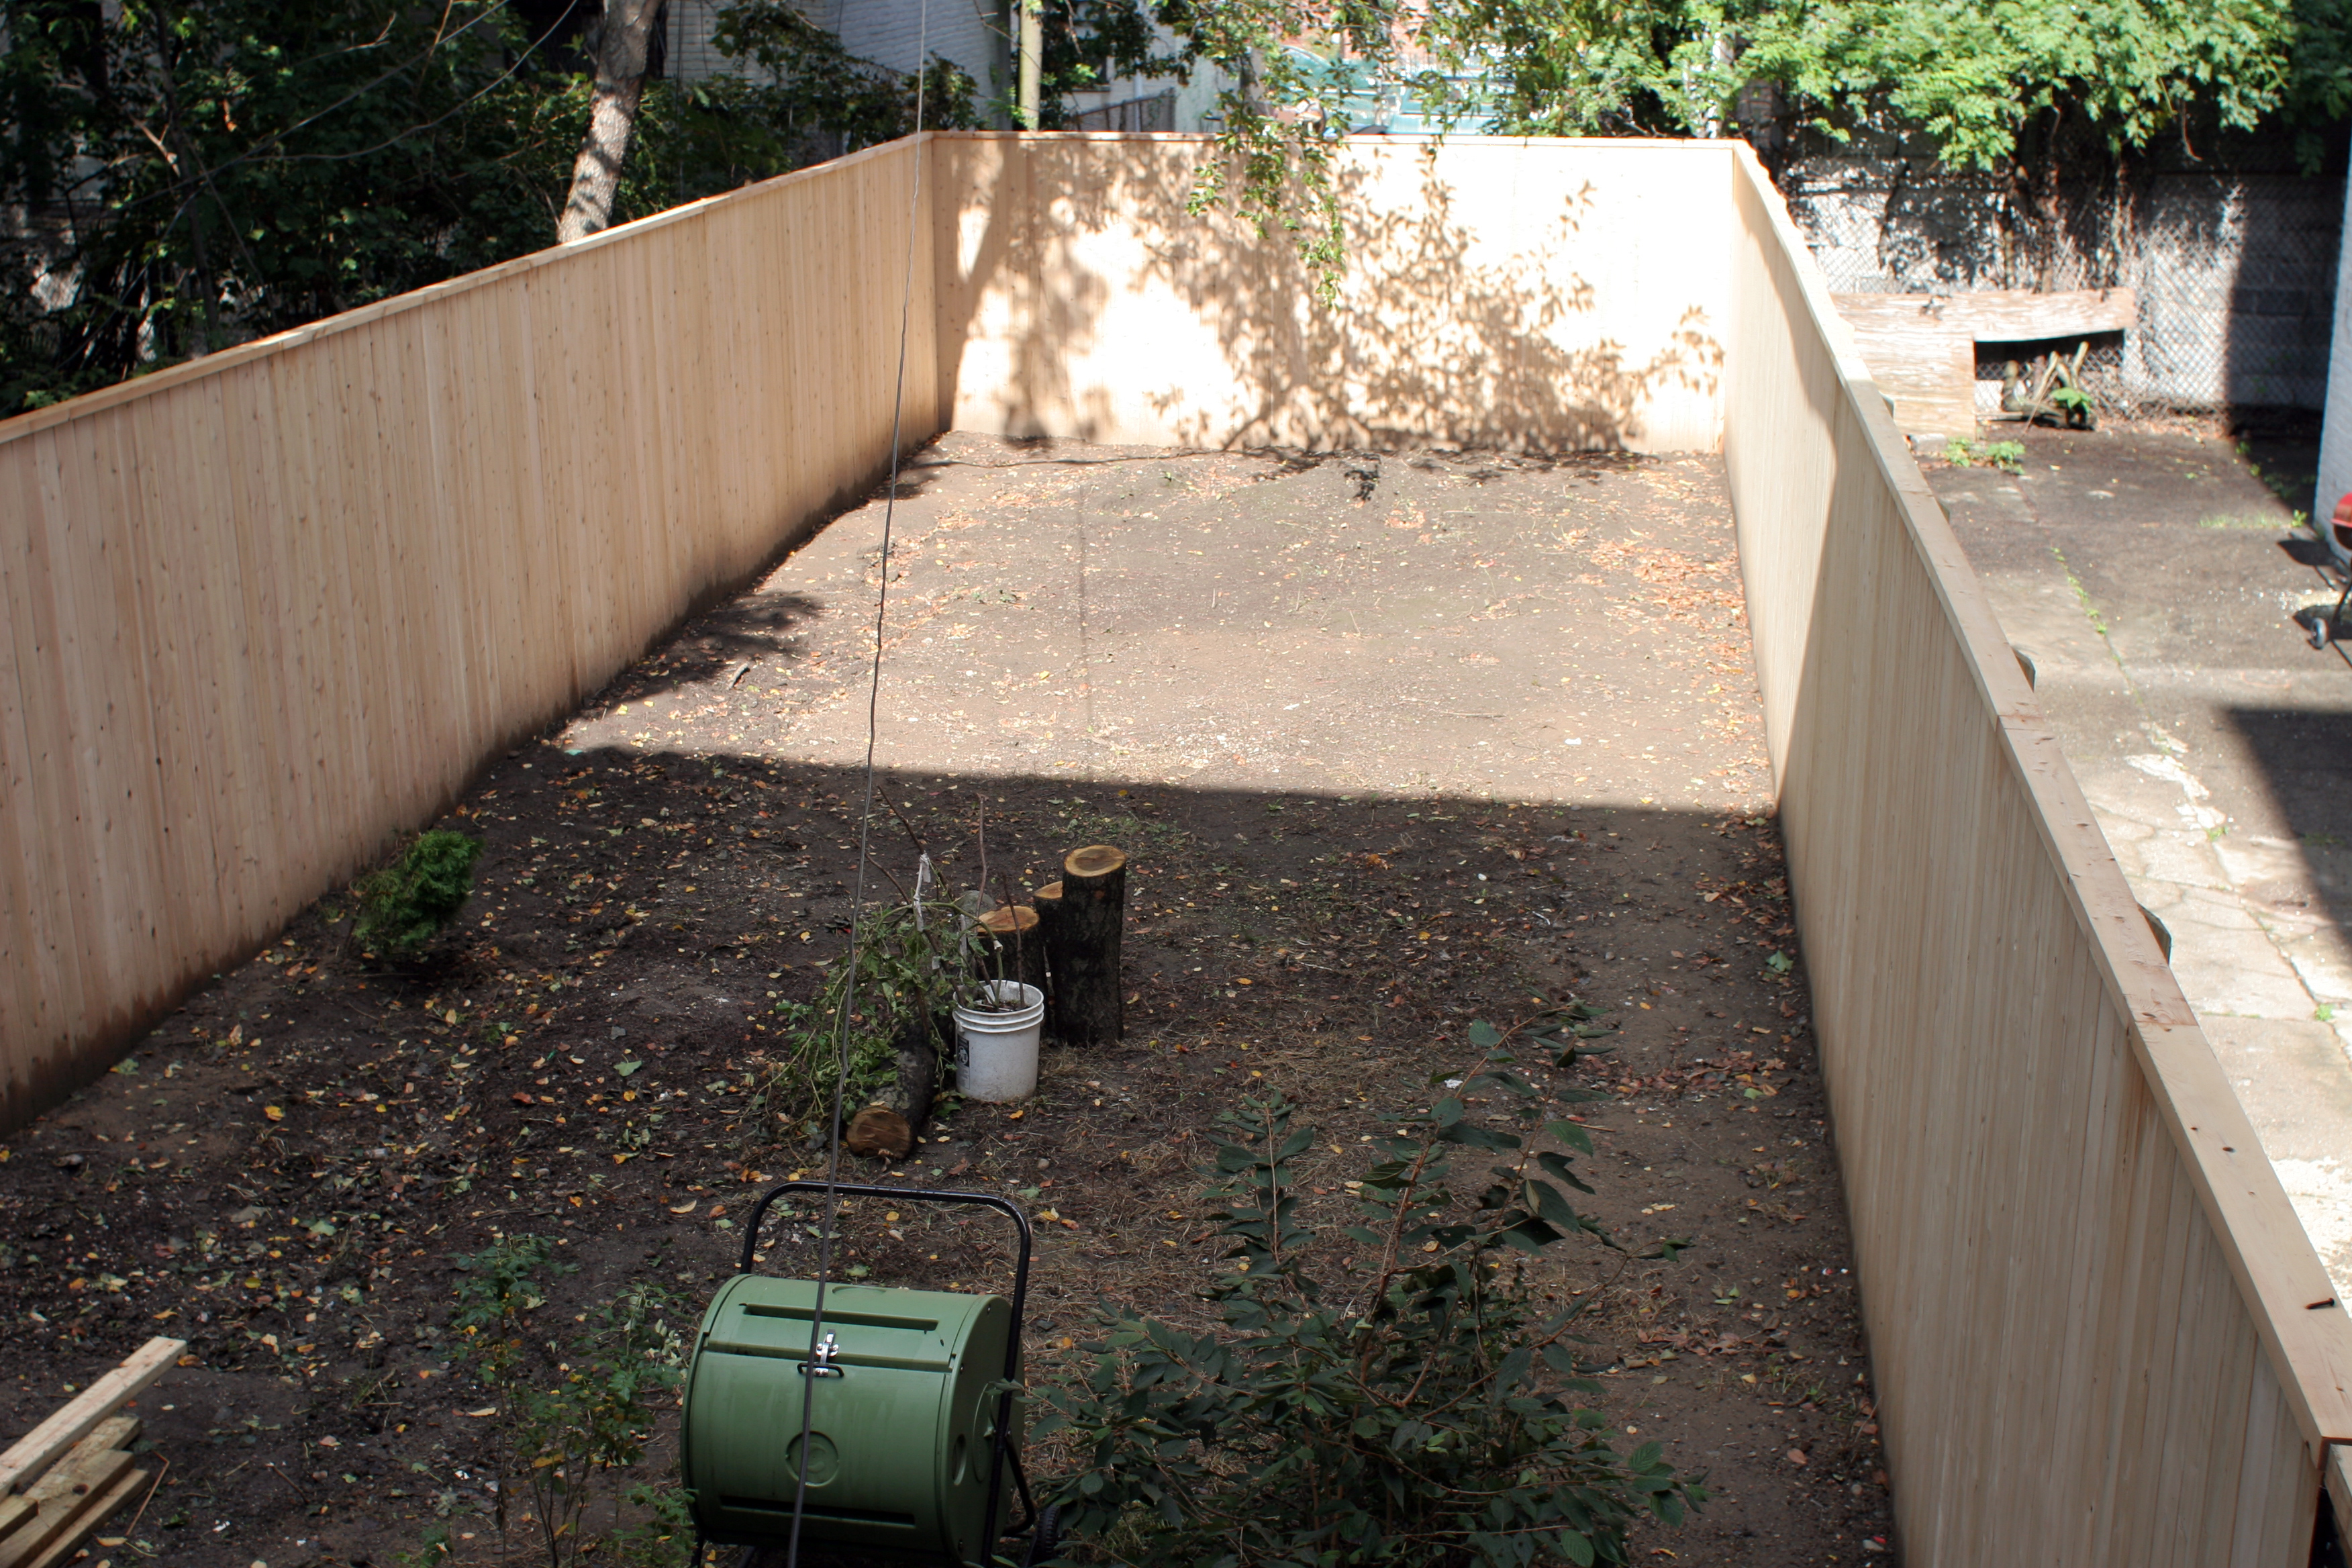
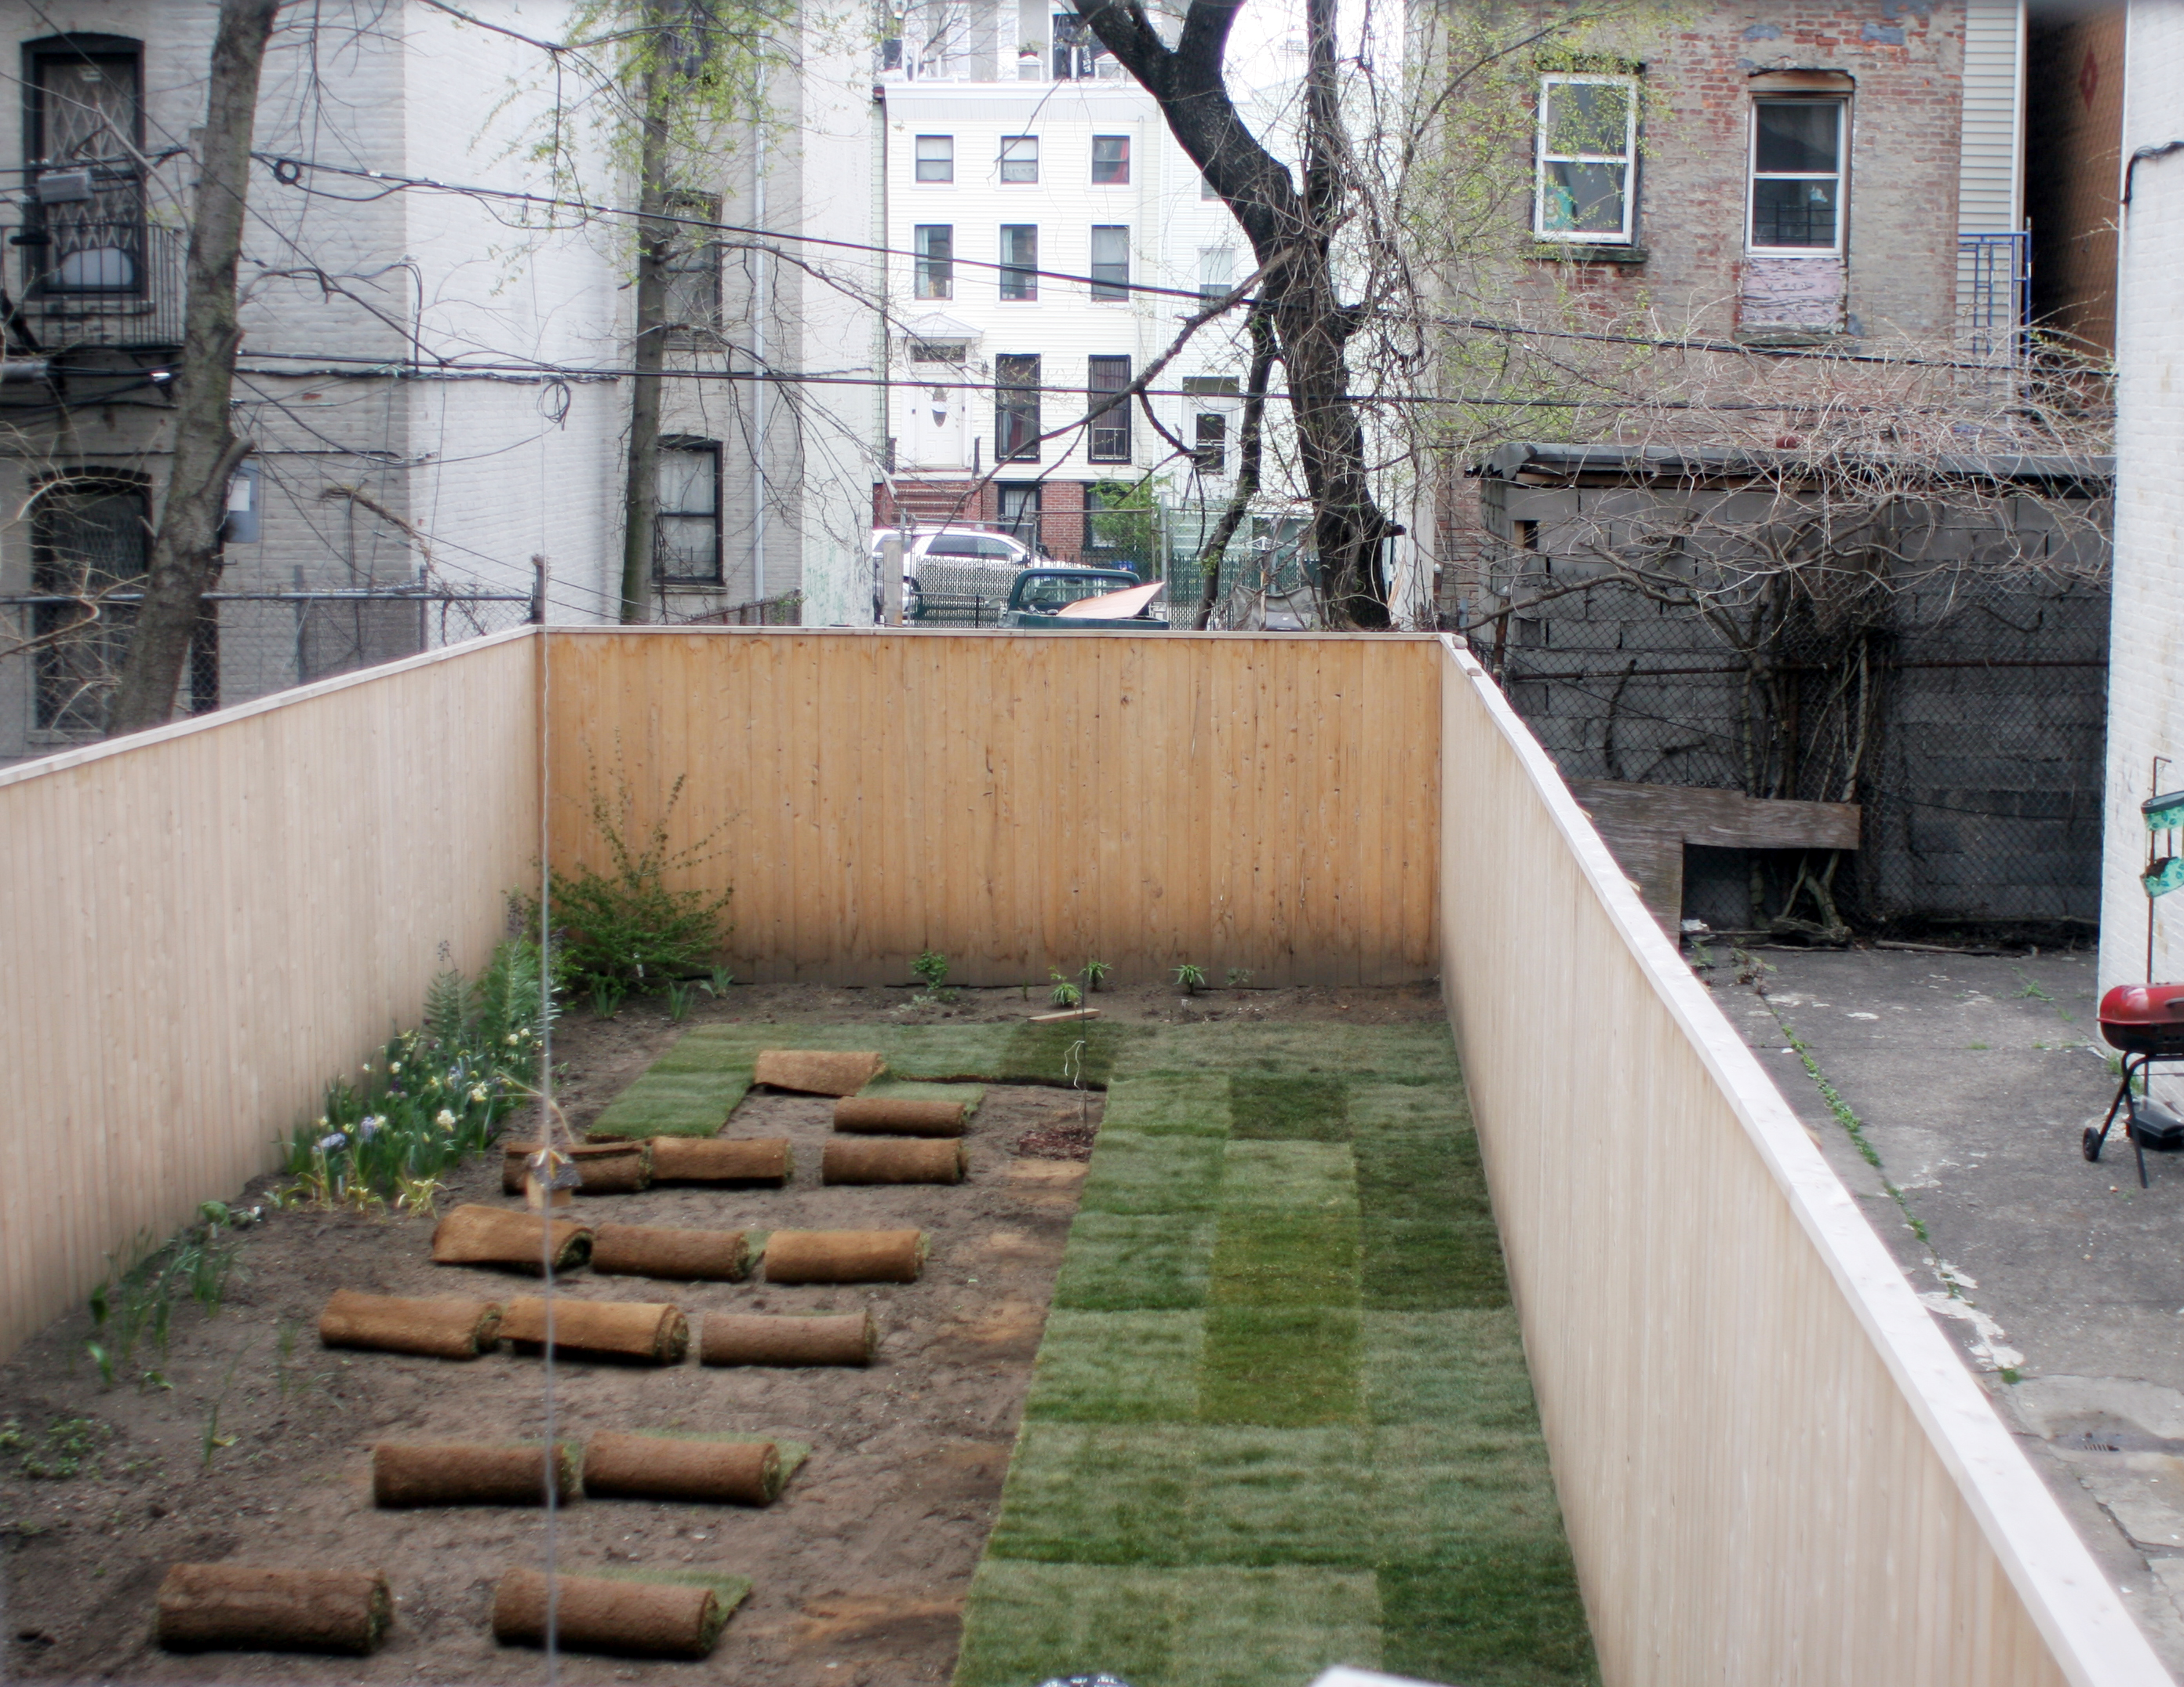
4. In the fall we hire fence builders to clear brush, remove most of the cement path, cut down trees, remove the metal awning and replace the chain link with a white cedar fence.  The change is amazing!  After three days and a big trash truck full of debris removed,  the back yard and fence look so much better!  By removing the metal awning, so much more light came into the kitchen.  The beautiful fence finally gave us a sense of privacy.  The fence has two gates, so we can leave our yard through our neighbors’ yards should we need to, and the cedar smells amazing.

5. Chris continues to remove trash with the soil-sifter.  He and ‘Uncle Frank’ rent a truck and bring 3 more tons (!) of trash to the transfer station.  They come home with a plan to start a scrap metal business.

6. We move the few shrubs we saved to the back corner of the yard, plant bulbs and wait for spring.

7. Our spring bulbs start to come up and we plant our first family tree.

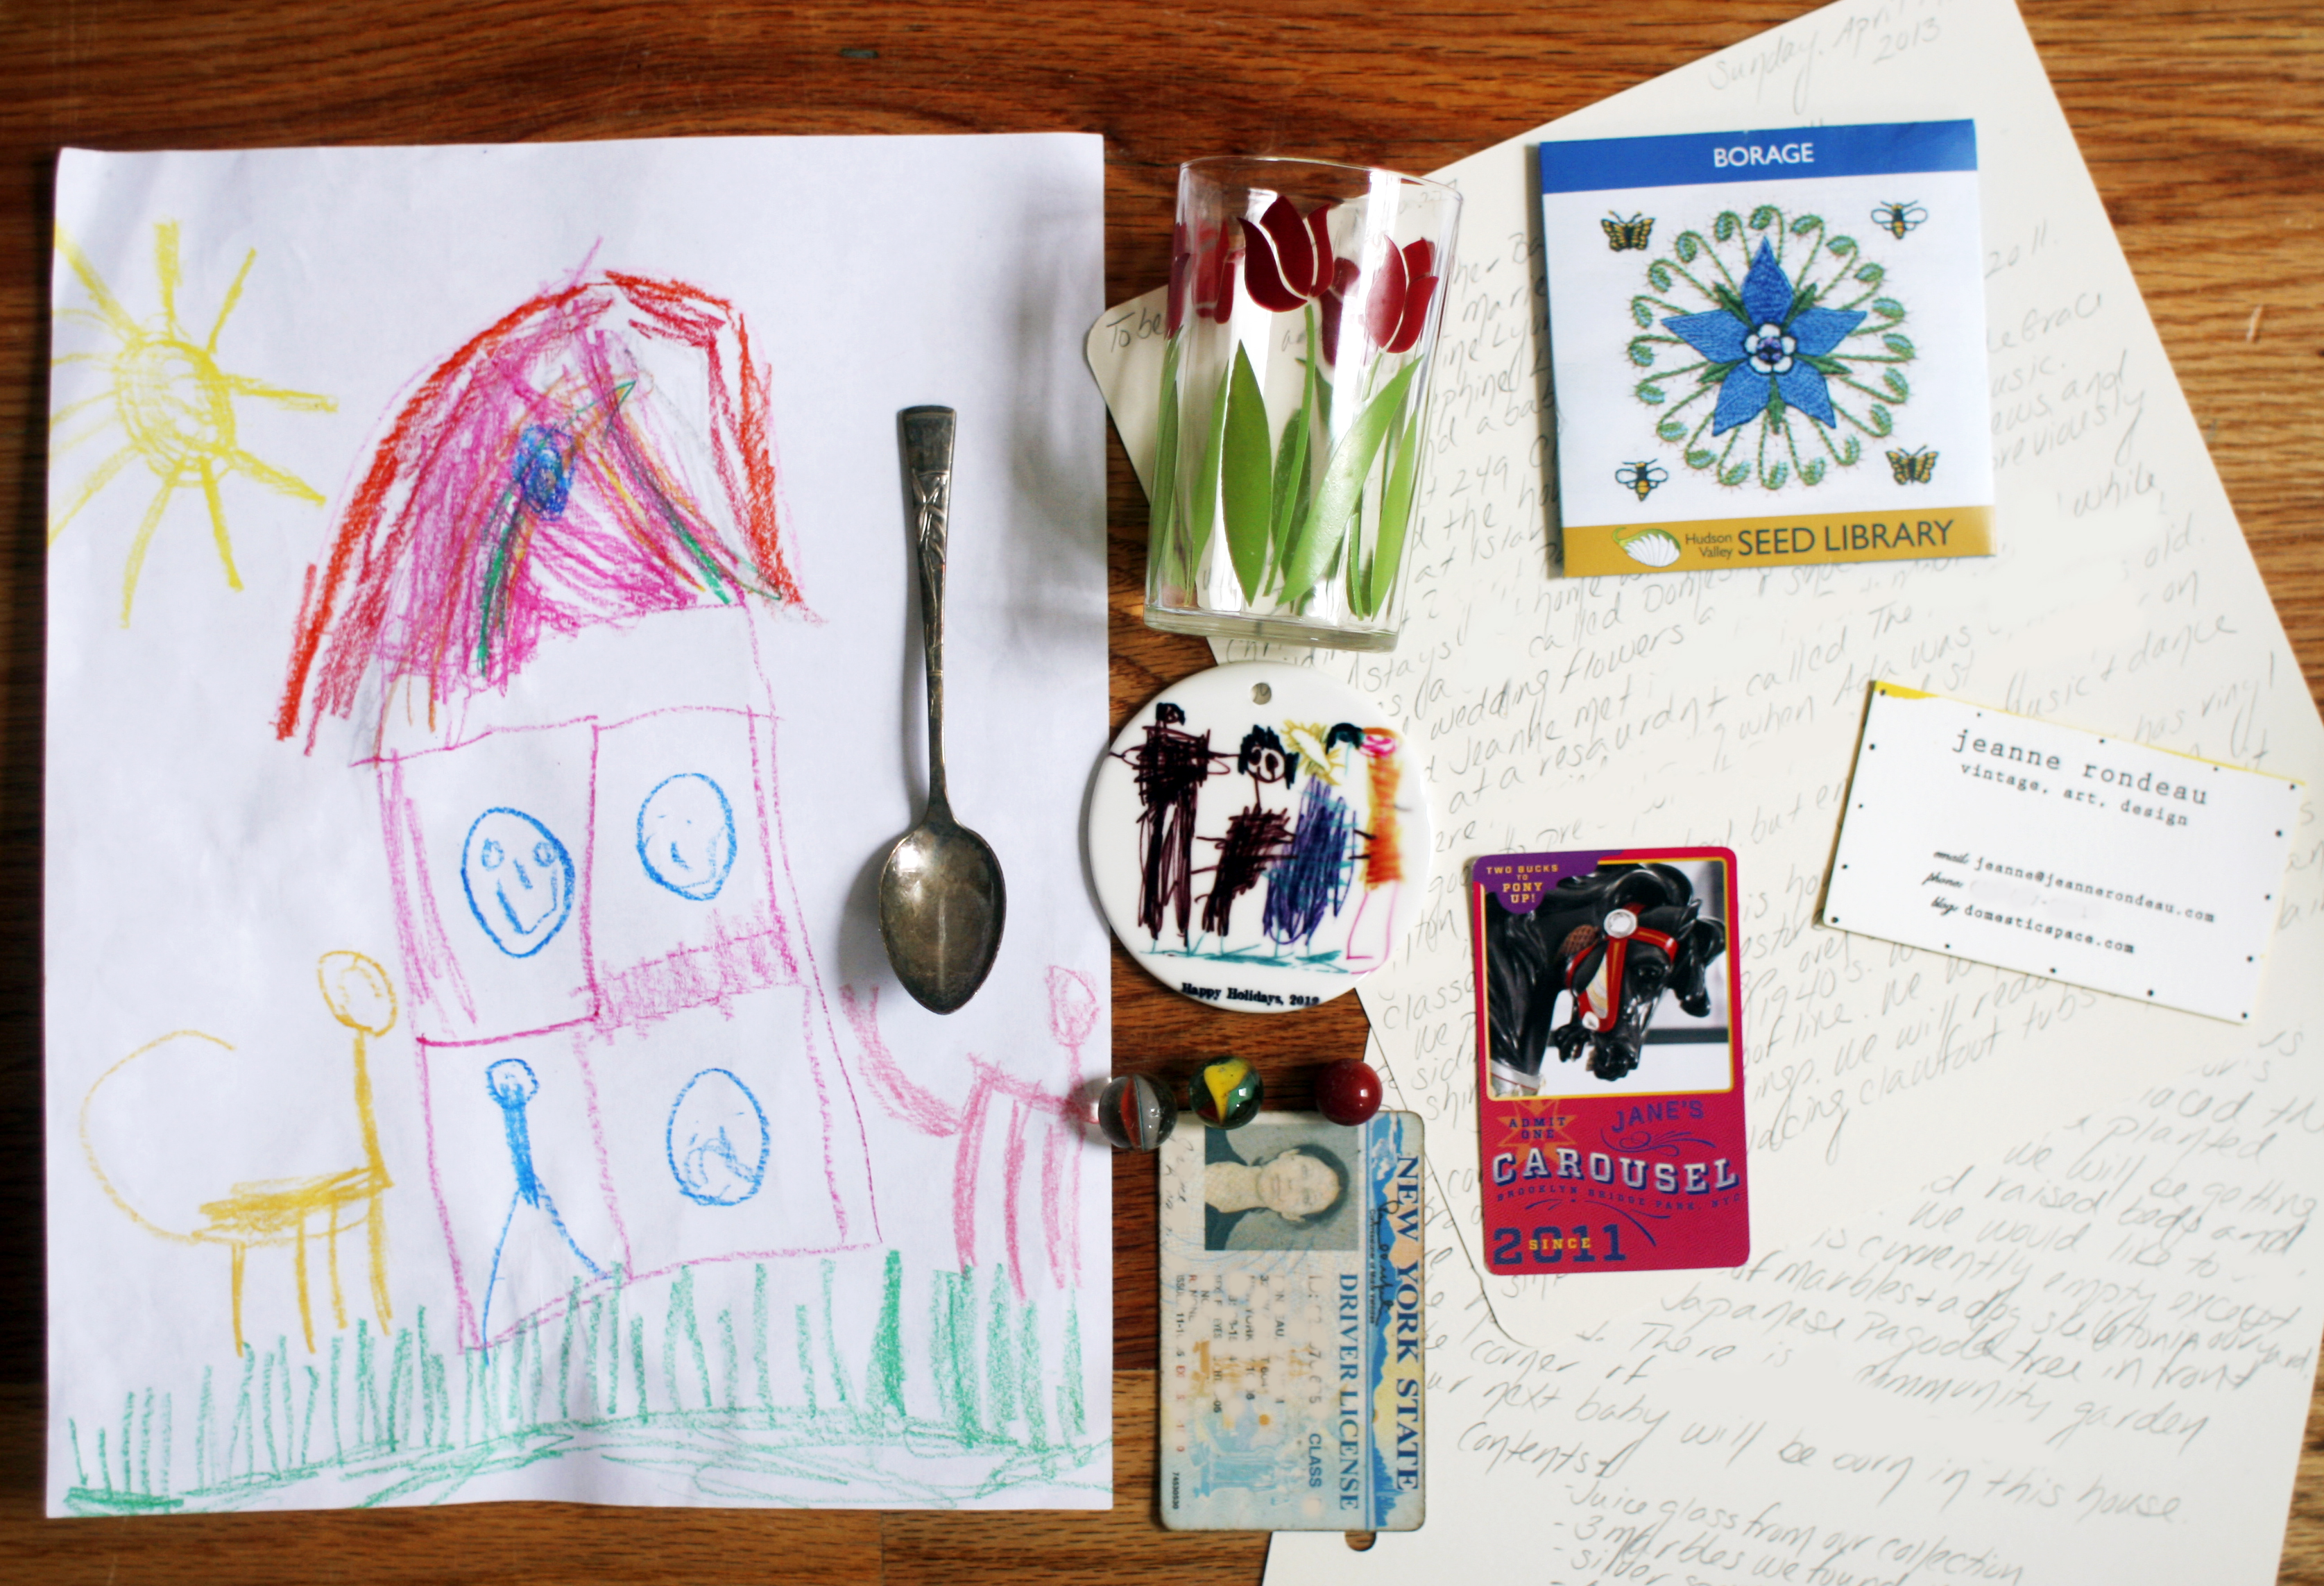
8.  We make and bury our family time capsule in the back corner of the yard.

9. After much deliberation, we decide to hire a company to lay sod down in the back instead of doing it ourselves.  We initially had trouble finding a company that would work with such a small yard, but finally ended up using Kings County Nursery in Brooklyn.  They were right down the road from us and showed up a super-quick 30 minutes after I called for an estimate.  They were very reasonable and did the job in under two hours.  We opted out of using the standard pest control and root stimulators (both chemical) for the sod.  Although our soil looked rich, we are trying to amend it after years of mistreatment and did not want to add any other chemicals to the yard.  The pesticide that sod companies use to control grubs is usually Sevin.  Sevin is known to be dangerous to both children and native insects such as honeybees.  Although the nursery assured us that Sevin would only be used under the sod, we did not feel comfortable adding it to our back yard.  We felt confident that the birds that make daily visits to our back yard, the earthworms in the soil and the rich brown dirt back there would make the sod happy without adding chemicals.

10. We have the heavy stone sink removed.  After much deliberation about whether to try to salvage the sink, we decide to let it go.  It was likely original to the house, but had been left out in the weather and had a strong adhesive on it that we could not remove without further damaging the soft soapstone.

11. We water and water and get an old-fashioned push mower to trim and the grass turns green!  The tulips open, the wisteria blooms and suddenly we like our back yard.  After a torturous two weeks of no foot traffic, the girls are allowed to run on the grass.  Finally, instead of me warning them not to touch anything in the dirt with their hands, they can be barefoot!

*We still have a list of plans for the back yard.  The wooden stands in the far back corner are for our bees which will arrive in June, (late this year due to a chilly spring in Upstate NY).  We will continue to fill in our garden with flowers as we watch and learn and inevitably make lots of first-time gardening mistakes.  I just got my vintage clothes line in the mail from Ebay, (post coming soon).  I cannot wait to hang out our sheets and dry them in the sun.  Chris wants to build a play house for the girls.  We want to eventually replace the remaining concrete patio with flagstone.  We want to re-side the laundry room that juts out into the yard, and turn it into a potting/bee supply shed.  And then we will tackle the inside of the house….

Here are some progress photos:

BY2

BY7

BY10

BY11

BY12

BY15

BY14

BY17

BY18

By19

BY20

BY21

BY22

BY23

BY25

BY29

BY31IMG_9261

BY32

BY33

BY34

BY35

BY38

BY40

Share this:

  • Click to share on Pinterest (Opens in new window) Pinterest
  • Click to share on Facebook (Opens in new window) Facebook
  • Click to share on LinkedIn (Opens in new window) LinkedIn
  • Click to share on Tumblr (Opens in new window) Tumblr
  • Click to share on X (Opens in new window) X
Like Loading...

Spring Cleaning: Stoop Sale

07 Tuesday May 2013

Posted by jeannerondeau in Organizing, Projects

≈ Leave a comment

Tags

housekeeping, life in Brooklyn, living with kids, magazine recycling, neighborhood, organizing kids rooms, recycling, spring cleaning, stoop sale, yard sale

StoopSale StoopSale2
I spent a few hours while Ada was at school yesterday organizing her room and adding to our yearly stoop sale pile.  It always feels so good to clean out the closets and get rid of unused stuff.  I try to rotate the girls’ toys so they get to play with some they have forgotten, but things they have outgrown can be moved on to another home.  I love living in Brooklyn because we often put magazines and other little things out on our front fence and neighbors take them home within a few hours.  We have gathered lots of our own free books from stoops of our neighbors.  This easy way of recycling and sharing unwanted items always makes me feel good.  (There is nothing better than something that is both free and useful!)  We also organize a larger stoop sale with friends once a year.  (I usually have to send the kids to Nan and Pappy’s so they don’t bring home more than we sell).  Aside from clearing out things that we no longer need and meeting the neighbors, it makes us happy to match items with people who are excited to bring a bargain home.

Share this:

  • Click to share on Pinterest (Opens in new window) Pinterest
  • Click to share on Facebook (Opens in new window) Facebook
  • Click to share on LinkedIn (Opens in new window) LinkedIn
  • Click to share on Tumblr (Opens in new window) Tumblr
  • Click to share on X (Opens in new window) X
Like Loading...

Hudson Valley Seed Library

02 Thursday May 2013

Posted by jeannerondeau in Likes, Projects

≈ 2 Comments

Tags

gardening, gardening with kids, heirloom seeds, heritage seeds, Hudson Valley Seed Library, non-GMO seeds, party favors, seed wedding favors

Seeds3Seeds1Seeds2

The Hudson Valley Seed Library offers heirloom and non-GMO seeds wrapped in beautiful packages.  Each seed pack is designed and illustrated by a different artist and contains a bit about the history and origin of the seeds.  The girls and I recently planted some of the borage and Basil seeds in our garden.  The borage is for the bees and the basil is for our salads.  Hudson Valley Seed Library’s seeds would make perfect wedding favors or party thank-yous.  The seed packs are not only pretty, they are also playing an important role in preserving heritage seeds and plants for the next generations.

Share this:

  • Click to share on Pinterest (Opens in new window) Pinterest
  • Click to share on Facebook (Opens in new window) Facebook
  • Click to share on LinkedIn (Opens in new window) LinkedIn
  • Click to share on Tumblr (Opens in new window) Tumblr
  • Click to share on X (Opens in new window) X
Like Loading...

Cheating on Mrs. Meyers

26 Friday Apr 2013

Posted by jeannerondeau in Likes, Projects

≈ 2 Comments

Tags

Caldrea, Caldrea at Target, hand washing dishes, home, housekeeping, life with kids, Mrs. Meyer's Clean Day, strong sense of smell when pregnant, washing vintage dishes

Caldrea

I love Mrs. Meyer’s Clean Day, I really do.  I have used their natural cleaning products for years.  But when I am pregnant and have super smelling powers the fragrance of Mrs. Meyer’s can make my head spin.  (Did I mention we are expecting a third baby in August?)  So, when I spotted Caldrea dish soap at Target the other day I gave them a cautious sniff.  They smell amazing!  The scents seemed powerful and fresh without being overpowering.  I gathered up some Hibiscus Yuzu, Citron Ginger and Blackberry Mint.  They cost $5.99 each and the bubbles turned out to last for an entire sinkful of dishes.  (We are crazy people who eat off of vintage dishes and glassware and never use our dishwasher because it would harm the bakelite and wash away Swanky Swigs decals).  The Caldrea soap smell seemed to pleasantly last through washing but did not linger for the next several hours.  I will have to seriously consider my return to Mrs. Meyer’s after the baby comes and my Spidey Sense wanes.

Share this:

  • Click to share on Pinterest (Opens in new window) Pinterest
  • Click to share on Facebook (Opens in new window) Facebook
  • Click to share on LinkedIn (Opens in new window) LinkedIn
  • Click to share on Tumblr (Opens in new window) Tumblr
  • Click to share on X (Opens in new window) X
Like Loading...

Garden Inside

25 Thursday Apr 2013

Posted by jeannerondeau in Likes, Projects

≈ 4 Comments

Tags

cutting garden, DIY backyard, fall bulbs, favorite cutting flowers, flowering bulbs, gardening with children, home, life with kids, spring flowers, White Flower Farm

Flowers

We are so excited to have flowers in the back yard!  I have wanted a cutting garden of my own since I worked designing wedding bouquets years ago.  Our garden is just starting out this spring, but we were able to do a bit of cutting from the bulbs we planted in the fall.  I am in love with these checkered Fritillaria and the Hyacinth and Daffodils smell wonderful.  We purchased our bulbs from White Flower Farm in Connecticut and the resulting plants have been strong and vibrant.  We are trying to stick to a blue/purple/white/cream color palette.  Although this scheme has morphed a bit as Chris recently purchased some giant yellow sunflower seeds, some of the tulip colors are slightly different than the catalog image, and Chris’ parents are giving us some beautiful pink peonies from their yard.  We are looking forward to figuring out the flowering schedule and filling in with new plants every season.  This is what has come up and bloomed in the garden so far:

*Narcissus Cheerfulness

*Narcissus Manly (Huge blooms!)

*Fritillaria Persica Adiyaman

*Fritillaria Meleagris (I love this!)

*Hyacinth Blue Eyes

*Hyacinth Miss Saigon (These smell wonderful)

*Tulip Backpacker

*Tulip Champagne Diamond (So beautiful!)

Happy Spring!

Share this:

  • Click to share on Pinterest (Opens in new window) Pinterest
  • Click to share on Facebook (Opens in new window) Facebook
  • Click to share on LinkedIn (Opens in new window) LinkedIn
  • Click to share on Tumblr (Opens in new window) Tumblr
  • Click to share on X (Opens in new window) X
Like Loading...

DIY Family Time Capsule

24 Wednesday Apr 2013

Posted by jeannerondeau in Projects

≈ 1 Comment

Tags

back yard renovation, back yard with kids, DIY family time capsule, family time capsule, history lesson with kids, kids time capsule, life with kids, make your own time capsule, old house living, time capsule

TimeCapsule2 Capsule3 Capsule1
We found so many things buried in our back yard when we were renovating.  The broken pottery, bone buttons, metal and marbles were all hints from the past.  We also found wild violets and strawberries and bulbs planted by previous tenants.  These things inspired us to make our own time capsule to bury under the grass and soil.  We decided to make two identical capsules: one to be opened when Ada is 18 and one to be left under the ground until we are gone and another family digs it up.  Here is what we included in our time capsules:

*A vintage juice glass from the collection we use daily.

*3 marbles that we dug up from the dirt.

*A silver spoon the girls used as babies.

*A family portrait that Ada drew in 2012 which was transferred on to ceramic (see that post here).

*Package from borage seeds we planted in the garden.

*Business card with our email and contact info.  (But who knows if email and phones will be around in the future?)

*An expired driver’s license.

*Ticket from Jane’s Carousel in Dumbo.  (The girls spend a lot of time here).

*A drawing of our house by Ada.

*A note from Ada about our family now.

*A note from me, about what I hope for our children in the future.

*A letter to us and people in the future – detailing who we are, our plans for the house and garden, and a little bit about the neighborhood.  We wrote this on archival paper with pencil, in hopes that it will be legible when it is dug up.  The letter also explains the contents of the capsule.

*We used these Anchor-Hocking jars to pack the contents, and placed a few layers of plastic between the screw top and glass.  Our hope is that the aluminum tops will not rust and will keep out some of the moisture from the ground.

*Chris cut pieces of wood to fit around the glass jars, so that a shovel will not break the jar when they are dug up.

We look forward to digging up our time capsule and remembering how we were in 2013.  Hopefully the jar we leave behind will give the next occupants of our house a little taste of the history that came before.

Share this:

  • Click to share on Pinterest (Opens in new window) Pinterest
  • Click to share on Facebook (Opens in new window) Facebook
  • Click to share on LinkedIn (Opens in new window) LinkedIn
  • Click to share on Tumblr (Opens in new window) Tumblr
  • Click to share on X (Opens in new window) X
Like Loading...

Spring Cleaning: Dusting

18 Thursday Apr 2013

Posted by jeannerondeau in Projects, Shop

≈ Leave a comment

Tags

housekeeping, how to clean crown moldings, living with children, natural cleaning, non-chemical house cleaning, old house living, Sla-Dust, Slack Dust Mop Company, wool dust mop

Sla-Dust1 Sla-Dust3
Our house has tall crown moldings that we rarely notice accept to bemoan their need of repairs.  I have never dusted up there and I am quite sure the previous owners did not. (It took a team of four people nine hours to clean the house before we moved in).  The cleaning team also ignored the crown moldings, so it has been at least five years since they got a good dusting.  I found this Sla-Dust this week and decided it was time to tackle the dusting job.  The Slack Dust Mop Company has been hand-making wool mops for over 100 years in Vermont.  The company is still owned by the same family and they  pride themselves on making sustainable, non-disposable quality products.  My Wool Hand Duster did a great job on the moldings and ceiling fans and also worked to grab dust out of the crevices in our radiators.  The wool head attaches with Velcro and can be hand washed in soap and water for cleanup.  I finished the whole job in under half an hour.  So satisfying!

Share this:

  • Click to share on Pinterest (Opens in new window) Pinterest
  • Click to share on Facebook (Opens in new window) Facebook
  • Click to share on LinkedIn (Opens in new window) LinkedIn
  • Click to share on Tumblr (Opens in new window) Tumblr
  • Click to share on X (Opens in new window) X
Like Loading...

Back Yard Progress: Blooms

10 Wednesday Apr 2013

Posted by jeannerondeau in Projects

≈ 2 Comments

Tags

Arbor Day Foundation, backyard bees, DIY backyard, fall bulbs, German Beer Garden bench, home, living with kids, outdoor space DIY, outdoor space for kids, spring flowers

Blooms1
Blooms2
We have flowers!  The first of our fall plantings started to bloom this week.  It seems the squirrels left the bulbs alone over the winter and the spring flowers have all started to show themselves.  Our Hyacinths were the first to open, quickly followed by a couple varieties of Fritillaria.  (These seem to be overshadowing our Hellebores in the back, so we will keep an eye on placement this first year).  The Lilac, Lilies, Peony, and Viburnum are sending out green leaves.  The only casualty seems to be one Hydrangea that we transplanted in the late fall.  An abundance of wild violets has returned to the newly-cleaned-out lawn space.  Ada and I have been transplanting them to the designated garden space before our sod arrives in a couple of weeks.  Our three-foot Japanese cherry tree arrived via post office from the Arbor Day Foundation last week.  It was a bargain at under $18 with shipping!  We planted it as our first tree as a family and it has already shot out bright green buds.  This is all quite a learning process, as neither Chris nor I have had a real garden of our own before… This post shows some of the before photos from the previously terrifying back yard – (I found a dead rat back there on our first walk-through of the property).  Our backyard bees are arriving in May and will take up residence in the far corner of the yard.  Chris found these German beer garden table and benches yesterday, which we are considering for use on cement patio.  We can hardly wait for the girls to have a real yard to play in!  We are slowly making progress and looking forward to perhaps even relaxing amongst all the projects outside this summer.

Share this:

  • Click to share on Pinterest (Opens in new window) Pinterest
  • Click to share on Facebook (Opens in new window) Facebook
  • Click to share on LinkedIn (Opens in new window) LinkedIn
  • Click to share on Tumblr (Opens in new window) Tumblr
  • Click to share on X (Opens in new window) X
Like Loading...
← Older posts
Newer posts →

Visit Our Etsy Store

Etsy Store Instagram

No Instagram images were found.

Categories

  • Brooklyn
  • Inspiration
  • Likes
  • Organizing
  • Our Etsy Store
  • Party!
  • Projects
  • Shop
  • Uncategorized
  • Vintage

Recent Posts

  • Visit Us at the Brooklyn Flea!
  • Inspiration
  • Inspiration
  • Winter Whites
  • Ocean Grove, NJ

Archives

Enter your email address to follow this blog and receive notifications of new posts by email.

Join 179 other subscribers

Blogs I Read

  • A Beautiful Mess
  • Anthology Magazine
  • Apartment Therapy Family (Ohdeedoh)
  • Bleubird Vintage
  • Katie's Pencil Box
  • Le Dans La
  • Making it Lovely
  • Oh Happy Day!
  • Oh My Little Dears
  • Purl Bee
  • Soulemama
  • Sweet Paul Magazine
  • The Sweetest Occasion
  • You Are My Fave

Copyright

All content is © 2010-2018 Jeanne Rondeau. Please do not copy or take images or content from this site without my permission. Requests may be sent to: jeanne@jeannerondeau.com Thank you!

Meta

  • Create account
  • Log in
  • Entries feed
  • Comments feed
  • WordPress.com

Blog at WordPress.com.

Privacy & Cookies: This site uses cookies. By continuing to use this website, you agree to their use.
To find out more, including how to control cookies, see here: Cookie Policy
  • Subscribe Subscribed
    • Domesticspace
    • Join 179 other subscribers
    • Already have a WordPress.com account? Log in now.
    • Domesticspace
    • Subscribe Subscribed
    • Sign up
    • Log in
    • Report this content
    • View site in Reader
    • Manage subscriptions
    • Collapse this bar
 

Loading Comments...
 

    %d