• Our Etsy Store
  • Vintage
  • Projects
  • Organizing
  • Likes
  • About
  • jeannerondeau.com

Domesticspace

~ Inside. kids, art, home, vintage.

Domesticspace

Category Archives: Party!

Happy Birthday Josie!

01 Friday Mar 2013

Posted by jeannerondeau in Party!, Shop, Vintage

≈ 2 Comments

Tags

birthday crown, child birthday, diy heart garland, DIY kids party, giant balloons, handmade feather crown, jadeite collection, paper lantern, paper straws, party supplies

Table1
Cake
Hyacinth
Crown1
GiftBag
CherryIceCream

It is hard to believe our little Josie is already two!  It seems like just the other day when Chris and I were planning our last weekend alone and my water broke two weeks early.  Josie has been sweet and kind and funny ever since her unexpected arrival.  Thank you for always making us smile Ms. Josie.  We had a little party this weekend and celebrated the actual day yesterday with cupcakes and berries and a pair of footie pjs from Daddy.

* Party Decorations.  Balloons from Bargain Balloons and silver and white lanterns from Tail of the Yak.  Heart Garland How-To Here.

*Coconut Cake from Ina Garten’s yummy recipe.  Beeswax number candle from Clothes  Pony/ Dandelion Toys in Fort Collins, CO – The Best Toy Store!  The Jadeite was an amazing Craigslist score.

*Bathroom hyacinth in a favorite Swanky Swig.

*Josie’s yearly Birthday Crown.  Cape by Wovenplay.

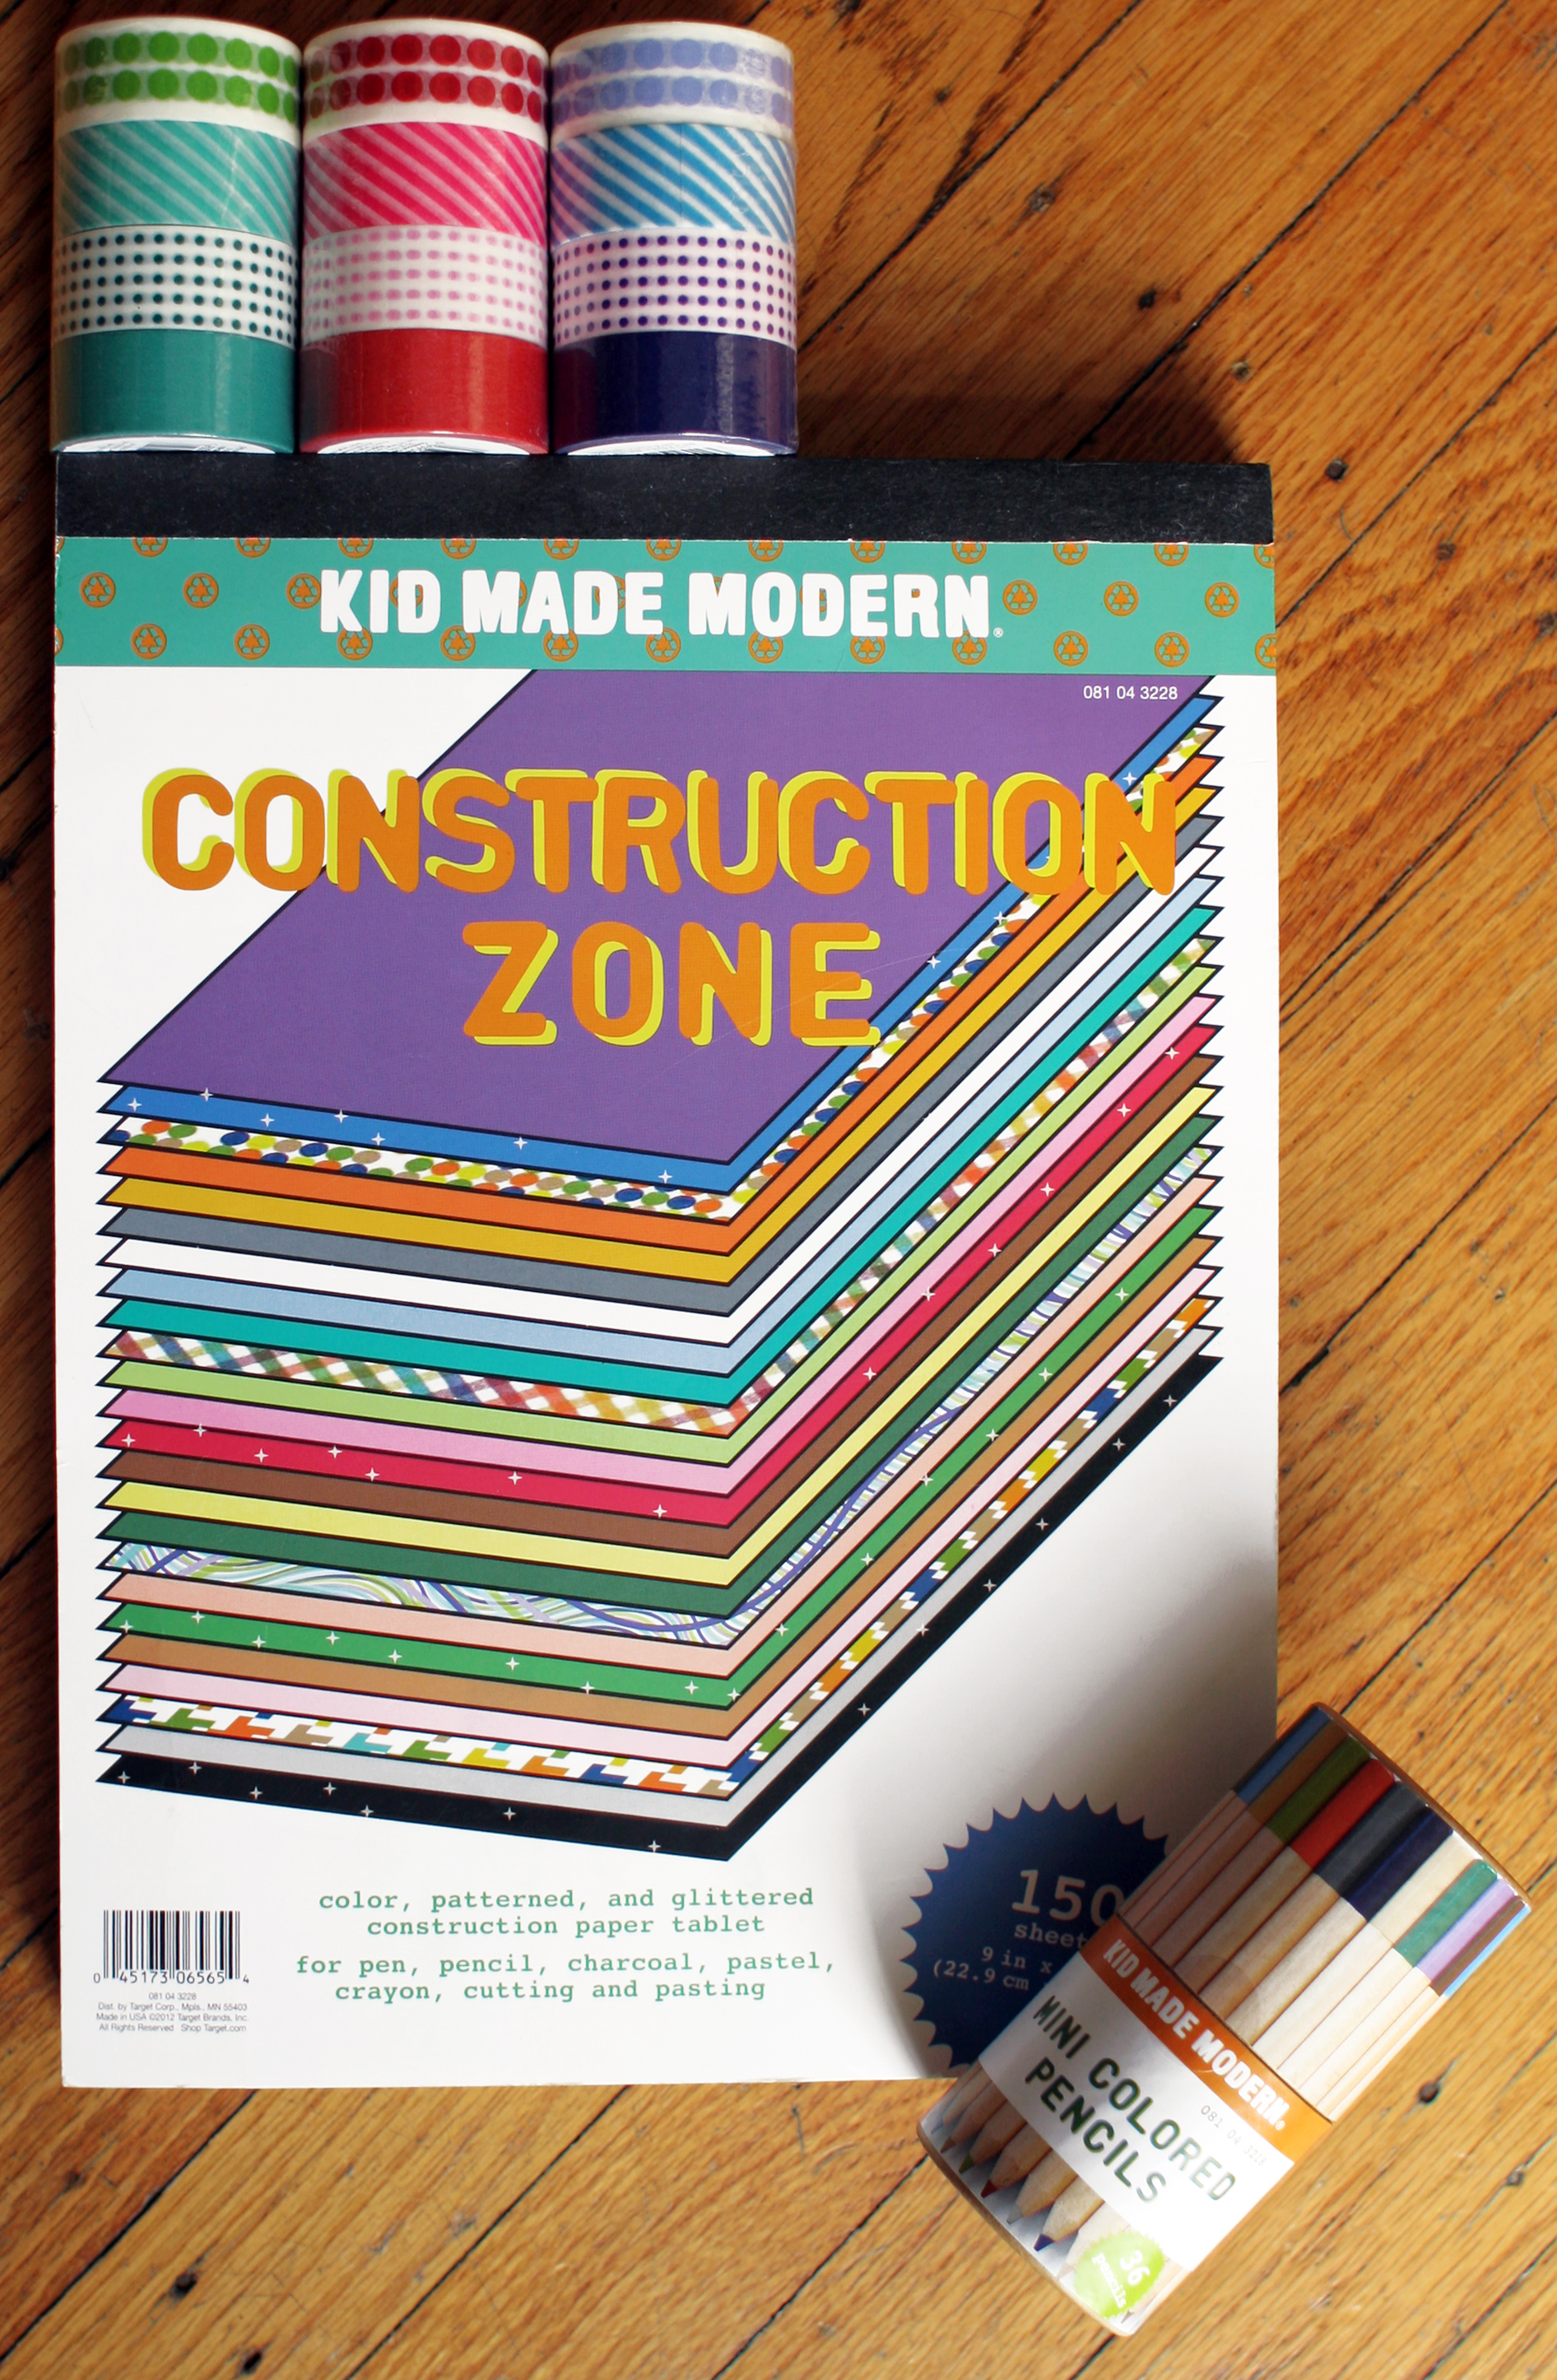
*Gift Bag Contents.  (I used to be anti-giftbag.  We never had these when I little, but kids love them and Ada insisted on making these).  Straws from Shop Sweet Lulu, mini fans and spirals from Pearl River Trading ,tape from Target.

*Cherry Vanilla Birthday Ice Cream.

Happy Birthday Big Girl!

Share this:

  • Click to share on Pinterest (Opens in new window) Pinterest
  • Click to share on Facebook (Opens in new window) Facebook
  • Click to share on LinkedIn (Opens in new window) LinkedIn
  • Click to share on Tumblr (Opens in new window) Tumblr
  • Click to share on X (Opens in new window) X
Like Loading...

Cherry Vanilla Ice Cream Recipe

27 Wednesday Feb 2013

Posted by jeannerondeau in Party!, Projects

≈ 3 Comments

Tags

birthday ice cream recipe, cherry almond ice cream recipe, cherry ice cream, cherry juice concentrate recipe, cherry vanilla ice cream recipe, DIY ice cream recipe, frozen cherry ice cream, Ina Garten ice cream recipe, kids birthday party, vanilla ice cream

CherryIceCreamJosie turns two tomorrow (!) and we came up with this Cherry Vanilla Ice Cream Recipe for her party.  I was dreaming of cherry ice cream this year, even though we are months from seasonal cherries.  We ended up using frozen cherries and changing up Ina Garten’s Vanilla Ice Cream recipe.  We added almond extract and concentrated black cherry juice to make the flavor more intense and the results were pretty yummy,  if I do say so myself.  Josie just saw the ice cream photo on my screen and begged for more ice cream for breakfast.  Success.  To make your own Cherry Vanilla Ice Cream you will need:

*Ice Cream Maker

*3 Cups of Good Quality Heavy Cream (The quality makes all the difference!)

*2/3 Cups + 1 Tablespoon Sugar

*1 Teaspoon Vanilla Extract

*3/4 Teaspoon Almond Extract

*One Vanilla Bean

*Two 12 Oz Packs of Unsweetened Frozen Cherries

*4-5 Tablespoons Black Cherry Juice Concentrate (We used this from Dynamic Health.  You could also cook down unsweetened cherry juice)

1. Heat cream, sugar, vanilla, scraped seeds from vanilla bean and empty seed pod in saucepan until sugar dissolves.  Place mixture in refrigerator to cool.

2. Pour the frozen cherries into a deep sauté pan and cook down over medium heat for about 30 minutes, stirring often.  The cherries will release a lot of liquid at first and then begin to look more gel-like.  When liquid seems to be thickening, add cherry concentrate, almond extract and tablespoon of sugar.  Cook a few more minutes until mixture resembles loose jam.

3. Place mixture in refrigerator to cool.

4. After an hour add cream and cherry mixture together, put into ice cream maker and follow manufacturer’s directions.

5. Allow ice cream to chill in freezer when complete and soften slightly before serving.

Enjoy!

IceCream2

Share this:

  • Click to share on Pinterest (Opens in new window) Pinterest
  • Click to share on Facebook (Opens in new window) Facebook
  • Click to share on LinkedIn (Opens in new window) LinkedIn
  • Click to share on Tumblr (Opens in new window) Tumblr
  • Click to share on X (Opens in new window) X
Like Loading...

Our Etsy Shop is Open!

12 Tuesday Feb 2013

Posted by jeannerondeau in Our Etsy Store, Party!, Projects, Shop, Vintage

≈ Leave a comment

Tags

children's crowns, feather crowns, headband crown for kids, Headband Feather Crowns, Jeanne Rondeau Etsy, party crowns, shopping, style, wedding feather crown, wedding headpiece

EtsyBanner2Our Etsy shop is open!  We have been working hard to get the final details finished and I am happy to say we are open for business.  You can find our Headband Feather Crowns at http://www.etsy.com/shop/jeannerondeau.  The crowns are made in adult and kids’ sizes and my girls like to wear them for dress-up.  All of the pieces are made by hand using vintage fabrics, beads and sequins and each crown is one-of-a-kind.  We also do custom work.  We will continue to add more items to the shop, so please visit us often!
 
IMG_2501IMG_2498

Share this:

  • Click to share on Pinterest (Opens in new window) Pinterest
  • Click to share on Facebook (Opens in new window) Facebook
  • Click to share on LinkedIn (Opens in new window) LinkedIn
  • Click to share on Tumblr (Opens in new window) Tumblr
  • Click to share on X (Opens in new window) X
Like Loading...

Kid Gifts: Target Art Supplies

31 Thursday Jan 2013

Posted by jeannerondeau in Likes, Party!, Projects, Shop

≈ Leave a comment

Tags

art for kids, art supplies for kids, emergency party box, kid gifts, Kid Made Modern, living with kids, paper tape for kids, Target, Todd Oldham, washi tape

GiftsArt supplies are one of my favorite gifts for kids.  I try to keep a supply on hand for birthday gifts and moments of desperation.  These Kid Made Modern art supplies by Todd Oldham for Target occupy a large section in our emergency party box.  The quality is great and I love the Kid Made Modern packaging and smart, thoughtful art kits.  This Construction Zone block of paper has lots of great colors and patterns and different weights of paper.  The Mini Colored Pencils are perfect for little hands and the colors are beautiful.  I recently added these paper tapes from the Target office section to our arsenal.  The tapes come in packs of four and are $4 per pack.  My kids can spend hours tearing and sticking paper tape (exhibit A here).  It is good to be prepared.

Share this:

  • Click to share on Pinterest (Opens in new window) Pinterest
  • Click to share on Facebook (Opens in new window) Facebook
  • Click to share on LinkedIn (Opens in new window) LinkedIn
  • Click to share on Tumblr (Opens in new window) Tumblr
  • Click to share on X (Opens in new window) X
Like Loading...

The Magic Garden

23 Wednesday Jan 2013

Posted by jeannerondeau in Party!, Projects, Shop

≈ 1 Comment

Tags

crystal garden, educational kids toy, kid gifts, kid party favors, kids party, Magic Garden, Mystical Garden, Pearl River, science with kids, Toysmith

MagicGarden1MagicGarden2MagicGarden3Do you remember these?  We used to get smaller versions when we were kids, but I’d never seen one quite so elaborate until I found this at Pearl River.  This Mystical Garden by Toysmith has cardboard trees, grass and a mountain to assemble before the mystery liquid is poured into the base.  (This assembly is best done by an adult).  Our crystals formed within the hour and were done growing within 10 hours.  The mountain really looked like it was growing snow and the trees bloomed cherry blossoms.  Kids should not touch the crystals or liquid, but these are pretty amazing to watch grow on a shelf.  The small price tag makes this Mystical Garden a fun party favor or add-on gift for kids.  Magic.

Share this:

  • Click to share on Pinterest (Opens in new window) Pinterest
  • Click to share on Facebook (Opens in new window) Facebook
  • Click to share on LinkedIn (Opens in new window) LinkedIn
  • Click to share on Tumblr (Opens in new window) Tumblr
  • Click to share on X (Opens in new window) X
Like Loading...

DIY German Glass Glitter Stars

20 Tuesday Nov 2012

Posted by jeannerondeau in Party!, Projects

≈ 1 Comment

Tags

christmas tree ornaments, diy, german glass glitter, glass glitter, glass glitter stars, glitter Christmas ornament, silver glitter, stars and moon, vintage glitter, vintage ornament

German glass glitter is amazing stuff.  It tarnishes as it ages and creates a super-sparkly vintage look.  We used silver to make our stars, but the glitter also comes in lots of beautiful colors.  German glass glitter is actually made from glass, so you need be careful and wear gloves when you work with it, but the results are worth the extra care.  We made these star and moon decorations for a friend’s birthday party.  They hung on the edges of a stage and were bright in the candle and stage lights.  We took some home for Ada’s room after the party.  To make your own Glass Glitter Stars you will need:

*Cardboard (We used recycled boxes)

*German Glass Glitter

*Craft Glue

*Hole Punch

*Scissors

*Large Paintbrush (To spread glue)

*String to Hang

*Wax Paper

*Rubber Gloves (to protect hands)

1. Draw stars and moon shapes onto cardboard and cut out.

2. Punch a hole in each for hanging.

3. Lay cardboard shapes out on layers of wax paper and squeeze a generous amount of glue on each star.

4. Using the paintbrush, spread glue evenly over the entire surface of stars and moon.

5. Put on the gloves.  Sprinkle glitter heavily over glue and leave a thick layer of glitter as the glue dries.  Be sure to leave the punched hole clear of glitter.  Use a pencil to clean out hole if needed.

6. Carefully shake off excess glitter onto the wax paper when glue is dry.  The paper can then be folded and extra glitter returned to the container for reuse.

7. Flip stars and moon over and repeat glue and glitter process.  (Don’t forget to leave your hole clear for hanging).

8. When both sides of stars are dry, string them up out of reach of the kids.

*These stars would make beautiful Christmas tree ornaments or garland!

Some other sparkly projects you might like:

Share this:

  • Click to share on Pinterest (Opens in new window) Pinterest
  • Click to share on Facebook (Opens in new window) Facebook
  • Click to share on LinkedIn (Opens in new window) LinkedIn
  • Click to share on Tumblr (Opens in new window) Tumblr
  • Click to share on X (Opens in new window) X
Like Loading...

DIY Vintage Crepe Paper Flower Hat

19 Monday Nov 2012

Posted by jeannerondeau in Party!, Projects, Vintage

≈ 3 Comments

Tags

Dennison Crepe Paper, diy, diy birthday hat, diy crepe paper flower hat, How to Make Crepe Paper Flowers, paper flower hat, Paper Mart, style, vintage flower, vintage paper flowers

My Mother-in-Law gave me this amazing How to Make Crepe Paper Flowers book for my birthday last year and I have been waiting for the right time to put it to use.  My copy is from 1922 and contains the secrets to making realistic flowers from crepe paper.  Needles to say, I am in love with this book!  Ebay has several copies for sale here.  The flowers turned out better than I had thought possible and we used them to make a special birthday hat for our friend Sandy.  To make your own Crepe Paper Flower Hat you will need:

*How to Make Crepe Paper Flowers book

*Variety of Crepe Paper (We used this 100 gms paper from Papermart, and each flower used less than one roll of paper)

*Headband

*Floral Tape

*Floral Wire (We used straight 18 gauge wire)

*Craft Glue

*Scissors

*Pinking Shears (optional)

*Card Stock for Patterns

*Ribbon to Tie Hat (optional)

1. Prepare patterns.  Our copy of the book did not come with the original patterns, so we followed the drawings in the book and made our own from card stock.  Label each pattern for future use.

2. Following directions from the book, make up flowers and leave stem wires long until you are ready to apply to the hat.  We used 9 flowers to make our hat.  It is helpful to hold finished flowers in a vase or cup as you go.

3. Lay ribbon over ends of headband about 2″ and glue.  (Our hat was a little heavy, so we added the ribbon to make it more secure for dancing).

4. Wrap headband with floral tape up until the point you want to add a flower.  (Start on one side of the headband and add flowers up and over to the other side).

5. Put a spot of glue over the floral tape and wind a 1″ strip of green crepe paper around the headband over the tape, gently pulling tight as you go.  This will be the visible headband covering, so try to keep it neat.  Our strip was about 15″ long x 1″ wide.

6. Trim the wire on first flower to about 3″, position it and use floral tape to secure to the headband.

7. Wrap green crepe paper over floral tape as you go, covering the headband between each flower.

8. Position the second flower and repeat the wrapping.

9. When all flowers are in place wrap the floral tape and crepe paper down to the other end of the headband and secure crepe with a little glue.

10. Allow the hat to dry.

Get your party on!

You may also like these projects:

Share this:

  • Click to share on Pinterest (Opens in new window) Pinterest
  • Click to share on Facebook (Opens in new window) Facebook
  • Click to share on LinkedIn (Opens in new window) LinkedIn
  • Click to share on Tumblr (Opens in new window) Tumblr
  • Click to share on X (Opens in new window) X
Like Loading...

Happy Birthday Lily!

14 Wednesday Nov 2012

Posted by jeannerondeau in Likes, Party!, Projects

≈ 3 Comments

Tags

abstract painting, birthday painting, Collage, happy birthday, mixed media, Monita Boesewetter, secret subway station, Semester at Sea

Happy Birthday to my beautiful, brave, friendly, inquisitive, funny, crazy friend Lily.  Thanks for the adventures- from traveling the world to chasing Monita around Manhattan to searching for secret subway tunnels with the double stroller…We are so happy you are in our lives! XOXO

Share this:

  • Click to share on Pinterest (Opens in new window) Pinterest
  • Click to share on Facebook (Opens in new window) Facebook
  • Click to share on LinkedIn (Opens in new window) LinkedIn
  • Click to share on Tumblr (Opens in new window) Tumblr
  • Click to share on X (Opens in new window) X
Like Loading...

DIY Knit Baby Bootie Gift

20 Thursday Sep 2012

Posted by jeannerondeau in Party!, Projects, Vintage

≈ 5 Comments

Tags

baby gift, Brooklyn General Store, cashmere yarn, DIY bootie, Envelope Mall, free knitting bootie pattern, knit baby bootie, Knit Mary Jane, More Last-Minute Knitted Gifts, vintage buttons

20120920-105203.jpg

20120920-105307.jpg

20120920-105327.jpg

20120920-105345.jpg

20120920-105405.jpg

20120920-105424.jpg

20120920-105443.jpg

These knitted Mary Jane booties are my favorite new baby gift. The pattern is so simple and can be found here (for free!). This pattern uses less than one skein of sport weight yarn, making it the perfect pattern for that half ball of precious cashmere. (Soon I’ll post the hats I made for Ada out of really expensive, but oh-so-amazing cashmere yarn. Chris nearly had a heart attack when he found out the price, but the hats were by far her favorites and are now being passed on to Josie). The most important part of this project is to find the perfect vintage buttons to finish up the Mary Janes. Ada loves to help search through the button jars with me for just the right pair. We wrapped the booties in some craft paper and tied them up with variegated yarn. More Last Minute Knitted Gifts has a beautiful section on wrapping with scrap yarns. The card by making a simple washi tape collage and trimming the edges with pinking shears. My favorite square vellum envelopes can be found here. Welcome little one!

Share this:

  • Click to share on Pinterest (Opens in new window) Pinterest
  • Click to share on Facebook (Opens in new window) Facebook
  • Click to share on LinkedIn (Opens in new window) LinkedIn
  • Click to share on Tumblr (Opens in new window) Tumblr
  • Click to share on X (Opens in new window) X
Like Loading...

DIY Egg Carton Scavenger Hunt

17 Monday Sep 2012

Posted by jeannerondeau in Party!, Projects

≈ Leave a comment

Tags

DIY scavenger hunt, egg carton game, kids party, park scavenger hunt, recycle egg carton, scavenger hunt, sidewalk chalk

We made this scavenger hunt game for Ada’s birthday this year. We did a larger hunt in Central Park early in the summer and it was a blast, so we decided to make a kid version. I took a few photos of clues while we were in the park the week before and printed them out at home. The level of difficulty can be adjusted per age group. To make your own egg carton scavenger hunt you will need:

*Egg Cartons (we cut ours in half for the little kids, but you can use a whole carton if you’d like more clues).

*Paint and Paintbrush

*Scissors

*Double Side Tape

*Camera

*Printer

*Chalk to match Paint colors

1. Take photos of the clues. (Small objects like leaves, acorns and flowers can be gathered and put into the egg carton. Larger things, such as statues can be marked by each team’s chalk).

2. Print photos to fit in the slots on the egg carton top.

3. Cut cartons in half with scissors if you choose.

4. Open each egg carton and paint a different color. Allow to dry before closing so they won’t stick shut.

5. Tape each clue photo into its slot.

6. Place corresponding colored chalk in each carton and close.

To play: give each team a carton and have them open to reveal clues at the same time. The first team to fill all of their slots, and mark any large items with their chalk wins!

Share this:

  • Click to share on Pinterest (Opens in new window) Pinterest
  • Click to share on Facebook (Opens in new window) Facebook
  • Click to share on LinkedIn (Opens in new window) LinkedIn
  • Click to share on Tumblr (Opens in new window) Tumblr
  • Click to share on X (Opens in new window) X
Like Loading...
← Older posts
Newer posts →

Visit Our Etsy Store

Etsy Store Instagram

No Instagram images were found.

Categories

  • Brooklyn
  • Inspiration
  • Likes
  • Organizing
  • Our Etsy Store
  • Party!
  • Projects
  • Shop
  • Uncategorized
  • Vintage

Recent Posts

  • Visit Us at the Brooklyn Flea!
  • Inspiration
  • Inspiration
  • Winter Whites
  • Ocean Grove, NJ

Archives

Enter your email address to follow this blog and receive notifications of new posts by email.

Join 179 other subscribers

Blogs I Read

  • A Beautiful Mess
  • Anthology Magazine
  • Apartment Therapy Family (Ohdeedoh)
  • Bleubird Vintage
  • Katie's Pencil Box
  • Le Dans La
  • Making it Lovely
  • Oh Happy Day!
  • Oh My Little Dears
  • Purl Bee
  • Soulemama
  • Sweet Paul Magazine
  • The Sweetest Occasion
  • You Are My Fave

Copyright

All content is © 2010-2018 Jeanne Rondeau. Please do not copy or take images or content from this site without my permission. Requests may be sent to: jeanne@jeannerondeau.com Thank you!

Meta

  • Create account
  • Log in
  • Entries feed
  • Comments feed
  • WordPress.com

Blog at WordPress.com.

Privacy & Cookies: This site uses cookies. By continuing to use this website, you agree to their use.
To find out more, including how to control cookies, see here: Cookie Policy
  • Subscribe Subscribed
    • Domesticspace
    • Join 179 other subscribers
    • Already have a WordPress.com account? Log in now.
    • Domesticspace
    • Subscribe Subscribed
    • Sign up
    • Log in
    • Report this content
    • View site in Reader
    • Manage subscriptions
    • Collapse this bar
 

Loading Comments...
 

    %d