Keeping House: Flowers

Tags

, , , , , , ,

Flowers1Flowers2
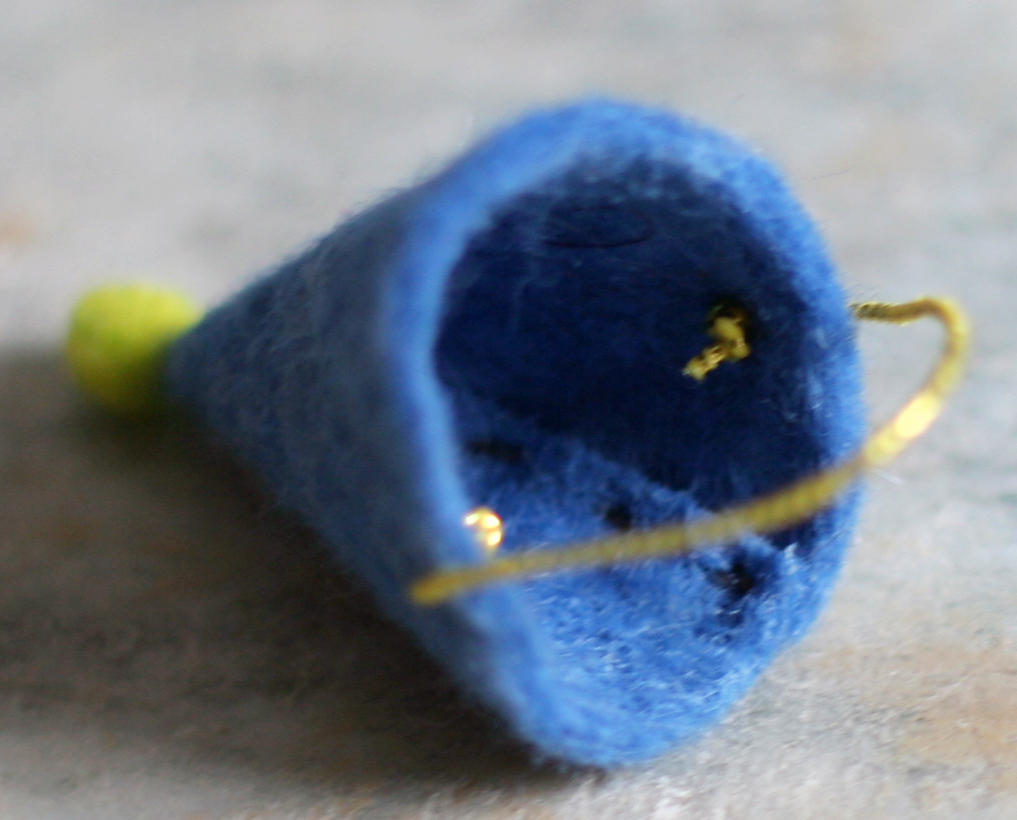
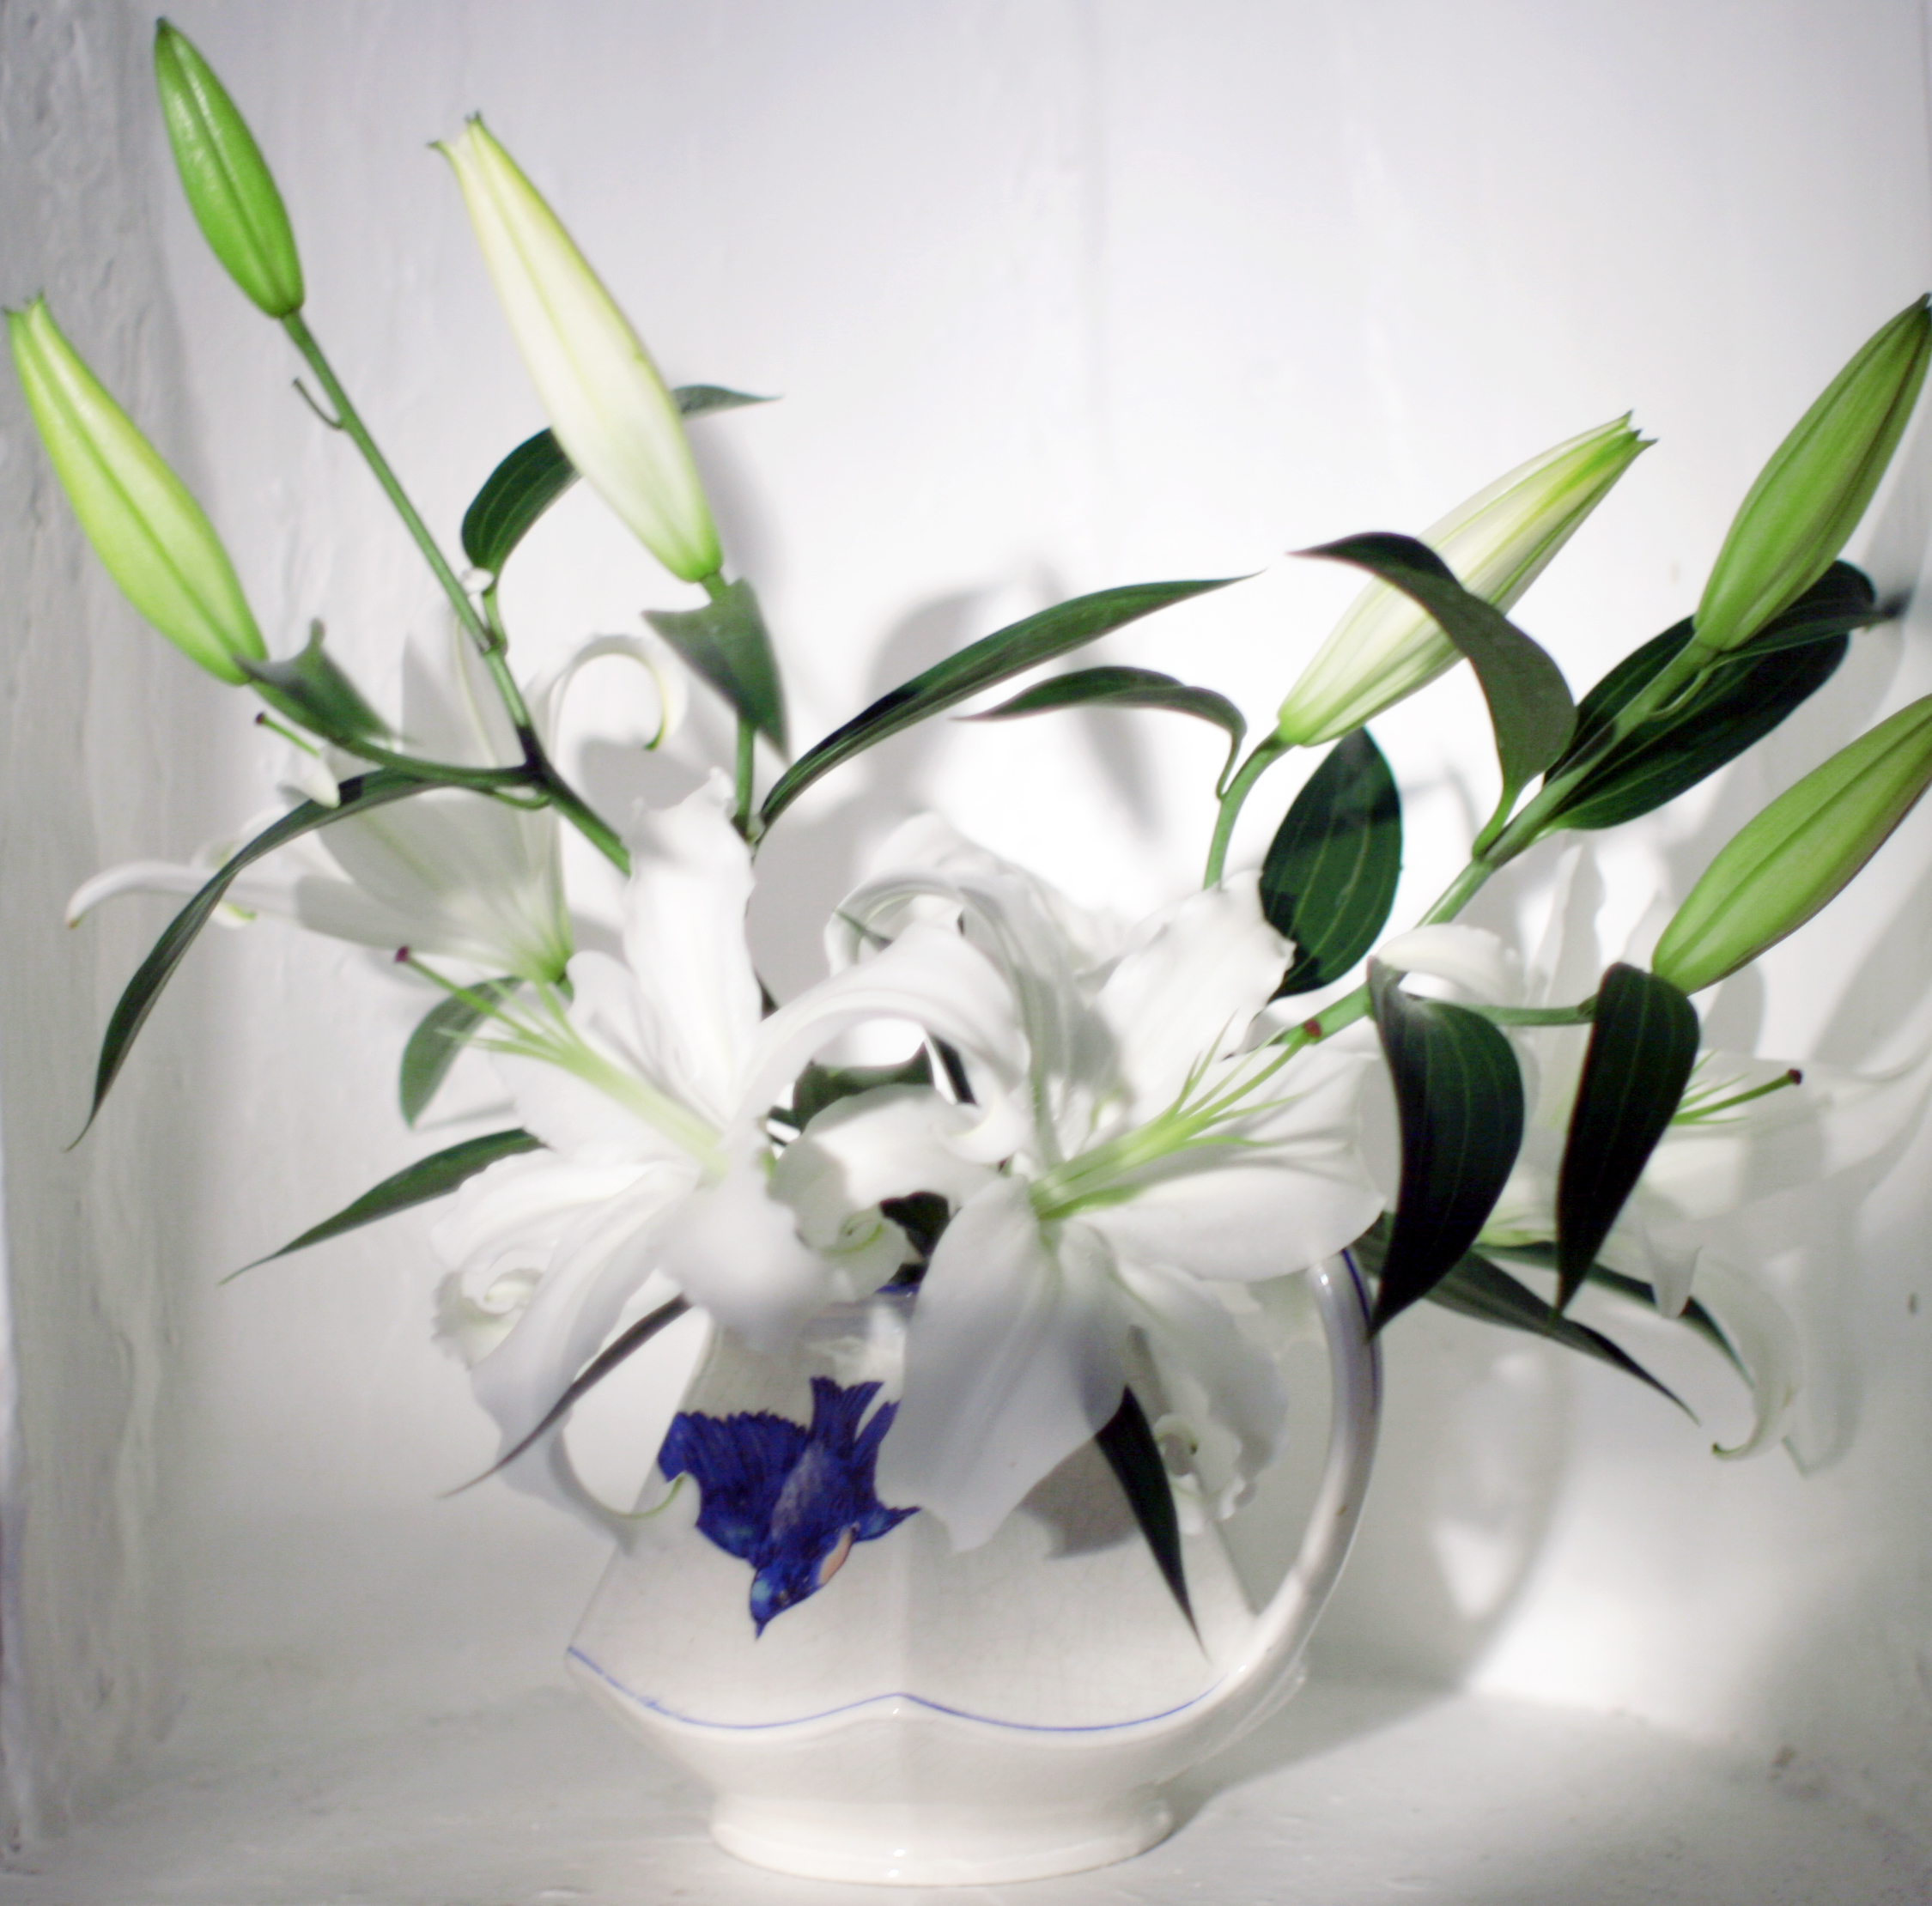
Fresh flowers make everything better, in my opinion.  These Casa Blanca lilies are one of my favorites.  Casa Blancas are fragrant and will last for more than a week.  We get ours for $5 a stem around here.  I like to buy lilies when their buds are closed and watch them open a little more each day.  Each Casa Blanca stem is so full of flowers that we often cut off singles to put in small vases for the bathrooms.  Our Bluebird of Happiness pitcher was an $8 flea market find.  To make your lilies last longer:

*Cut flower stems and place in water as soon as you get home.

*Be sure to add flower food to the water.  (Ask the florist for a couple of packets).

*Remove pollen anthers as soon as each bloom opens.  (If you miss picking one before it gets messy and fuzzy, use a pipe cleaner to dust pollen off of petals).

*Change water every four days.  Recut stems, add more flower food and be sure stems are submerged.

*Remove old blooms as they fade.

Enjoy!

Party! DIY Mini Felt Hats

Tags

, , , , , , , ,

PartyAnimials1Hat3Hat2HatWe have been planning to make the animals some felt party hats for a while.  Now that the holidays are over and the weather is gloomy the animals are ready for a party.  We loved these paper party hats from Oh Happy Day!  We wanted to make our hats a little more durable for play so our version uses felt, glue and elastic thread.  Ada made the flag banner in the background with color chips and a hole punch.  To make your own Mini Felt Party Hats you will need:

*Card Stock or Paper for Pattern

*Assorted Felt

*Mini Pom Poms

*Scissors

*Needle and Thread

*Glue

*Elastic Thread (We used 9mm)

1. Using the pattern above, cut out felt shapes to fit your animals.

2. Stitch two straight edges of felt together.

3. Stitch pom pom on top and tie thread.  (I pushed the needle up through the top of the hat and then through the pom pom).

4. Using the needle, bring elastic thread through two sides of hat and tie knots inside.  Adjust per animal as needed.

5. Squirt glue inside hat, spreading evenly along the inside.  Allow hat to dry on its side, being careful not to squish the hat out of shape.  The glue will cause the felt to stiffen as it dries, making it more durable.

6. When hats are dry, dress the animals and bake a cake!

Flea Market Finds: Vintage Flower Pots

Tags

, , , , , , , , ,

PotsThere is nothing better than a bit of green on a cloudy winter day.  Our paperwhites are shooting up stems and leaves and are almost ready to bloom.  We plant the bulbs in lined vintage pots from our collection and count the days until we see the tiny white flowers.  The pots get new plantings and go outside in warmer weather.  I like to group the planters by color and we use vintage plates and bowls as drip catchers.  McCoy and USA pots are some of my favorites.  The pots’ happy colors and subtle designs were originally made as inexpensive ways to brighten the home, (although prices for rare pieces can now be high).  Most of the pieces in our collection were made in the 1940s and 1950s and we usually find them at antique shops and flea markets for under $15.  Ebay and Etsy have a wide variety of vintage flower pots and planters.  To plant your own forced paperwhites you will need:

*Forced Paperwhite Bulbs (These have been put through a period of dormancy and tricked into thinking that the inside of your house is a warm spring day)

*Pots

*Plastic Liner (If your flower pot has drainage holes.  Two layers of Ziplock bags will also work)

*Pebbles, Rocks or Soil (We use small pebbles which we wash and reuse year after year.  The little stones are pretty and they help hold down the bulbs as they grow.  Pebbles are available at florist, pet or hardware stores)

*Plates, Saucers, Bowls to Fit Under Flower Pots

1. Line your flower pot as needed.  The bulbs need a constant source of water, so any drainage holes must be stopped up.

2. Fill pot about half way with pebbles.

3. Place bulbs into pot.  The shoots should face up, roots down.  We usually put 1-3 bulbs in each pot, depending on the size.

4. Fill pebbles in around bulbs.  Pebbles should reach the top of the rim and almost cover bulbs, leaving the shoots exposed.

5. Place saucer beneath and water your bulbs.  Water should be filled to about half-way up the bulb.  This will allow the roots a constant water source, but keep the shoots and bulb from rotting.

6. Place pots in a spot with indirect sunlight and watch them grow.  They will last longer away from window and bloom faster if they get more sunlight.  Ours are near a window and usually bloom in three weeks.

Enjoy!

Early Winter Spring Cleaning: Vinegar, Baking Soda and Baby Oil

Tags

, , , , , , , , ,

MirrorWe spent the better part of our weekend on spring cleaning. (Yes, I know it is only mid-January), but I’ve felt in a bit of a funk since the holidays ended and a major house cleaning always makes me feel better. The luxury of child-free time to myself to do a major overhaul feels like meditation to me. It clears my head. While Chris took the girls to the park I dug through junk drawers, washed windows, did some secret toy editing. I put away outgrown clothes and took down the bigger sizes. Aaahhh – so much better to wake up to a clean floor and a clear view out the window! Here are some of our essential and non-toxic cleaning supplies:

*White Vinegar – Nothing gets windows, mirrors, or picture glass more sparkling. Fill up a spray bottle with straight white vinegar (the cheaper the better). Spray, wipe with a soft cloth and voila! The smell disappears as soon as the vinegar evaporates, so you don’t need to worry about your space smelling like a pickle factory. Old clean cloth diapers are my favorite cloths for window washing.

*Baking Soda – Make a paste with water, or mix with your favorite liquid cleaner, rub on bathtubs, tiles and chrome faucets and rinse with water. The grit removes soap scum and bathtub rings and leaves tile shiny. My favorite liquid multi-purpose cleaner is Charlie’s Soap. It “Cleans Everything From False Teeth to Diesel Engines” and they aren’t kidding.

*Baby Oil – Unscented mineral oil works magic on our vintage wood furniture. Squirt a bit on a rag, wipe over the wood and let it sit for ten minutes. Wipe off excess oil and polish with a soft cloth. The oil helps hide the scratches left by little hands and toys and evens out any discoloration in the wood. Be sure to test in an inconspicuous spot if you are worried about darkening.

*Miele Vaccuum – I am in love with our vacuum. Chris and I both had our own Miele when we moved in together and neither of us would give up our model so now we technically have two. Mieles are quiet, super-powerful, easy to use and not ugly (an important count in my book). I have never used a better vacuum in my life and it is worth the price. I promise.

*These are our everyday favorite cleaning for everyday messes.

Happy Day!

Flea Market Finds: Suitcase Side Table

Tags

, , , , , , , ,

SuitcaseWe are always on the hunt for the perfect vintage furniture for the house.  The bedroom search list includes bedside tables, a lamp for Ada’s room, wall sconces…But for now we’ve employed this little vintage suitcase to hold the lamp and water glasses.  It is just the right height and can be quickly converted back to its original self when Ada needs a suitcase to carry to Nan’s.  Vintage suitcases are abundant at flea markets.  Etsy has some cute choices here.  Be sure to check inside linings if you plan to use the case for storage.  A stack of vintage child-size suitcases also makes a good storage/table option.

Clean Up Everybody!

Tags

, , , , , , , , ,

Brooms1Brooms2Broom3These are our favorite cleaning tools.  I had the large sets first and found matching smaller brooms when Ada was old enough to use them.  Josie loves to help with the sweeping and the girls often turn the large brooms into horses and run around the kitchen while I cook.  I especially love that little horsehair brush and the woven detail along the handle of the large broom.  Cleaning is less of a chore if you have pretty tools!

We got our brooms here:

*Large and Small Straw Brooms are from Moon River Chattel in Williamsburg, Brooklyn. Moon River has an amazing selection of home goods, both new and vintage.

*We got our Small Dustpan and Brush from the children’s store Pomme in Dumbo, Brooklyn but they seem not to carry them any longer.  You can find a similar the same German-made Gluckskafer set here for an amazing $7 each.

*The Large Dustpan and Horsehair Brush set is from Kiosk , one of my favorite places in Manhattan.  I coveted this Swedish set for a long time before purchasing, but it is worth every penny.

Inspiration

Tags

, , , , , , , , ,

Instagram23

Instagrams from the week:

*Parasols from Pearl River Mart

*The Mural at One Girl Cookies in Dumbo (So cute and so yummy)

* Ada’s Bouquet

* Glitter Painting

* Paper Whites (Finally) Planted, on My New Favorite Ikea Tray)

* New Plaid Dress from The Thrift Shop (for Ada to grow into)

**Have a Happy Weekend!

DIY Glitter Thank-you Postcards

Tags

, , , , , , ,

Postcards1

GlitterPostcards2

I originally planned to make our thank-you cards by cutting apart holiday cards once the holidays were over.  Ada decided she wanted to keep the cards forever in her “special papers” box and refused to let the scissors anywhere near.  Luckily, she got glitter for Christmas.  So we cut some card stock into postcard sizes, rounded the edges with this corner-cutting rounder and let the girls go crazy with glue, glitter and crayons.  I love this set of glitter’s rainbow colors and variety of shapes.  (Thank you Aunt Anna!)  The glitter tubes are just small enough for little hands to grasp, and the shakers on top do a good job of controlling the glitter storm that usually erupts when a four-year-old gets to do her own shaking.  To make your own postcards you will need:

*Card Stock

*Scissors

*Corner Punch

*Crayons

*Craft Glue

*Glitter

1. Trim card stock to postcard size (The standard is 4″ x 6″).

2. Using the punch, round corners.

3. Let the kids color, glue and glitter.  (This works best if you color first.  I liked the cards that combined Josie’s coloring with Ada’s glittering).

4. Allow cards to dry, write your message and addresses on back.

5. Pop them in the mail.  Thank-yous done.

Flea Market Find: Pegboard Towel Rack

Tags

, , , , , , , , ,

Rack

I found this rack for $8 at an antique shop in Northwood, NH.  We weren’t sure what it was originally used for, but the color and price were right.  (It is genetically impossible for me to pass up a bargain with potential).  Our upstairs bathroom has a funky layout with no space for hanging towels, so Chris added some hooks and hung the pegboard on the wall above the tub.  Some days we have to hold ourselves back from digging under the old floors in this house and knocking down walls with our hammers.  (What the heck is under the tile that completely encases the clawfoot tub upstairs?)  Other days we can make peace with the slow renovation of an old house, one dependent on time and money we don’t always have right this minute.  Some days we can be happy with an $8 towel rack, and move on with life for the time being.

Happiest New Year!

Tags

, , , , , , , ,

SwingAnnHamiltonCarouselHappy New Year’s Eve!  I hope you are spending the evening in your favorite way – be that at a party or in a quiet place away from the crowds.  We are off to spend the night with friends in a few hours.  Ada is planning her outfit and I am feeling just a little thankful to not have to clean up tomorrow morning.  Our New Year’s Eve party last year was a fun way to celebrate our first year in this new house.

We are celebrating our one year anniversary here at Domestic Space!  Thank you to all of you who follow along with our lives and projects.  We love your enthusiasm and ideas and comments.  We are excited to make the next year in this space even better and we’ve have been working on lots of new ideas.  We hope you enjoy!

We spent yesterday with friends doing some things that make me love living here in New York.  If you are in the area, be sure to visit Ann Hamilton’s installation at the Park Avenue Armory.  The Armory is amazing on its own, and the addition of huge swings and billowing sheets of silk has made the space magical.  We also made our first visit to Jane’s Carousel since it survived Hurricane Sandy.  (We discovered that our friend Jen used to ride the same horses as a child when they were housed at their original location in Ohio).  We were thrilled to find the horses in almost perfect shape above ground.  (The organ is being repaired and the live music has been replaced by cd’s until March).  The carousel’s protective box is warm and sunny on a winter day.

Cheers to 2013!