Bribery
04 Monday Nov 2013
Posted Projects
in04 Monday Nov 2013
Posted Projects
in31 Thursday Oct 2013
Posted Projects
inTags
anatomy for kids, DIY Halloween, DIY skeleton decoration, drawing for kids, Halloween, homemade Halloween, how to draw a skeleton, life with kids, skeleton decoration, skeleton drawing
We had a fun walk to school this morning spotting all of the costumes around the neighborhood. It is warm here today, and we are hoping that the rain stops in time for our favorite Halloween tradition this evening. Ada finished up one last decoration, which she has named Sam. She looked at a picture of a human skeleton and copied each part on to a piece of paper. I love the toes! We used paper fasteners to attach the bones together and hung him on the door. This project is great for learning about anatomy, and not just for Halloween. To make your own Paper Skeleton you will need:
*Heavy Weight Paper
*Pencil
*Scissors
*Paper Fasteners
*Hole Punch
*Picture of a Skeleton (We Googled a few images)
1. Have child look at the skeleton picture and draw their interpretation of each bone onto a separate piece of paper. (The results are so much quirky and better if you let them do it themselves).
2. Cut out the bones, and keep them in order as you go.
3. Punch holes at area where each group of bones connect. Push paper fasteners through holes and press open on the back.
4. Hang up your spooky skeleton!
28 Monday Oct 2013
Posted Projects
inTags
DIY Fairy costume, diy fairy wings, DIY tulle tutu, fairy costume, Halloween for kids, homemade Halloween, no-sew tutu, Pinterest, tulle costume, vintage fairy costume
Here are our finished Fairy costumes for Halloween. The wing construction how-to is posted here. Initially I was going to sew costumes out of tulle, like some of the vintage ballet costumes on our Pinterest board. But after some experimenting I realized altering some of our existing dress-up clothes would work better. These two dresses are old shirts. I altered and added shorter straps to the green dress and made slits up the sides of the gold dress to allow a tulle skirt to fit underneath. We used this tutorial from wikiHow to make a simple no-sew tulle skirt similar to this one:
The skirts are super easy to make and only use a ribbon and strips of tulle. I ended up making a second tutu to match the wings. Both will end up in the dress-up clothes after Halloween. I wrapped strips of tulle around a headband for Ada’s hair. I wondered how sturdy the wings would be, but our double layer of pantyhose survived nicely through the first of our Halloween celebration this weekend.
We managed to finish the costumes with a whole week to spare, and Josie seems to have finally stopped changing her mind about what she wants to be for Halloween.
Trick or Treat!
28 Monday Oct 2013
Posted Projects
inTags
DIY Butterfly costume, DIY costume, DIY Fairy costume, DIY kids costume, diy play wings, homemade Halloween, how to make butterfly wings, Kid Made Modern, life with kids, pantyhose butterfly wings
The big girls decided to be fairies for Halloween this year. They were inspired by some books with beautiful vintage drawings of flower fairies that Nan gave Ada for her birthday. We used the book illustrations and gathered some more images on Pinterest for inspiration. The girls had fun finding pictures of vintage ballet costumes and old photos of girls in homemade fairy costumes. I love the muted colors and the magical effects that can be achieved with humble materials. The wings are also fun for the dress-up box once Halloween is over. Here is how to make Butterfly / Fairy Wings like ours:
*14 Gauge Galvanized Steel Wire
*Wire Cutters
*Large Full Size or Knee-high Pantyhose in Desired Color
*Duct Tape
*Scissors
*Felt
*Needle and Thread
*Chalk
*Cardboard Scraps (Optional)
*Acrylic Paint (We used this Kid Made Modern Paint)
*Craft Glue
*Glitter (Optional)
*Elastic Banding for Straps
1. Top Wings: The upper wings will be larger than the bottom set. Unspool wire and cut to desired length with wire cutters. (We used between 18 and 24 inches per single wing. If you make them too large the pantyhose won’t fit over the wing).
2. Carefully twist wire ends together and tape with duct tape. Securely wrap any sharp ends with the tape.
3. Bend wire loop into wing shape. It helps to have a picture of some wings in front of you to help get the shapes right. Repeat for the second top wing, measuring and bending into the same shape.
4. Repeat steps 1-3 for the smaller set of bottom wings.
5. Tape the set of top wings together as shown.
6. Tape the set of bottom wings together.
7. Cover the wings with pantyhose. (We used two layers for more durability).
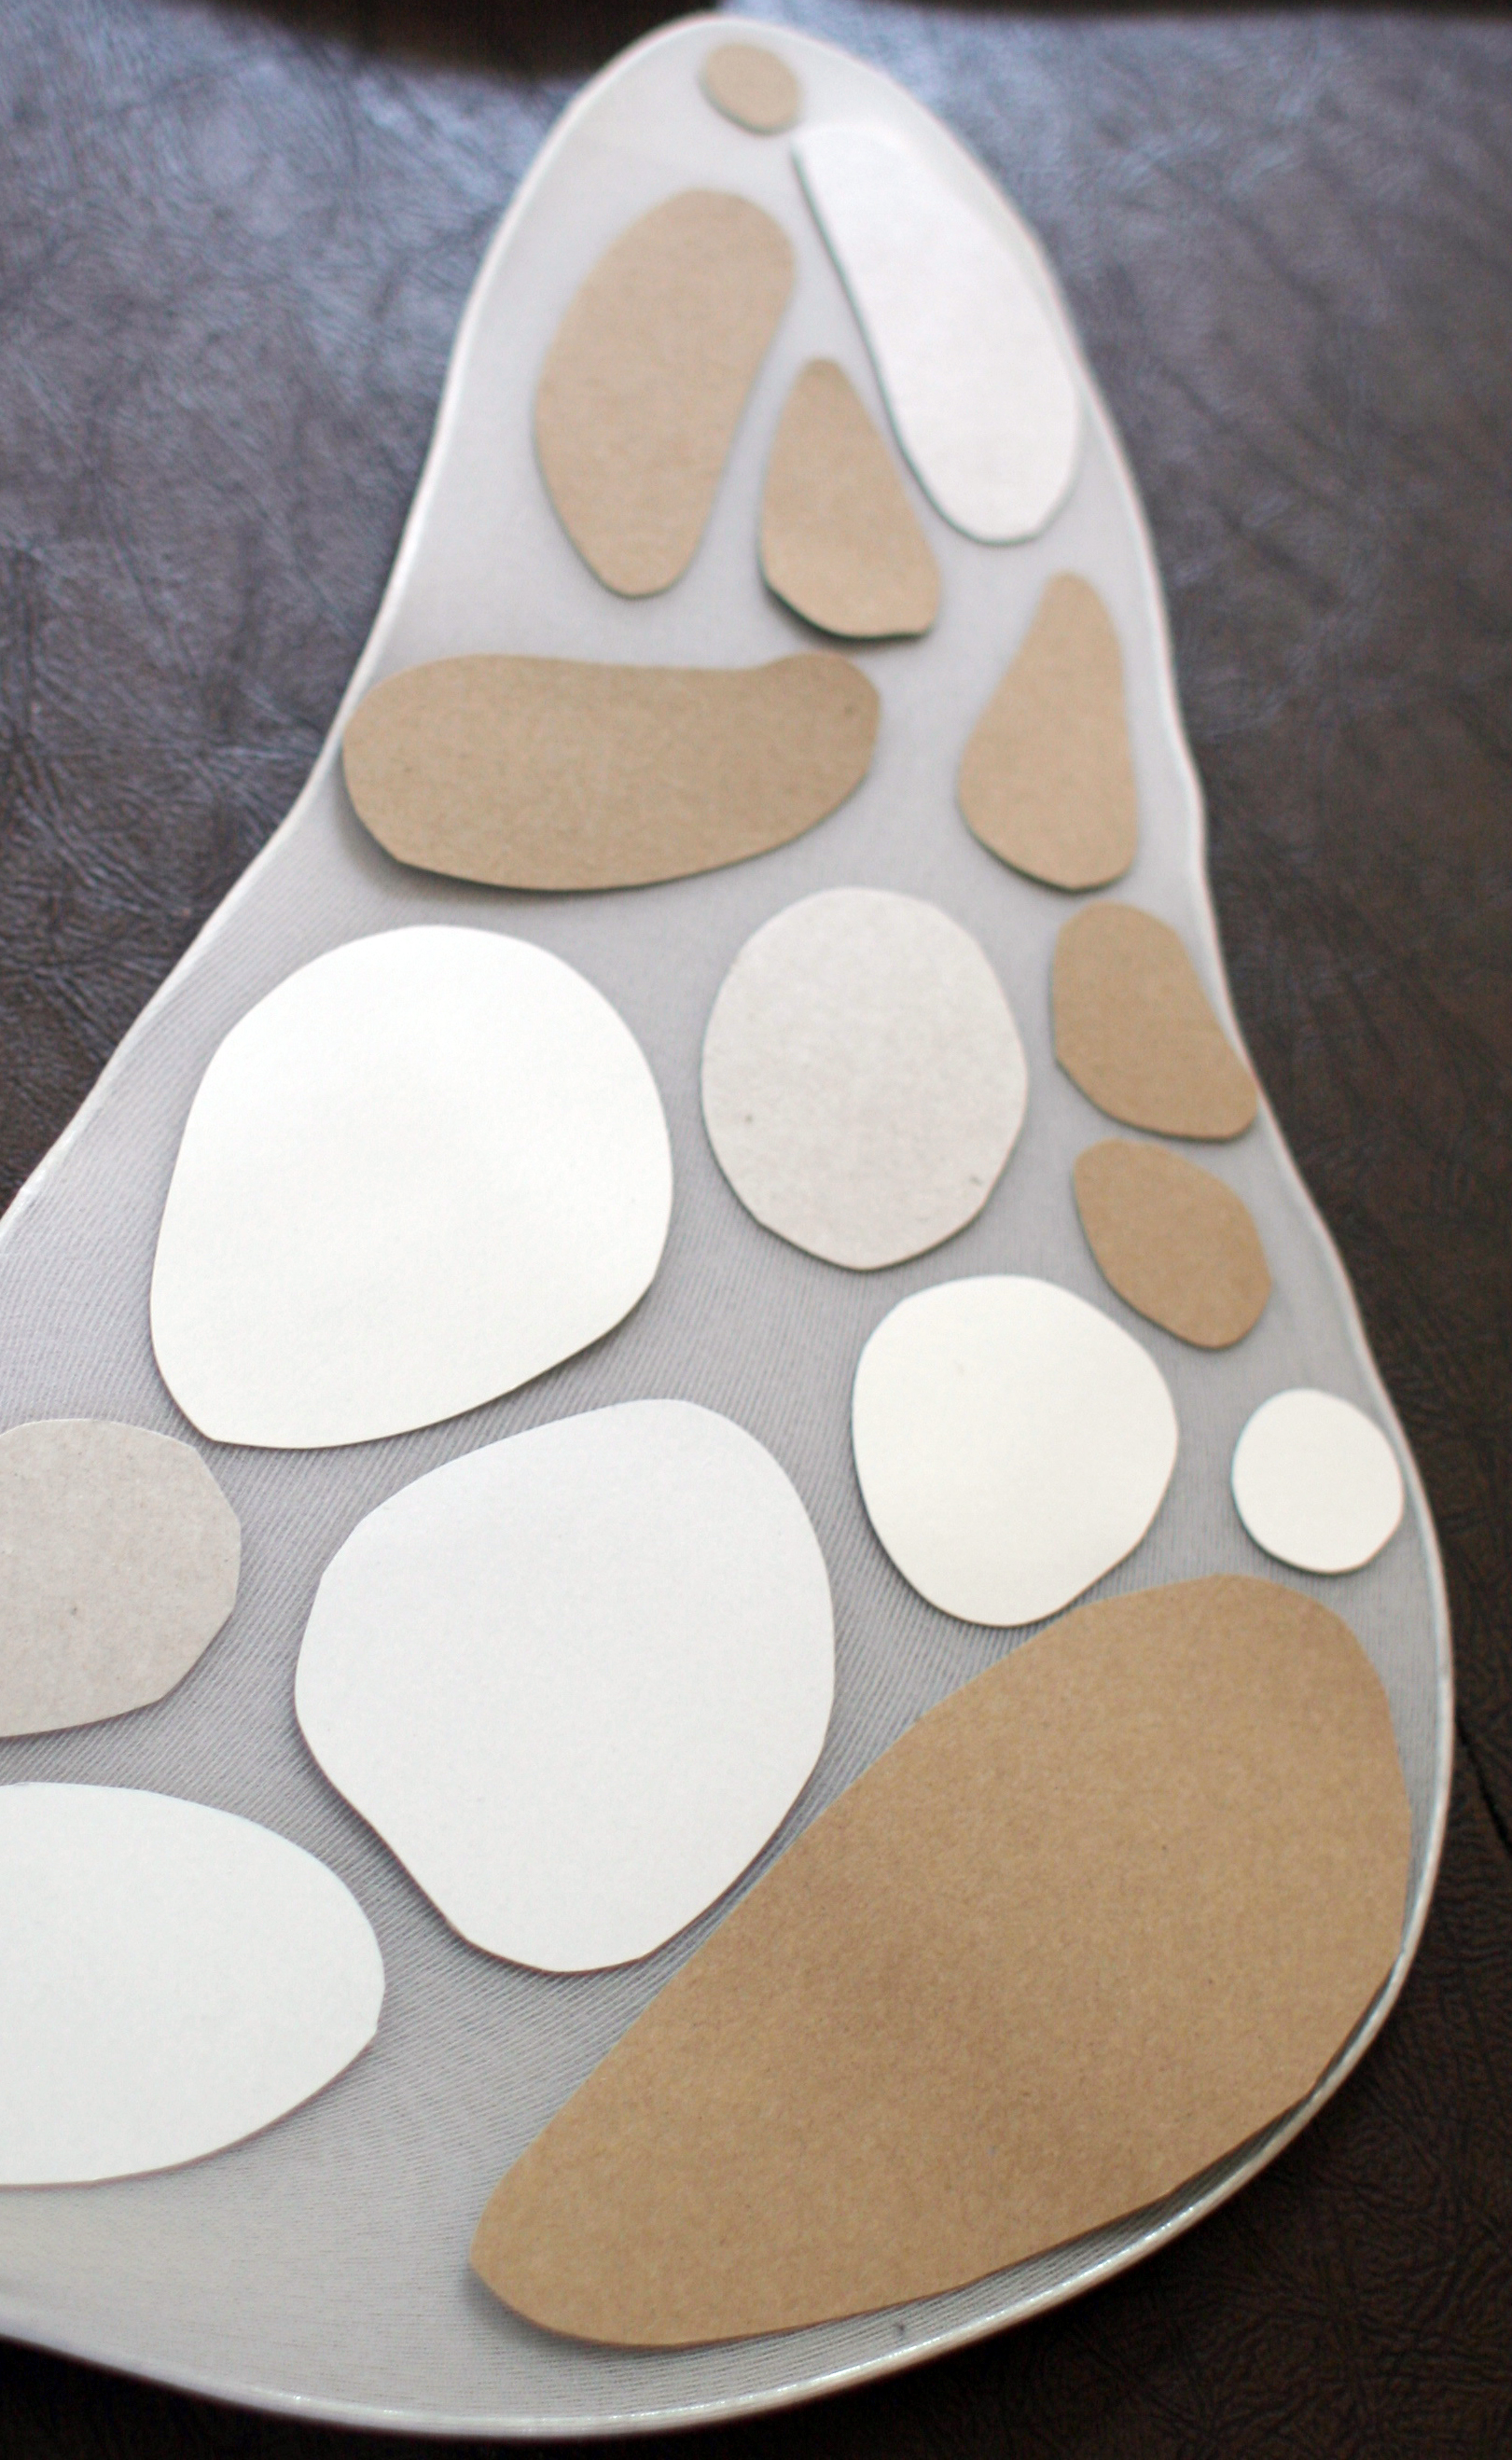
8. We used cardboard stencils to create decorations on the wings. You can also draw wing designs by hand, but the stencils help make them symmetrical. Spaces between shapes will become the veins on wings once paint is added.
9. Cut out cardboard shapes, (we used scraps from the pantyhose packaging). Lay pieces on one wing, trace with chalk and flip cardboard over to create a mirror image on second wing. Chalk can be brushed off or painted over later.
10. Repeat tracing to cover each wing.
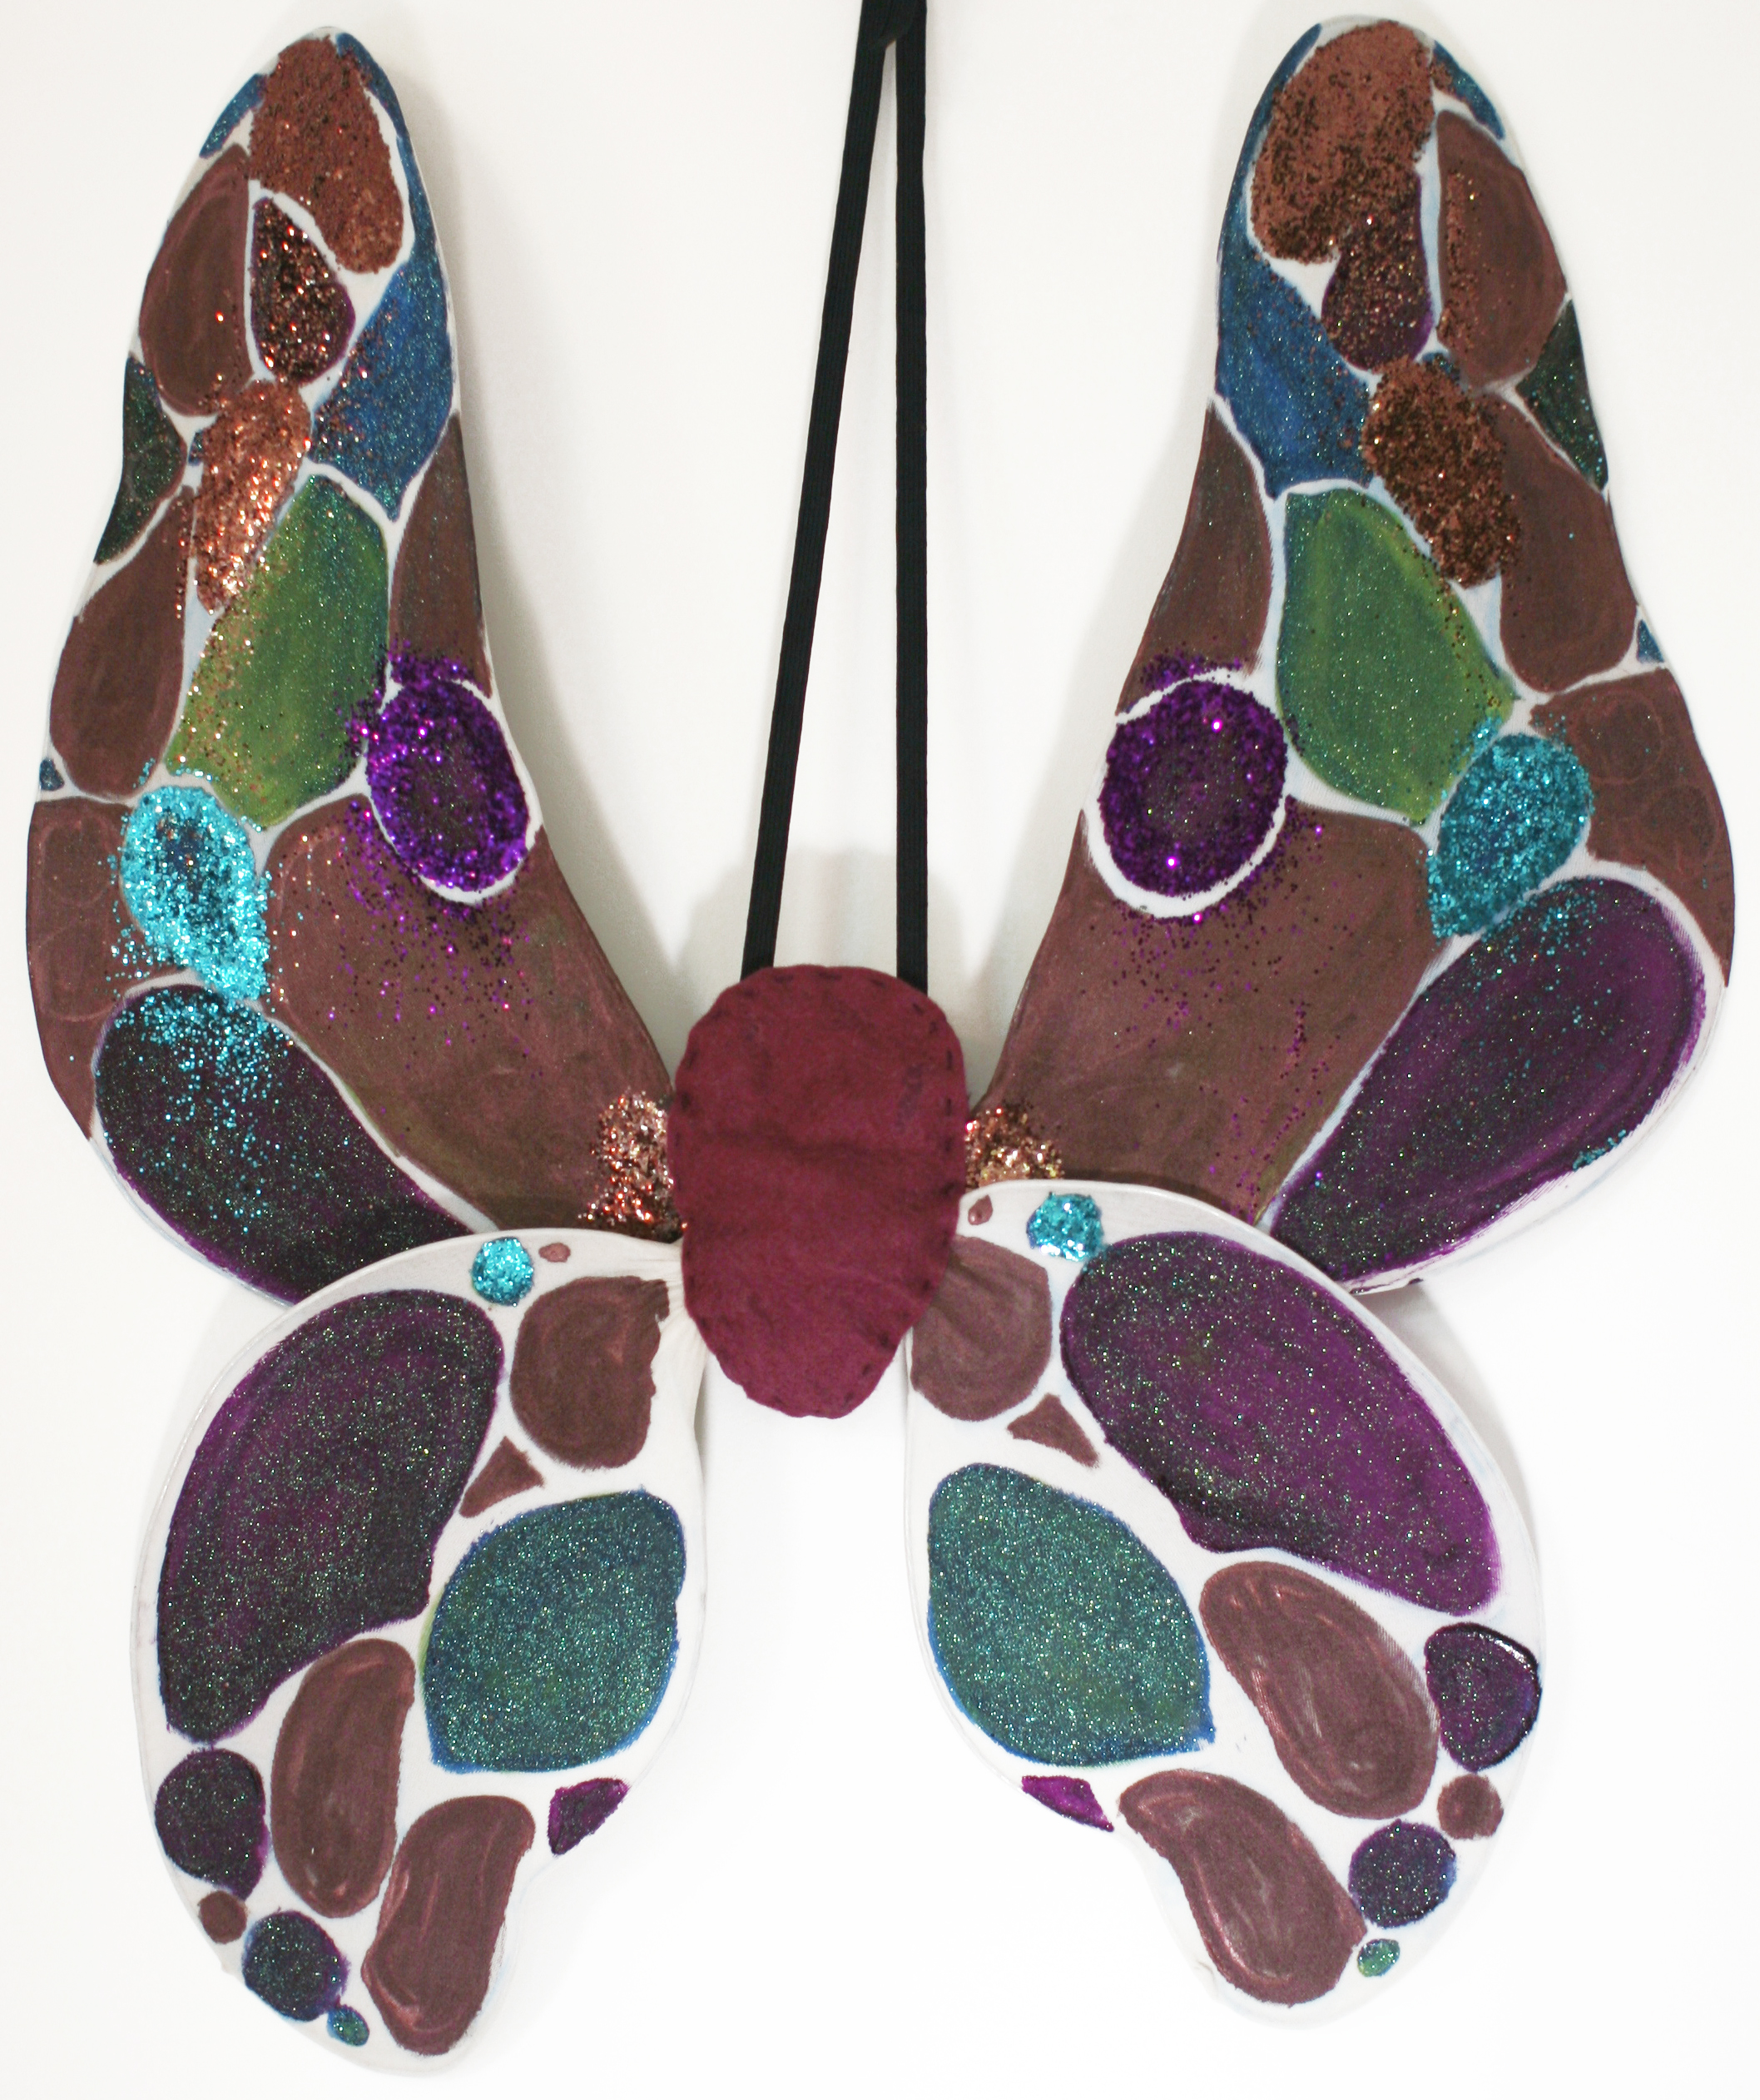
11. Fill in traced shapes with paint. Add glue and glitter as you like. This part is fun! Our black wings had a Velvet Elvis sort of feeling and the acrylic paints create a dusty wing-like finish on top of the pantyhose.
12. Once paint and glue are dry, use the duct tape to position and tape top and bottom wing sections securely together. Tie any loose ends of pantyhose together over the tape.
13. Fold felt in half and cut out two identical pieces to cover center of wings.
14. Measure elastic banding to fit. Straps will go around your back and over shoulders to hold wings securely.
15. Using scissors, make four slits in one felt layer. This will be the layer that lays against your back.
16. Loop elastic around the wings and back through slits in the felt and stitch in place as shown. Loose elastic will come out on the unpainted side of the wings, which will lay across your back.
17. Squirt glue over the first felt layer, position second layer on top and stitch the two together.
18. Allow glue to dry.
19. Try wings on and adjust the elastics to fit. Tie loose ends of elastic together to secure.
20. Go for a fly!
22 Tuesday Oct 2013
Tags
DIY baby sweater, easy knit sweater pattern, Knitbot, knitting for baby, KnitWit, Portland Maine, Quince & Co Lark, simple cardigan knit pattern, Yoked Cardigan Sweater pattern
I finally finished this yoked cardigan for Dare. I bought the Knitbot pattern and Quince & Co Lark Wool (in Frost) at Knitwit in Portland Maine earlier this year. I started working on the little sweater on vacation in August…and finished in October. The pattern is super quick to work up, but babies and life have a habit of using up many knitting hours. The Yoked Cardigan is just in time for a chill in the air, and Dare’s increasingly round belly. Two sweaters down, and one more for me to finish the three I’d planned to complete by her predicted August birth.
17 Thursday Oct 2013
Tags
autumn with kids, Brooklyn with kids, chartreuse, fall, fall harvest, life with kids, Osage Orange
It is my kids’ favorite time of year to visit the park. The leaves are changing colors, the chestnut trees are dropping their bounty and there are plenty of squirrels to chase. But our favorite treasures to hunt in early autumn are osage oranges. These strange fruits are inedible, but have a sweet smell and their color is other-worldly. We have started our yearly osage collection on the dining room table. Their citrus fragrance fills up the room and their bright florescent color just happens to be in vogue this year.
15 Tuesday Oct 2013
Posted Projects
inTags
art with kids, collage for kids, color, color theory, DIY Color Collage, fall leaf rubbings, learning colors kids, life with kids, paint chip projects, teaching child colors
We started making these collages with Ada when she was first learning her colors. I was having trouble explaining subtle differences in shade and tone to a two-year-old. Why is green so many different colors? Should I really make a toddler try to say chartreuse? I decided to have her help define what falls under a color’s given name. We laid out a pile of collage scraps, Ada picked out pieces for one color at a time and then glued them to a white square. She has continued making the collages and I love the little compilations that have come out of the project. (I don’t think I would have thought to add the sticky side of masking tape to the “tan” collage, or to glue down metal chain to the “yellow”). The squares make a pretty sort of quilt when hung up together. They are even fun to make on your own if you don’t have kids. To make your own Color Collage you will need:
*White Card Stock (Ours were 5″ X 5″ squares)
*Craft Glue
*Collage Materials (fabric, string, paper, glitter, buttons, etc).
*Crayons, Markers, Colored Pencils, etc.
1. Pick a color for the first collage.
2. Find collage scraps that match the color.
3. Glue down scraps to card stock.
4. Color with markers or crayons.
5. Repeat with other colors.
6. Allow glue to dry. Hang up collages on their own, or group them together on a wall.
Here are some other color related posts:
10 Thursday Oct 2013
Tags
DIY Ballerina Costume, DIY Halloween, DIY jellyfish costume, DIY kids Halloween Costumes, DIY Knit Bear Ears, DIY mermaid costume, free knit pattern Halloween costume, Goldilocks and the Three Bears, homemade Halloween, life with kids
Halloween is serious business around here. The girls have been dreaming up, planning and changing their minds about costumes for months now. I have been spending a crazy amount of time thinking about tulle and glitter. This real-time blog tends to post our costumes later in the month because we spend most of October in costume construction mode. We have been using Pinterest boards to amass images and ideas this year. Ada and I are pretty addicted to Pinterest and the girls want to look over the boards whenever they get a turn on the computer. Here is our Domestic Space Halloween Board. Any guesses about this year’s costumes?
Here are some DIY costume ideas from prior Halloweens:
*Knitted Bear Ears (We made three of these and dressed Ada up as Goldilocks)
I promise we will post this years costumes as soon as we get them finished. Hooray for Halloween!
02 Wednesday Oct 2013
Tags
4by6 postcard, B Design Studio, Bob Lapointe, diy baby announcement, diy birth announcement, fruit and veggie birth announcement, library card birth announce, new baby, welcoming baby
If you have been around a pregnancy lately you probably know that many baby sites compare fetal development to various fruits and vegetables. Your baby is now the size of a banana! We always found the comparisons amusing, if not a bit strange and decided to use the idea for Dare’s birth announcement. We took photos of various produce and arranged them by size. The fruit and veggies are on one side and Dare and her stats are on the other. My dear friend Bob at B Design did the layout and we ordered postcards from 4by6. Dare is two months old already(!) and we are finally getting these into the mail. Welcome (again) little one!
Here is the announcement we did for Dare’s big sister Josie.
04 Wednesday Sep 2013
Tags
ABC soap, back to school, birthday number soap, counting with kids, DIY number soap, Etsy number soap, learning numbers, number soap for kids, number soaps
My sister got us a bag of these adorable little number soaps as a gift. They are just the right size for little hands and great for helping kids work on their number recognition. I’d been putting the soaps out out in random order, and realized that the appropriate number would be cute for Ada’s recent birthday celebration. We secretly planted the number five in the downstairs bathroom and Ada dragged her friends in there to wash with her birthday soap. You can find your own number soaps here, or buy a mold and make your own. Just in time for back-to-school!