• Our Etsy Store
  • Vintage
  • Projects
  • Organizing
  • Likes
  • About
  • jeannerondeau.com

Domesticspace

~ Inside. kids, art, home, vintage.

Domesticspace

Category Archives: Uncategorized

DIY Popsicle Party Invitations

08 Monday Jul 2013

Posted by jeannerondeau in Party!, Projects, Uncategorized

≈ 1 Comment

Tags

birthday party for kids, crafts for kids, DIY party invitation, DIY popsicle cards, DIY popsicle invitation, kids summer party, make your own popsicles, Popsicle birthday party, Popsicle card, summer birthday party

Popsicles1
Popsicles1B
Popsicles2
Popsicle3
Popsicles4

We came up with these invites for Ada’s birthday this year.  She requested popsicles for the guests to eat at the party, so we wanted to make matching invitations.  (I found the cutest popsicle sticks on Etsy and can’t wait for them to arrive so we can start popsicle production!)  We made two versions of the invitations – one using tissue paper and one using washi tape.  Both are simple to make and Ada helped put on the stripes.  To make your own Popsicle Party Invitations you will need:

*Card Stock

*Scissors

*Pencil

*Washi Tape in Various Colors

*Tissue Paper in Various Colors

*Double-Stick Tape

*Craft Glue

*Small Popsicle Sticks

*Vellum Envelopes

1. Fold a piece of card stock in half.

2. Draw half a popsicle shape along the fold.

3. Cut out and unfold to make a whole, symmetrical popsicle pattern.

4. Trace pattern onto card stock and cut out.  You will need two popsicle shapes for each card.

5a. For tissue paper version: put double-stick on to one side of card stock.

6a. Cut out stripes of tissue in various colors and stick onto double tape.

7a. Trim edges of overhanging tissue and tape with scissors.

5b. For washi tape version: Stick stripes of tape onto card stock popsicle.

6b. Trim edges of overhanging tape with scissors.

8. Place popsicle stick between decorated popsicle shape and blank popsicle shape.

9. Glue stick to card stock and two halves of card stock together.

10. Place popsicle cards under some books to press while they dry.

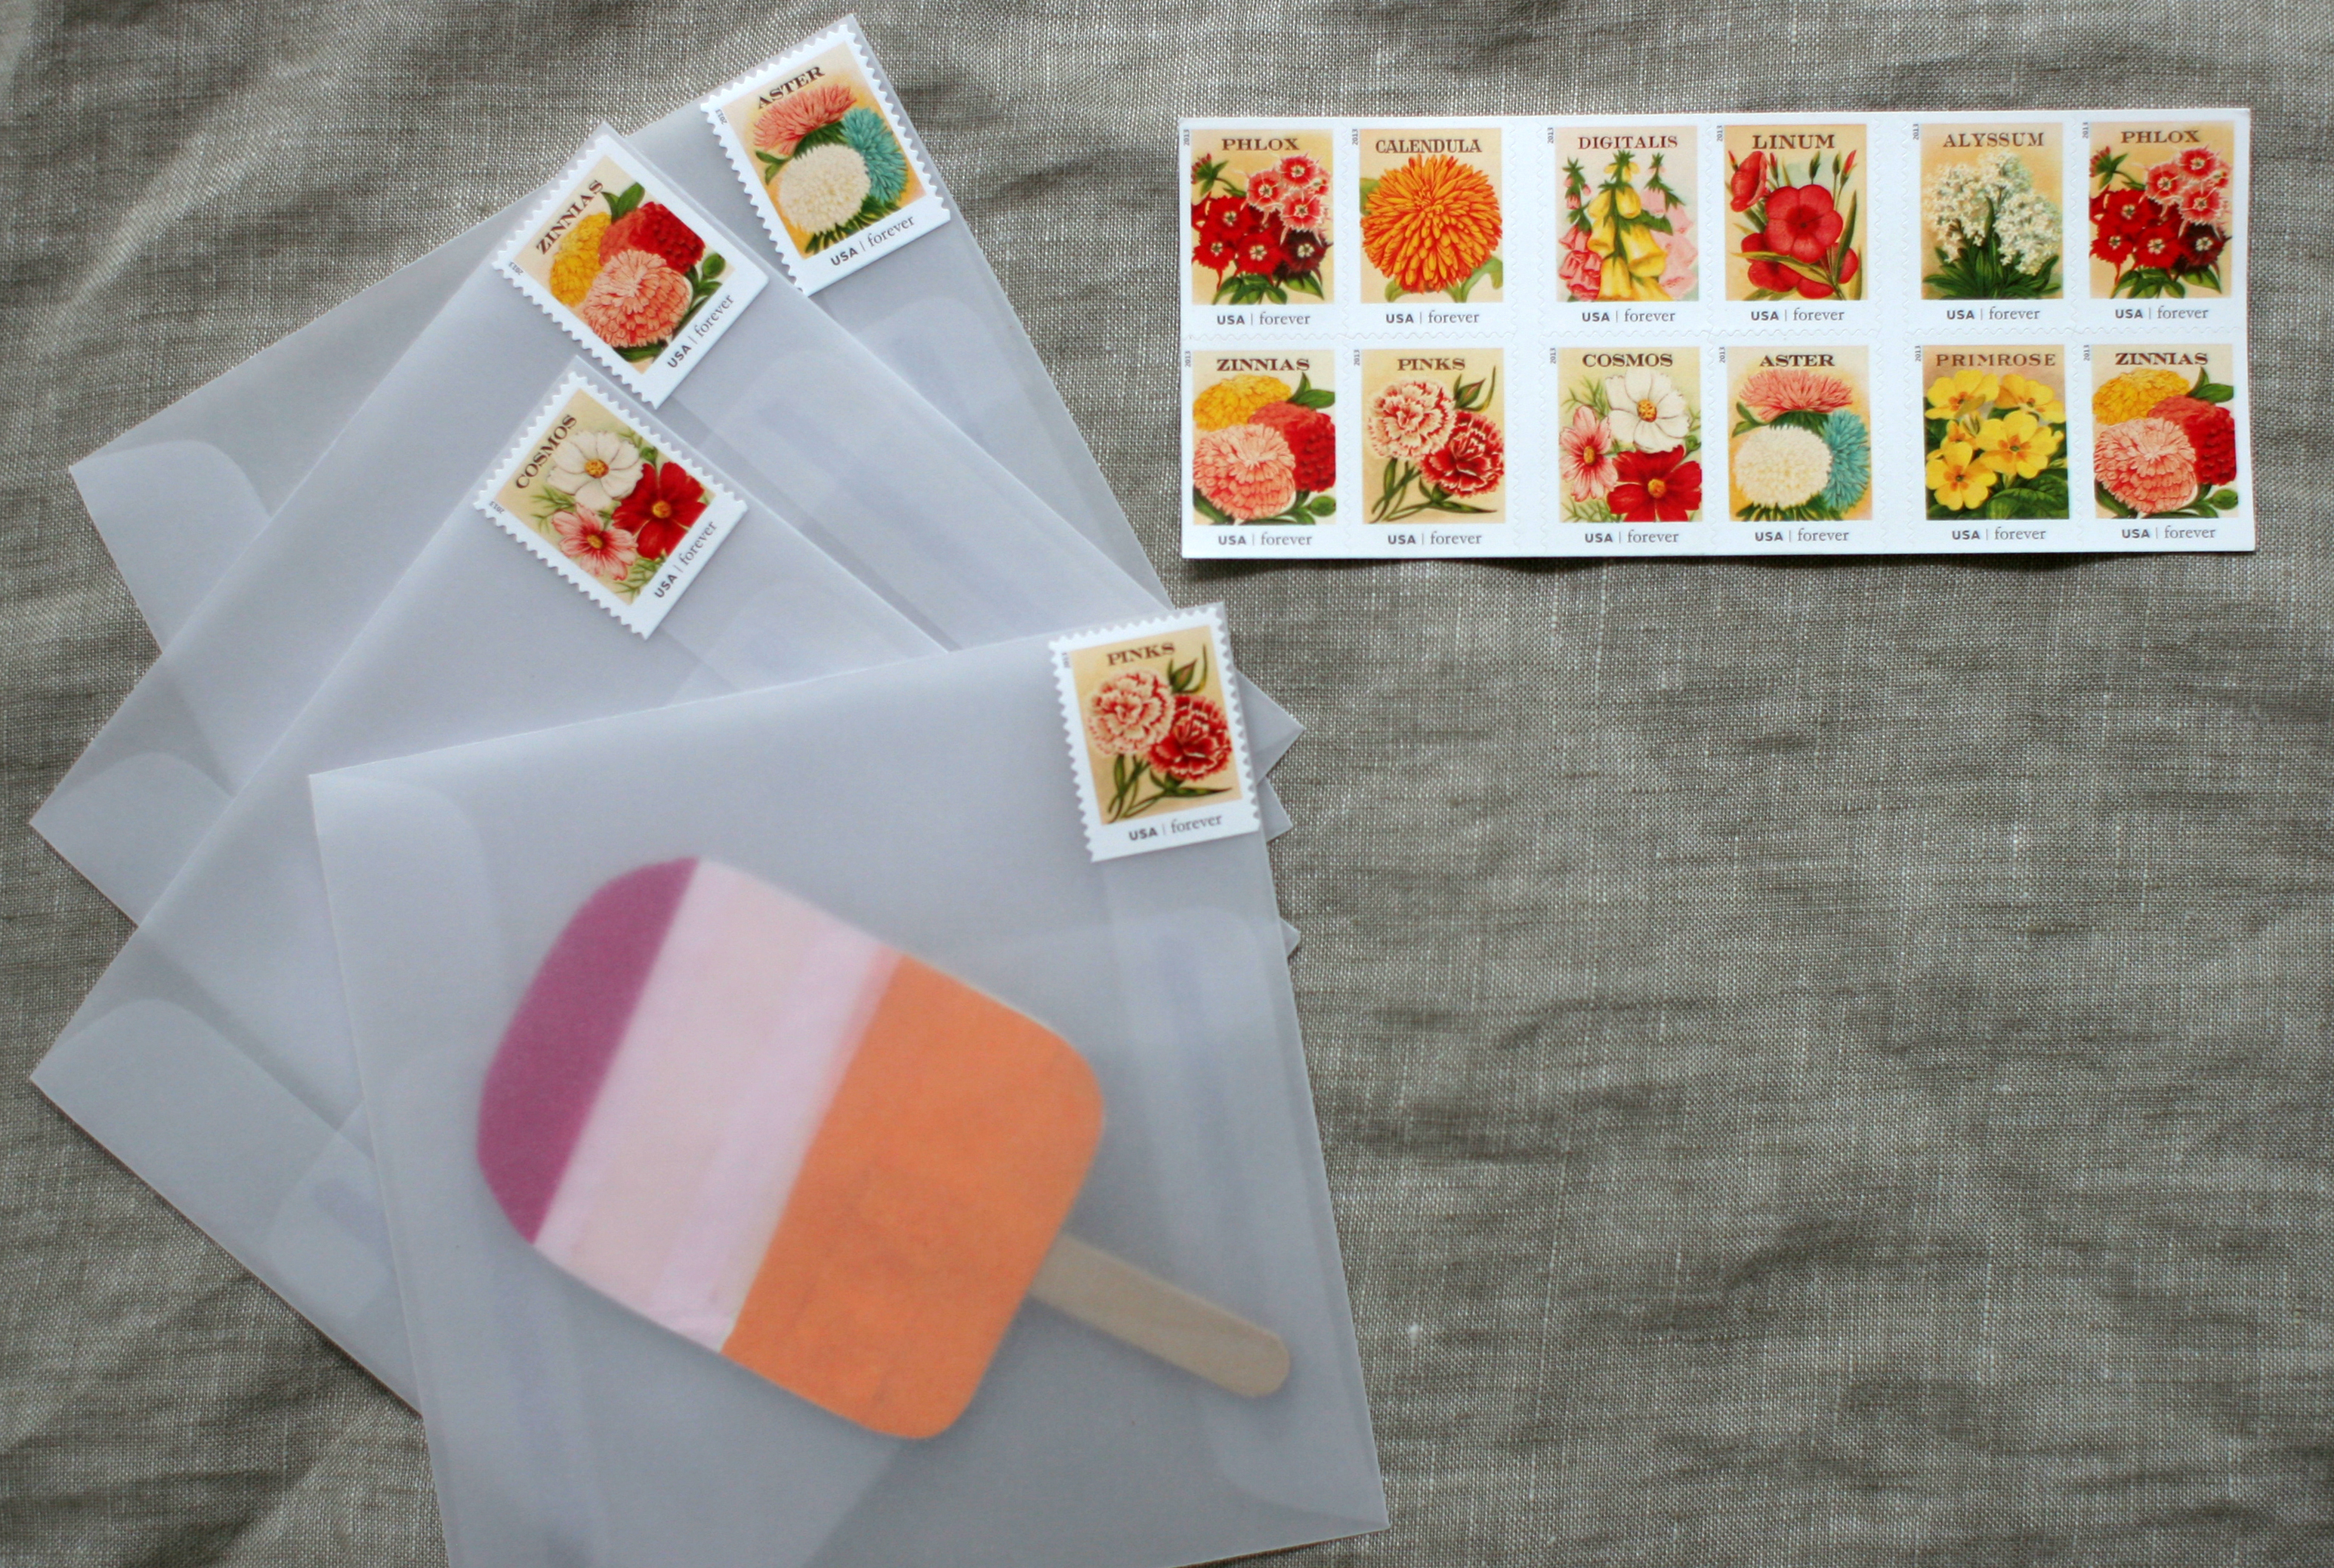
11. Print out party details and affix with washi tape to the back of popsicle.

12. Put invites into envelope and put on a pretty stamp.  (I love these stamps!)

Hooray for summer!

Here are some other cool summer treat-related posts:
Popsicles1
StripeyPops
KnitIceCream
IMG_1324

Share this:

  • Click to share on Pinterest (Opens in new window) Pinterest
  • Click to share on Facebook (Opens in new window) Facebook
  • Click to share on LinkedIn (Opens in new window) LinkedIn
  • Click to share on Tumblr (Opens in new window) Tumblr
  • Click to share on X (Opens in new window) X
Like Loading...

DIY Paper Kites

03 Wednesday Jul 2013

Posted by jeannerondeau in Projects, Uncategorized

≈ Leave a comment

Tags

diy kite, DIY paper kite, DIY projects for kids, German kite paper, How to make a paper kite, life with kids, paper kites for kids

Kites10Kite10

Kites3

Kites4

Kites5

Kites6

Kites9

Kites9B

Kites8

Kites9

Kite7

We finally got around to making kites with the pretty German Kite Paper I found in Maine a few months ago.  The girls did most of the gluing, so although our kites look pretty, but are not the most aerodynamic of flying machines.  Ada and Josie like to run around the yard with them nevertheless, and the kites make colorful wall decorations when not in use.  To make your own Paper Kite you will need:

*Kite Paper (We got ours at Circa Home in Portland Maine.  Here are some other sources: 1, 2, 3)

*Craft Glue

*Two Thin, Lightweight Sticks or Dowels (We used twigs from Nan’s back yard)

*String

*Lightweight Ribbons for the Tail (We used Seam Binding)

*Scissors

1. Cross sticks (one larger than the other to make a diamond),  and tie with string.

2. Wrap string around four corners of the diamond, gently pull taught and tie.

3. Cut, wrap and glue kite paper around diamond shaped frame.  We glued our seams shut as well.  Be sure to wrap edges and secure around the string at the edges. (Larger paper and less glue would make the kites lighter).

4. Decorate with cut out kite paper shapes.

5. Allow glue to dry.

6. Tie tail ribbons together and cut to desired length.

7. Gently push knot of tail between bottom long stick and kite paper.

8. Put a bit of glue between kite tail and stick.  Wrap string around tail knot and tie.

9. Tie string in upside-down T shape between ends of the short stick and the top of the diamond shape.

10. Go to a windy spot and let the kids run!

Share this:

  • Click to share on Pinterest (Opens in new window) Pinterest
  • Click to share on Facebook (Opens in new window) Facebook
  • Click to share on LinkedIn (Opens in new window) LinkedIn
  • Click to share on Tumblr (Opens in new window) Tumblr
  • Click to share on X (Opens in new window) X
Like Loading...

Party! DIY Mini Felt Hats

16 Wednesday Jan 2013

Posted by jeannerondeau in Projects, Uncategorized

≈ 2 Comments

Tags

animal party hats, diy, DIY party hat, kids party, mini felt party hats, mini flag banner, Oh Happy Day!, party hats for animals, toy party hats

PartyAnimials1Hat3Hat2HatWe have been planning to make the animals some felt party hats for a while.  Now that the holidays are over and the weather is gloomy the animals are ready for a party.  We loved these paper party hats from Oh Happy Day!  We wanted to make our hats a little more durable for play so our version uses felt, glue and elastic thread.  Ada made the flag banner in the background with color chips and a hole punch.  To make your own Mini Felt Party Hats you will need:

*Card Stock or Paper for Pattern

*Assorted Felt

*Mini Pom Poms

*Scissors

*Needle and Thread

*Glue

*Elastic Thread (We used 9mm)

1. Using the pattern above, cut out felt shapes to fit your animals.

2. Stitch two straight edges of felt together.

3. Stitch pom pom on top and tie thread.  (I pushed the needle up through the top of the hat and then through the pom pom).

4. Using the needle, bring elastic thread through two sides of hat and tie knots inside.  Adjust per animal as needed.

5. Squirt glue inside hat, spreading evenly along the inside.  Allow hat to dry on its side, being careful not to squish the hat out of shape.  The glue will cause the felt to stiffen as it dries, making it more durable.

6. When hats are dry, dress the animals and bake a cake!

Share this:

  • Click to share on Pinterest (Opens in new window) Pinterest
  • Click to share on Facebook (Opens in new window) Facebook
  • Click to share on LinkedIn (Opens in new window) LinkedIn
  • Click to share on Tumblr (Opens in new window) Tumblr
  • Click to share on X (Opens in new window) X
Like Loading...

Thankful Halloween

31 Wednesday Oct 2012

Posted by jeannerondeau in Uncategorized

≈ 4 Comments

Tags

costumes, family, first trick-or-treat, Halloween, home, hurricane, old house, Sandy, storm, thankful

20121031-131930.jpg

Happy Halloween!

It has been a dramatic and scary week for many of us here on the East Coast. We are thankful our family and friends are safe and that our home weathered the storm, and our hearts go out to those who were not so lucky. We spent a night upstairs Sunday sleeping away from tree the branches creaking and bending outside the windows. Chris and I were up late listening to the wind and hoping for the best during our first real storm in this old house. Ada and Josie jumped ecstatically on the feather bed we’d put down for them as we adults tried to look brave. This week also had our family waiting out a frightening but ultimately successful medical scare. We are so thankful that all is going well with our sweet cousin and niece. Both the storm and the surgery are now becoming the past and healing is starting. The last week makes me want to hug my girls and remember how lucky we are, and what a luxury it is to be able to take that for granted. Chris just left with the girls in their costumes for a Halloween party. They are off on adventure of first trick-or-treating and have quite forgotten about the scares of the past few days. I am happy to be here alone for the moment, in an empty and now quiet house, feeling thankful.

Share this:

  • Click to share on Pinterest (Opens in new window) Pinterest
  • Click to share on Facebook (Opens in new window) Facebook
  • Click to share on LinkedIn (Opens in new window) LinkedIn
  • Click to share on Tumblr (Opens in new window) Tumblr
  • Click to share on X (Opens in new window) X
Like Loading...

Inspiration

26 Friday Oct 2012

Posted by jeannerondeau in Uncategorized

≈ Leave a comment

Tags

Blaze, butterfly forest, Ebay, fall leaves, Guesellino, H Mart, Italian kids shoes, shopping, Studio Bimbi, style

Instagrams from the week:

*Colored Leaves from Our Walk Home

*Beautiful Packages at H Mart

*Josie Sleeping in Boots She Refused to Take Off (Studio Bimbi boots were an Ebay find when Ada was her size.  I cry every time I dig out the hand-me-down shoes that Josie has grown into.)

*Josie, Sleeping in Her Shoes (These Gusellino shoes were another Ebay bargain.  The Italians make the best kids shoes!)

*Rain on the Screen

*Dinosaur Pumpkins at Blaze (This was our first visit and the kids had a great time spotting all of the spooky and beautiful animals.  Ada especially loved the butterfly forest.)

**We are off to celebrate Halloween early.  What our your upcoming Halloween plans?  Have a wonderful weekend!

Share this:

  • Click to share on Pinterest (Opens in new window) Pinterest
  • Click to share on Facebook (Opens in new window) Facebook
  • Click to share on LinkedIn (Opens in new window) LinkedIn
  • Click to share on Tumblr (Opens in new window) Tumblr
  • Click to share on X (Opens in new window) X
Like Loading...

DIY Hanging Fall Leaves

18 Thursday Oct 2012

Posted by jeannerondeau in Projects, Uncategorized

≈ Leave a comment

Tags

Autumn leaves, diy, DIY decoration, fall decoration, kid leaf project, Leaf rubbings, nature, paper projects with kids, safety scissors

I remember making leaf rubbings when I was little. It seemed magical to see the veins and lacy outlines appear as the crayon was rubbed across the paper. We have been working on quite a leaf collection on our walks home from school, so we decided to preserve some of them by making rubbings. To make your own leaf rubbing cutouts you will need:

*Various Fresh Leaves (These are less likely to crumble under paper).
*Card Stock
*Crayons with Wrappers Removed
*Scissors
*Hole Punch
*Twine

1. Place leaf under card stock.
2. Rub crayon above the leaf until outline and veins are clearly visible. Be sure to hold paper still so leaf doesn’t shift.
3. Cut out leaf shapes.
4. Punch hole in leaf shape and string up.

Happy Fall!

Share this:

  • Click to share on Pinterest (Opens in new window) Pinterest
  • Click to share on Facebook (Opens in new window) Facebook
  • Click to share on LinkedIn (Opens in new window) LinkedIn
  • Click to share on Tumblr (Opens in new window) Tumblr
  • Click to share on X (Opens in new window) X
Like Loading...

Inspiration

07 Friday Sep 2012

Posted by jeannerondeau in Uncategorized

≈ 3 Comments

Tags

autumn, fall, first day of school, life with kids

20120907-145157.jpg

20120907-145216.jpg

Flower, made by Ada from bouncy balls.

Sleeping Dolls. Gram brought these dolls from Spain. Ada made them beds from hankies after carefully removing their shoes.

It is the last weekend before school starts for Ada. She goes for a longer day this year. I am looking forward to some time alone with Josie. We are planning to make more trips into the city this year. I used to take Ada to museums a lot when it was just the two of us. Josie is often under the shadow of her energetic big sister. I am excited to see how she does with a lot of solo Mama time…But I know we will both be looking forward to picking up our Ada from school at the end of the day.

How are you changing your routine for fall?

Share this:

  • Click to share on Pinterest (Opens in new window) Pinterest
  • Click to share on Facebook (Opens in new window) Facebook
  • Click to share on LinkedIn (Opens in new window) LinkedIn
  • Click to share on Tumblr (Opens in new window) Tumblr
  • Click to share on X (Opens in new window) X
Like Loading...

Inspiration

10 Friday Aug 2012

Posted by jeannerondeau in Uncategorized

≈ 1 Comment

Tags

home, home garden, Inspiration, Instagram, Liberty of London, pink butterfly net, Victory Garden, vintage shell box, wartime garden

Instagrams from the week:

*Ada’s Great-Grandma’s shell box

*Insanely bad but good paint-by-number in a thrift shop

*Airport coloring

*Bunny in Liberty

*Cover of ‘Victory Edition 1919 War Gardening and Home Storage of Vegetables‘

*Pink butterfly net, sawed short to fit in suitcase and then repaired with seam binding

Have a wonderful weekend!

Share this:

  • Click to share on Pinterest (Opens in new window) Pinterest
  • Click to share on Facebook (Opens in new window) Facebook
  • Click to share on LinkedIn (Opens in new window) LinkedIn
  • Click to share on Tumblr (Opens in new window) Tumblr
  • Click to share on X (Opens in new window) X
Like Loading...

Homemade Pickles

09 Thursday Aug 2012

Posted by jeannerondeau in Uncategorized

≈ 4 Comments

Tags

Animal Vegetable Mineral, Barbara Kingsolver, canning, cooking, food, home canning, pickles, tamale steamer, Weck jars, Williams-Sonoma


We have been wanting to can our own preserves and pickles since we moved into our house a year ago. So when our CSA offered up 25 pounds of pickling cukes for $24 we decided this was the time. We were quickly reminded that canning is dependent on the readiness of the ingredients, and not on our schedule when the cucumbers arrived the same week as my new niece. I left Chris alone with a pile of spices and a crock and a vague idea of how to ferment pickles…But he did a fabulous job of mixing and skimming and the pickles are great! (I must admit I ate them alone the first few days to be sure we hadn’t made any dreadful pickling mistakes). We were overly cautious with our sterilization and our kitchen was an August sauna, but despite a little cloudiness in our brine our first try at picking was a success!

We used this recipe from Bakespace, and added extra hot peppers, garlic and more dill than called for. Our jars are Weck #908 Asparagus Liter Jars and fit about 8 pickles per jar. I had never used the Weck system before, but it was quite simple and none of the seals failed. We needed about 18 jars for about 5 gallons of cucumbers. Chris’ parents lent us a huge 10 gallon crock which was heavy, but perfect for the job. I had a hard time finding an affordable and deep enough pot for sterilizing the tall jars, but finally located an aluminum tamale steamer at our neighborhood grocery store. I took out the steamer section and it worked wonderfully and cost only $12. (You should not cook canning ingredients in an aluminum container, but it worked fine for sterilizing the jars).

Ada helped color and stick the labels on the jars this morning. We were all pretty amazed at the alchemy of turning cucumbers into pickles. Barbara Kingsolver’s book Animal, Vegetable, Miracle is a wonderful place to start for self-sufficient inspiration. And now I am dreaming up shelves in the basement to house the winter stores.

Share this:

  • Click to share on Pinterest (Opens in new window) Pinterest
  • Click to share on Facebook (Opens in new window) Facebook
  • Click to share on LinkedIn (Opens in new window) LinkedIn
  • Click to share on Tumblr (Opens in new window) Tumblr
  • Click to share on X (Opens in new window) X
Like Loading...

DIY Clothespin Dolls

08 Wednesday Aug 2012

Posted by jeannerondeau in Uncategorized

≈ 2 Comments

Tags

clothespin dolls, crayon, diy, diy doll, felt, home, pipecleaners, scissors, toys for kids, wooden clothespin

Ada came up with this project.  I was going to make arms for the clothespins with the pipe cleaners and she decided they would make better clothes.  She cut out the felt blankets with her scissors and the girls used crayons to decorate the shells for beds.  To make your own you will need:

*Wooden Clothespins

*Pipe cleaners

*Felt

*Crayons

*Large Seashells

*Scissors (We used Safety Scissors)

*Permanent Marker

1. Draw eyes on the clothespin with the permanent marker.

2. Hand the clothespin over to the kids to dress.  (Help them bend the end of the pipe cleaner wire into the opening on clothespin).

3. Let kids decorate shells with crayons, and cut out blankets with safety scissors.  (Ada made sinks out of the spiral shells and beds out of the clams).

4. Store the clothespin dolls in a shoebox house or zipper pouch.

5. Enjoy some peace while the kids play with their new family.

Share this:

  • Click to share on Pinterest (Opens in new window) Pinterest
  • Click to share on Facebook (Opens in new window) Facebook
  • Click to share on LinkedIn (Opens in new window) LinkedIn
  • Click to share on Tumblr (Opens in new window) Tumblr
  • Click to share on X (Opens in new window) X
Like Loading...
← Older posts
Newer posts →

Visit Our Etsy Store

Etsy Store Instagram

No Instagram images were found.

Categories

  • Brooklyn
  • Inspiration
  • Likes
  • Organizing
  • Our Etsy Store
  • Party!
  • Projects
  • Shop
  • Uncategorized
  • Vintage

Recent Posts

  • Visit Us at the Brooklyn Flea!
  • Inspiration
  • Inspiration
  • Winter Whites
  • Ocean Grove, NJ

Archives

Enter your email address to follow this blog and receive notifications of new posts by email.

Join 179 other subscribers

Blogs I Read

  • A Beautiful Mess
  • Anthology Magazine
  • Apartment Therapy Family (Ohdeedoh)
  • Bleubird Vintage
  • Katie's Pencil Box
  • Le Dans La
  • Making it Lovely
  • Oh Happy Day!
  • Oh My Little Dears
  • Purl Bee
  • Soulemama
  • Sweet Paul Magazine
  • The Sweetest Occasion
  • You Are My Fave

Copyright

All content is © 2010-2018 Jeanne Rondeau. Please do not copy or take images or content from this site without my permission. Requests may be sent to: jeanne@jeannerondeau.com Thank you!

Meta

  • Create account
  • Log in
  • Entries feed
  • Comments feed
  • WordPress.com

Create a free website or blog at WordPress.com.

Privacy & Cookies: This site uses cookies. By continuing to use this website, you agree to their use.
To find out more, including how to control cookies, see here: Cookie Policy
  • Subscribe Subscribed
    • Domesticspace
    • Join 179 other subscribers
    • Already have a WordPress.com account? Log in now.
    • Domesticspace
    • Subscribe Subscribed
    • Sign up
    • Log in
    • Report this content
    • View site in Reader
    • Manage subscriptions
    • Collapse this bar
 

Loading Comments...
 

    %d