• Our Etsy Store
  • Vintage
  • Projects
  • Organizing
  • Likes
  • About
  • jeannerondeau.com

Domesticspace

~ Inside. kids, art, home, vintage.

Domesticspace

Category Archives: Projects

DIY Inspiration Books

05 Tuesday Mar 2013

Posted by jeannerondeau in Inspiration, Projects

≈ 6 Comments

Tags

collage book, collecting, home, inspiration book, magazine inspiration, magazine tears, organizing images, organizing magazine tears, Pinterest, style

Tears1 Tears2 Tears3 Tears8 Tears5 Tears6 Tears7 Tears4
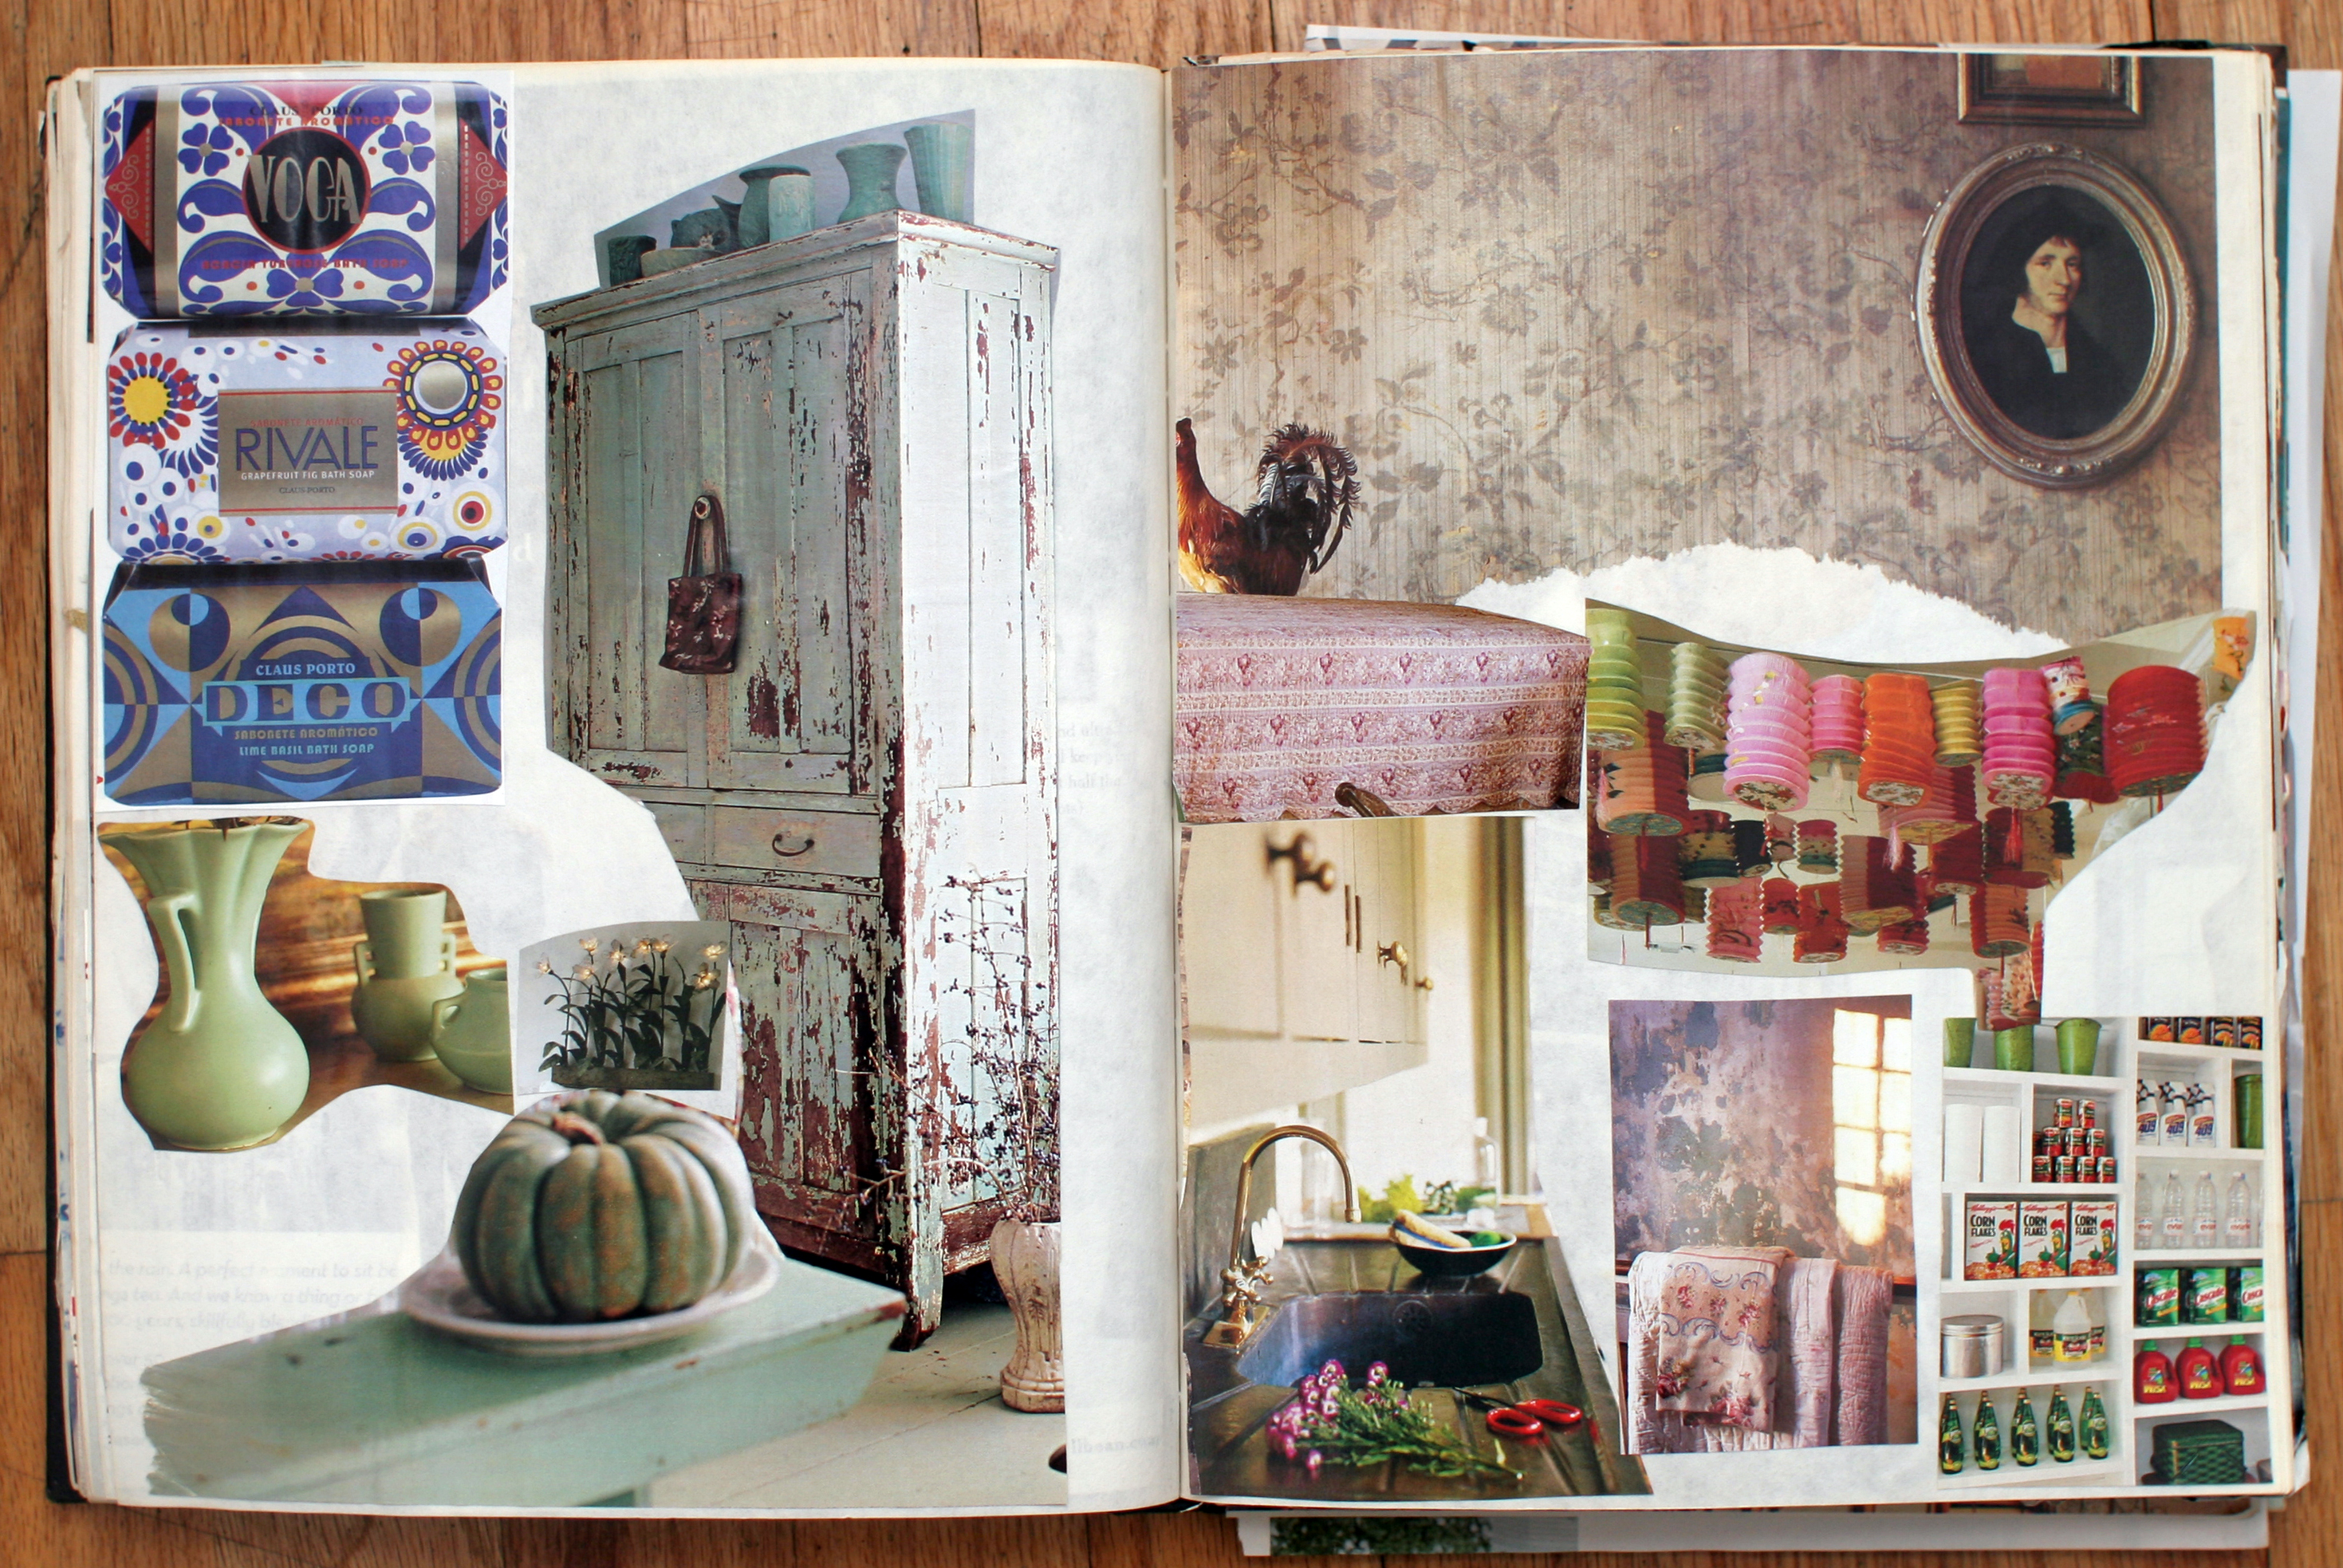
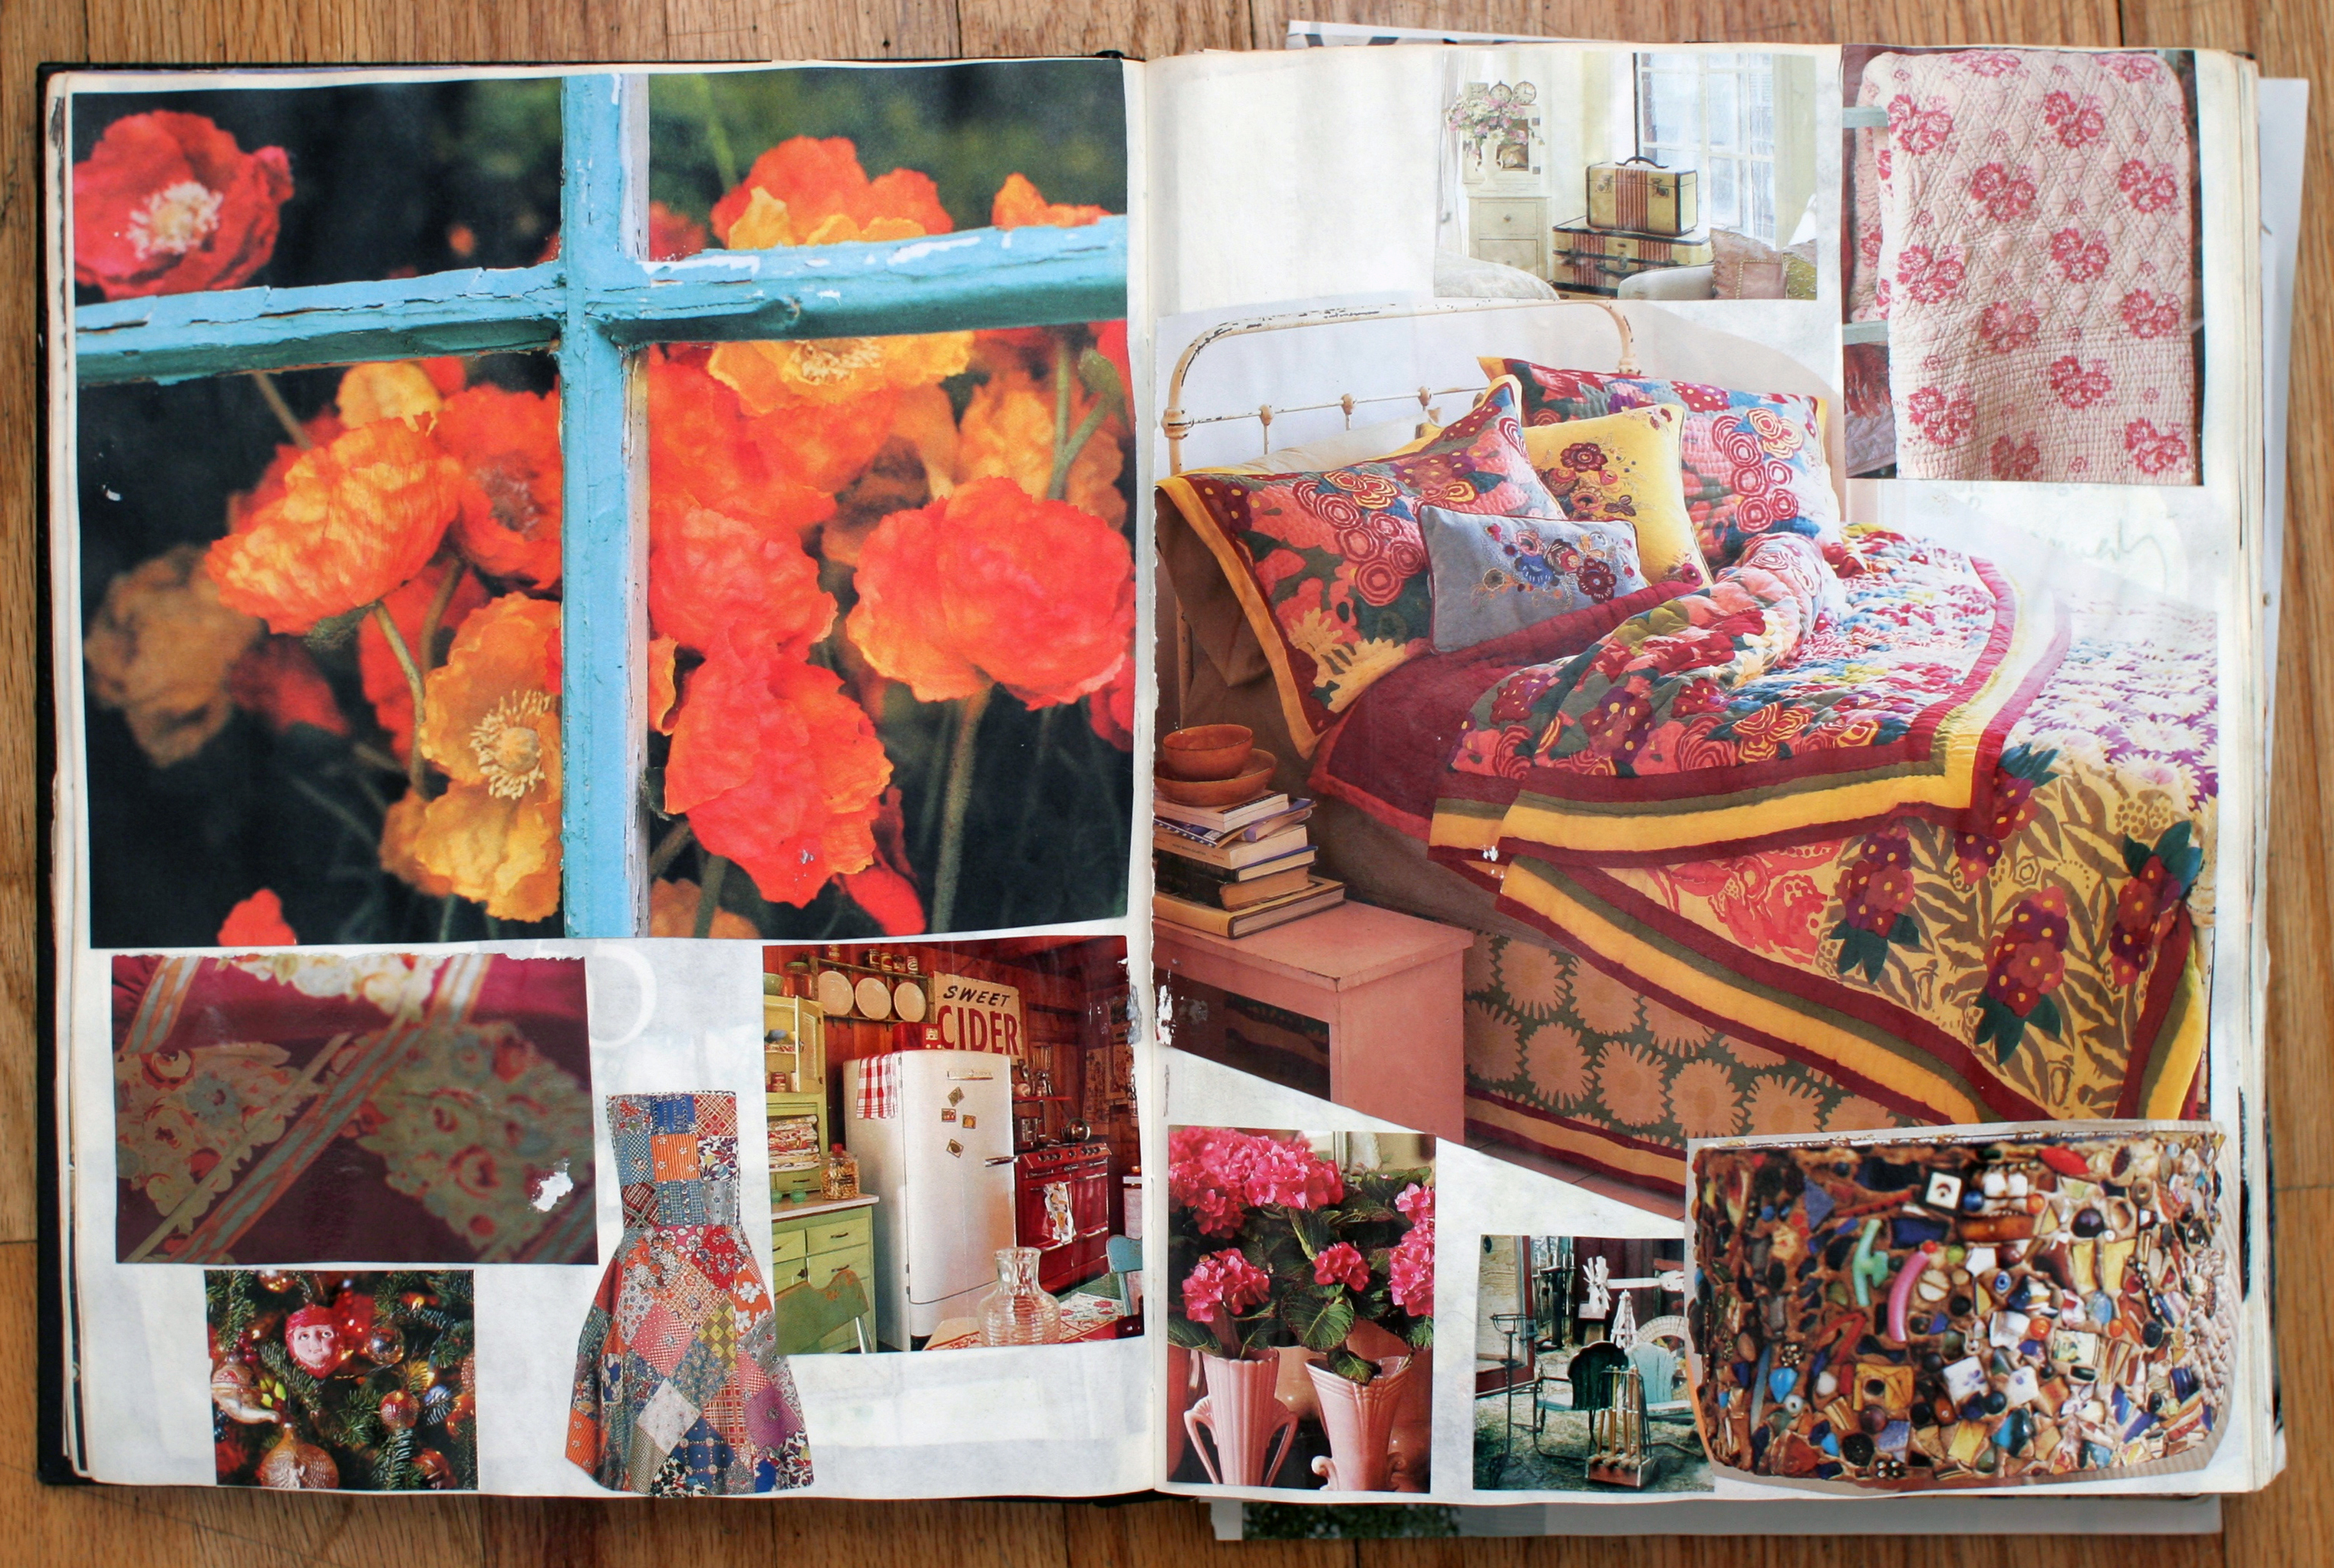
I love Pinterest.  It is a guilty pleasure of mine that I admittedly don’t have enough time for.  (Here are my sparse Pinterest boards).  As much as I love the online version, I cannot let go of good old-fashioned magazine tears.  I love the tactile quality of ripping out pages and I love cutting out and collaging the images together.  I collect photos from the pages of Martha Stewart Living, Country Living, Anthropologie catalogs, Domino, Blue Print, Martha Stewart Weddings, etc. etc and paste them into large blank sketch journals.   I think my idea for these books came from the amazingly obsessive collections made by my great-grandmother.  (I will post on Gram’s books soon).  I have used the images from my books as inspiration boards when I worked in fashion, as reminders of how I want our home to look when going out to a flea market,  and as idea pages for styling work.  But most of the time I just enjoy flipping through the pictures and getting inspired.

*Sorry for my lack of image credits above.  Unlike with Pinterest, I don’t keep my sources credited in my books.  I will be happy to credit any images if you drop me an email!*

Happy collecting!

Share this:

  • Share on Pinterest (Opens in new window) Pinterest
  • Share on Facebook (Opens in new window) Facebook
  • Share on LinkedIn (Opens in new window) LinkedIn
  • Share on Tumblr (Opens in new window) Tumblr
  • Share on X (Opens in new window) X
Like Loading...

DIY Child’s Smock Dress

04 Monday Mar 2013

Posted by jeannerondeau in Projects, Vintage

≈ 1 Comment

Tags

child's smock dress pattern, diy smock dress, dog print dress, Ebay vintage pattern, Etsy vintage dress pattern, girls smock dress, McCall's pattern 3470, sewing DIY, sewing for kids, vintage dress pattern

DoggyDress
This smock dress is a variation on a vintage McCall’s pattern, #3470 from 1972.  I have had this dog print fabric for years and finally made it into a dress for Josie’s birthday last week.  (The dress was immediately trumped by Daddy’s gift of green pjs from Baby Gap).  Josie is at the age when a dog spotted on the sidewalk is extremely exciting, so I am hoping she will like the dress more as she grows into it.  The pattern is fairly easy and includes variations with pants and a jumper top with short ruffle sleeves.  (See our version of the ruffle sleeve dress here).  I love the short smock dress because it can be worn as a dress and then a top as the girls grow.  You can find your own pattern #3470 here, or search Etsy for other vintage patterns.

Share this:

  • Share on Pinterest (Opens in new window) Pinterest
  • Share on Facebook (Opens in new window) Facebook
  • Share on LinkedIn (Opens in new window) LinkedIn
  • Share on Tumblr (Opens in new window) Tumblr
  • Share on X (Opens in new window) X
Like Loading...

Cherry Vanilla Ice Cream Recipe

27 Wednesday Feb 2013

Posted by jeannerondeau in Party!, Projects

≈ 3 Comments

Tags

birthday ice cream recipe, cherry almond ice cream recipe, cherry ice cream, cherry juice concentrate recipe, cherry vanilla ice cream recipe, DIY ice cream recipe, frozen cherry ice cream, Ina Garten ice cream recipe, kids birthday party, vanilla ice cream

CherryIceCreamJosie turns two tomorrow (!) and we came up with this Cherry Vanilla Ice Cream Recipe for her party.  I was dreaming of cherry ice cream this year, even though we are months from seasonal cherries.  We ended up using frozen cherries and changing up Ina Garten’s Vanilla Ice Cream recipe.  We added almond extract and concentrated black cherry juice to make the flavor more intense and the results were pretty yummy,  if I do say so myself.  Josie just saw the ice cream photo on my screen and begged for more ice cream for breakfast.  Success.  To make your own Cherry Vanilla Ice Cream you will need:

*Ice Cream Maker

*3 Cups of Good Quality Heavy Cream (The quality makes all the difference!)

*2/3 Cups + 1 Tablespoon Sugar

*1 Teaspoon Vanilla Extract

*3/4 Teaspoon Almond Extract

*One Vanilla Bean

*Two 12 Oz Packs of Unsweetened Frozen Cherries

*4-5 Tablespoons Black Cherry Juice Concentrate (We used this from Dynamic Health.  You could also cook down unsweetened cherry juice)

1. Heat cream, sugar, vanilla, scraped seeds from vanilla bean and empty seed pod in saucepan until sugar dissolves.  Place mixture in refrigerator to cool.

2. Pour the frozen cherries into a deep sauté pan and cook down over medium heat for about 30 minutes, stirring often.  The cherries will release a lot of liquid at first and then begin to look more gel-like.  When liquid seems to be thickening, add cherry concentrate, almond extract and tablespoon of sugar.  Cook a few more minutes until mixture resembles loose jam.

3. Place mixture in refrigerator to cool.

4. After an hour add cream and cherry mixture together, put into ice cream maker and follow manufacturer’s directions.

5. Allow ice cream to chill in freezer when complete and soften slightly before serving.

Enjoy!

IceCream2

Share this:

  • Share on Pinterest (Opens in new window) Pinterest
  • Share on Facebook (Opens in new window) Facebook
  • Share on LinkedIn (Opens in new window) LinkedIn
  • Share on Tumblr (Opens in new window) Tumblr
  • Share on X (Opens in new window) X
Like Loading...

Still Life

25 Monday Feb 2013

Posted by jeannerondeau in Projects

≈ 1 Comment

Tags

art for kids, crayon and watercolor drawing, drawing, drawing for children, drawing from observation, paperwhite bulb, saving children's artwork, still life drawing, vintage flower pot, watercolor

APaperwhite
Ada came home from school the other day with this card and I fell in love with the drawing.  The kids made them by drawing a paperwhite plant which was growing in the classroom.  The initial drawing was made with crayon and then painted with a wash of watercolor to make the colors pop.  Do you remember making those?  It always seemed like some kind of magic to watch my crayon marks emerge from under wet paint, brighter than when I had first laid them down.  This drawing is one of those art projects that I will carefully save away in Ada’s art folder. (Unlike much of the paper that she comes home, which I save for a little while and then recycle when she has forgotten them).  I think this is the first drawing she has made from careful observation.  I love that she drew all the parts of the plant- leaves, bulb, tiny roots and open flowers.  It is exciting to watch her art projects change as she grows older.  Proud Mama.

Share this:

  • Share on Pinterest (Opens in new window) Pinterest
  • Share on Facebook (Opens in new window) Facebook
  • Share on LinkedIn (Opens in new window) LinkedIn
  • Share on Tumblr (Opens in new window) Tumblr
  • Share on X (Opens in new window) X
Like Loading...

DIY Felt Magnet Alphabet Gift

20 Wednesday Feb 2013

Posted by jeannerondeau in Projects

≈ Leave a comment

Tags

alphabet for kids, alphabet gift for kids, alphabet letters, diy, DIY gifts for kids, DIY magnet alphabet, felt letter DIY, felt letter magnet gift, felt letters, Felt Magnet Alphabet

Alphabet1Alphabet2Alphabet3Alphabet4

I posted directions to make these Felt Alphabet Magnets a few months ago.  Ada has used her set on our fridge since she was first learning her letters.  I wanted to make an alphabet set as a gift for my niece, but wasn’t sure how they would look when they arrived through the mail.  (The magnets are really strong and they tend to stick together when they get the chance).  I decided to stitch the letters down to some card stock and then layer the sheets with tissue paper inside a box.  To make your own Felt Alphabet Magnet Gift you will need to:

1. Follow directions here to make alphabet letters

2. Cut card stock to fit snuggly inside box

3. Using thin thread and a needle, stitch up through the back of card stock. Catch the bottom of a felt letter and stitch it down, being careful not to poke through the top of the letter.  We used 2-3 stitches per letter to hold in place.

4. Place down your next letter and repeat.

5. When all letters are secure tie off thread.

6. Place tissue paper in box and layer card stock with letters in alphabetical order from the top down.

7. Fold tissue over the top of the letters and wrap up the box.

Here are some other felt projects you may enjoy:

Heart1

Raindrops5

Fish6

Share this:

  • Share on Pinterest (Opens in new window) Pinterest
  • Share on Facebook (Opens in new window) Facebook
  • Share on LinkedIn (Opens in new window) LinkedIn
  • Share on Tumblr (Opens in new window) Tumblr
  • Share on X (Opens in new window) X
Like Loading...

Our Etsy Shop is Open!

12 Tuesday Feb 2013

Posted by jeannerondeau in Our Etsy Store, Party!, Projects, Shop, Vintage

≈ Leave a comment

Tags

children's crowns, feather crowns, headband crown for kids, Headband Feather Crowns, Jeanne Rondeau Etsy, party crowns, shopping, style, wedding feather crown, wedding headpiece

EtsyBanner2Our Etsy shop is open!  We have been working hard to get the final details finished and I am happy to say we are open for business.  You can find our Headband Feather Crowns at http://www.etsy.com/shop/jeannerondeau.  The crowns are made in adult and kids’ sizes and my girls like to wear them for dress-up.  All of the pieces are made by hand using vintage fabrics, beads and sequins and each crown is one-of-a-kind.  We also do custom work.  We will continue to add more items to the shop, so please visit us often!
 
IMG_2501IMG_2498

Share this:

  • Share on Pinterest (Opens in new window) Pinterest
  • Share on Facebook (Opens in new window) Facebook
  • Share on LinkedIn (Opens in new window) LinkedIn
  • Share on Tumblr (Opens in new window) Tumblr
  • Share on X (Opens in new window) X
Like Loading...

Crayons For Little Hands

11 Monday Feb 2013

Posted by jeannerondeau in Organizing, Projects, Shop

≈ Leave a comment

Tags

Animal Crayons, art with kids, Bead Necklace DIY, Crayon Necklace, Crayon Rings, crayons for little kids, crayons for toddlers, kid art supplies, Plastic Crayons, Tape Fort DIY


CrayonsThere is nothing quite as perfect as a pristine box of Crayolas, but little hands tend to snap the thin crayons quickly.  Josie will sit for an hour peeling the paper wrappers off of Ada’s crayons, (thus instigating a big fight).  This is our little kid crayon box – the shapes and sizes work better for smaller hands and they are all less breakable than the classics.

*Crayon Rings  ($5.99 for 6)

*Short Crayons (Similar to ours – $5.99 for 12)

*Stubby Crayons (Similar to ours – $7.99 for 18)

*Animal Crayons ($11.49 for 12)

*Crayon Necklace ($10.50)

*You may also like these kid art supply posts:


Ada'sSketchBookClayBeads3TapeHouse1

Share this:

  • Share on Pinterest (Opens in new window) Pinterest
  • Share on Facebook (Opens in new window) Facebook
  • Share on LinkedIn (Opens in new window) LinkedIn
  • Share on Tumblr (Opens in new window) Tumblr
  • Share on X (Opens in new window) X
Like Loading...

DIY Framed Crayon Heart Valentine

07 Thursday Feb 2013

Posted by jeannerondeau in Projects

≈ 1 Comment

Tags

crayon valentine card, diy, DIY valentine, diy Valentine card, Framed Crayon Heart Valentine, handmade valentine, heart frame, heart valentine, Valentine's Day craft, Valentines made by kids

CrayonHeart1CrayonHeart2CrayonHeart3CrayonHeart4CrayonHeart6CrayonHeart5This Framed Crayon Heart Valentine starts out with some good old-fashioned scribbling.  The kids, (or adults) can be as messy as they want with the coloring and the frame will contain and define the heart shape.  To make your own Framed Crayon Heart Valentine you will need:

*Crayons in Reds and Pinks

*Card Stock

*Exact-o Knife or Sharp Scissors

*Double-Stick Tape

*Thin Black Marker

1. Cut two pieces of card stock- one to form the card and the other slightly smaller than one side of the folded card.

2. Color one side of the smaller card stock making sure you go all the way to the edges.

3. Fold card in half and draw a heart on the inside front fold.

4. Using an Exact-o or scissors, cut out the heart shape.

5. On the outside of the card draw designs around the heart frame as shown.

6. Place double-stick tape along the inside of the card, around the heart shape.

7. Tape the colored card stock inside card, with coloring facing out through the heart frame.

8. Write your message inside card, place in the envelope and pop in the mail.

*One more week till V-day! XO

Share this:

  • Share on Pinterest (Opens in new window) Pinterest
  • Share on Facebook (Opens in new window) Facebook
  • Share on LinkedIn (Opens in new window) LinkedIn
  • Share on Tumblr (Opens in new window) Tumblr
  • Share on X (Opens in new window) X
Like Loading...

DIY Conversation Heart Flower Valentine

06 Wednesday Feb 2013

Posted by jeannerondeau in Projects

≈ 2 Comments

Tags

candy valentine, Conversation Heart Valentine, Conversation Hearts, diy, DIY card, DIY valentine, handmade valentine, homemade valentine, Necco

ConvoFlower1ConvoFlower2 ConvoFlower3Conversation Hearts are some of my favorite Valentine’s Day candies.  Choosing the perfect message for someone took up a lot of our time back in grade school around this time of year.  This simple card is made using Conversation Hearts and tiny flowers.  To make your own Conversation Heart Flower Valentine you will need:

*Card Stock

*Envelope

*Conversation Hearts

*Small Flowers

*Pen

*Green Paper

*Craft Glue

*Double-Stick Tape

1. Cut out two rectangles from the card stock, one slightly larger than the other.  These will make the frame for the flowers.

2. Double-stick tape the frames, one inside and on top of the other.  Center frame on card and stick down.

3. Put thin strips of double-stick tape on green paper and cut out leaf shapes.  Pull tape backing from leaves and stick onto frame.

4. Draw stems.

5. Using craft glue, stick on heart and flowers.

6. Allow to dry completely before placing in envelope.

*The bulk of the Conversation Hearts make this card difficult to mail.  It is best delivered by hand.

Share this:

  • Share on Pinterest (Opens in new window) Pinterest
  • Share on Facebook (Opens in new window) Facebook
  • Share on LinkedIn (Opens in new window) LinkedIn
  • Share on Tumblr (Opens in new window) Tumblr
  • Share on X (Opens in new window) X
Like Loading...

DIY String of Hearts Valentine

05 Tuesday Feb 2013

Posted by jeannerondeau in Projects

≈ 1 Comment

Tags

DIY Glitter Heart String, DIY valentine, glitter heart garland, glitter valentine, paper valentine, Valentine, Valentine DIY, washi tape valentine

HeartString1BHeartString2HeartString3HeartString4HeartString5HeartString6HeartString8This glittery valentine is easy to make and folds flat for mailing.  To make your own String of Hearts Valentine you will need:

*Card Stock

*Scissors

*Hole Punch

*Craft Glue

*Soft Paintbrush

*Wax Paper

*Glitter in Red, White and Pinks

*Twine

*Envelope

*Washi Tape (Optional)

*Permanent Pen (Optional for note writing)

1. Make heart pattern by folding card stock in half, drawing half a heart with center along crease and cutting out with scissors. Make three sizes of hearts, trace onto card stock and cut out.

2. Punch holes in all hearts.

3. Lay hearts out on layer of wax paper.

4. Squirt a layer of glue onto one side of each heart and spread evenly with paintbrush.  Be sure to go all the way to the edges.

5. Generously sprinkle a layer of glitter on to each heart and allow glue to dry, (about an hour).  Hearts may bow with glue moisture, but they will flatten after you glitter both sides.

6. Shake off excess glitter and repeat steps 3-5 for the other side of hearts.  (Extra glitter can be put back into containers at the end by folding wax paper in half and carefully shaking glitter back into jars).

7. Tie dried hearts on to twine. 

8. If you are writing a message, fold washi tape in half along twine and stick back on to itself.  Cut ends in flag shapes as shown and write your note along the tape pieces.  (We wrote ‘Sending Lots of Love!’).

9. Carefully fold up hearts along string to fit inside card, place in envelope and send off to your valentine.

XOXO


Share this:

  • Share on Pinterest (Opens in new window) Pinterest
  • Share on Facebook (Opens in new window) Facebook
  • Share on LinkedIn (Opens in new window) LinkedIn
  • Share on Tumblr (Opens in new window) Tumblr
  • Share on X (Opens in new window) X
Like Loading...
← Older posts
Newer posts →

Visit Our Etsy Store

Etsy Store Instagram

No Instagram images were found.

Categories

  • Brooklyn
  • Inspiration
  • Likes
  • Organizing
  • Our Etsy Store
  • Party!
  • Projects
  • Shop
  • Uncategorized
  • Vintage

Recent Posts

  • Visit Us at the Brooklyn Flea!
  • Inspiration
  • Inspiration
  • Winter Whites
  • Ocean Grove, NJ

Archives

Enter your email address to follow this blog and receive notifications of new posts by email.

Join 179 other subscribers

Blogs I Read

  • A Beautiful Mess
  • Anthology Magazine
  • Apartment Therapy Family (Ohdeedoh)
  • Bleubird Vintage
  • Katie's Pencil Box
  • Le Dans La
  • Making it Lovely
  • Oh Happy Day!
  • Oh My Little Dears
  • Purl Bee
  • Soulemama
  • Sweet Paul Magazine
  • The Sweetest Occasion
  • You Are My Fave

Copyright

All content is © 2010-2018 Jeanne Rondeau. Please do not copy or take images or content from this site without my permission. Requests may be sent to: jeanne@jeannerondeau.com Thank you!

Meta

  • Create account
  • Log in
  • Entries feed
  • Comments feed
  • WordPress.com

Create a free website or blog at WordPress.com.

Privacy & Cookies: This site uses cookies. By continuing to use this website, you agree to their use.
To find out more, including how to control cookies, see here: Cookie Policy
  • Subscribe Subscribed
    • Domesticspace
    • Join 179 other subscribers
    • Already have a WordPress.com account? Log in now.
    • Domesticspace
    • Subscribe Subscribed
    • Sign up
    • Log in
    • Report this content
    • View site in Reader
    • Manage subscriptions
    • Collapse this bar
 

Loading Comments...
 

    %d